


Follow along as Lauren Bergold uses various colors of Ranger Embossing Powder with Simon Hurley create. stencils and stamps to craft a delightful set of polar bear-themed cards for the winter season.
Trading Hearts Layered Embossing Cards by Lauren Bergold
- Materials
- Instructions
Simon Hurley create. Layering Stencil Dazzling Diamond
Simon Hurley create. Winter Scene Maker Stencil Set
Simon Hurley create. Photopolymer Stamp Winter Woodland
Embossing Powders: Green, Blue, Turquoise, Snowflake Tinsel, Black
Emboss It™ Ink Pad Re-Inker Grey
Ranger Emboss It™ Ink Pad Clear
Archival Ink™ Pads: Jet Black, Seafarer, Emerald
Letter It™ White Cardstock
Ranger Mini Ink Blending Tool
Ranger Mini Ink Blending Tool Domed Replacement Foams
Wendy Vecchi Make Art Stay-tion
Ranger Heat It™ Craft Tool
Wendy Vecchi MAKE ART Perfect Card Adhesive
Letter It™ White Foam Roll Tape
Other:
4 x 5.25" panel of dark blue cardstock
3" heart die or heart template
craft knife
Instructions
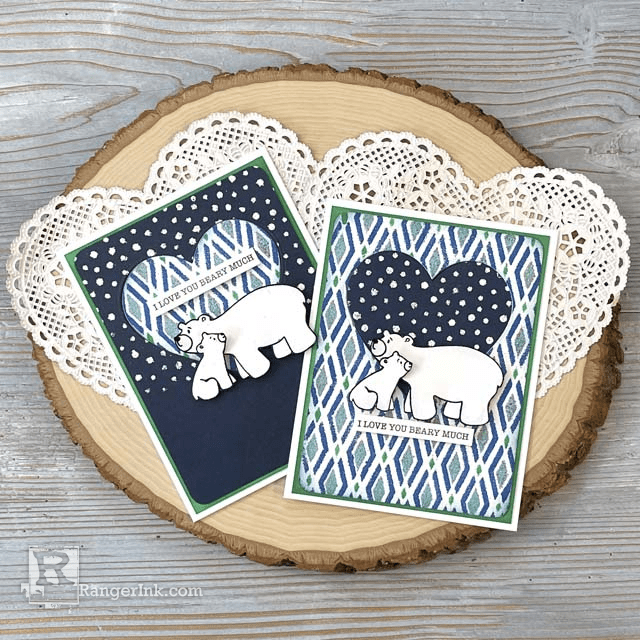
This project started as ONE card that used two sets of Simon's fabulous layering stencils; when I realized that by making both embossed panels full-sized, I had a fast and easy two-fer!

Step 1: Center the most intricate layer of Simon Hurley’s create. Dazzling Diamond Layered Stencils on a 4.25 x 5.5" panel of Letter It White Cardstock and use the magnets from Wendy Vecchi's MAKE ART STAY-tion to hold the panel and stencil firmly in place. Dispense some gray-tinted Ranger Emboss It Ink onto a plastic plate or your craft sheet and use a Ranger Mini Ink Blending Tool and Domed Foam Applicator to sparingly apply the embossing ink through the stencil. Sprinkle with Ranger Blue Embossing Powder, tap off the excess, use a small brush to remove any straight powder if necessary, and use the Ranger's Heat It Craft Tool to melt the powder. Allow the melted powder to cool completely before proceeding to the next step.

Step 2: Carefully place the second most intricate of the Dazzling Diamond Layered Stencils on top of the previously embossed piece from Step 1, centering the small diamonds on the larger diamond outlines. Repeat the technique as above, using Turquoise Embossing Powder rather than Blue.

Step 3: Place the final stencil from the Dazzling Diamond set on top of the embossed panel and add the third layer of embossing, this time with Ranger Green. Set panel side.

Step 4: Align the snowfall stencil from the Simon Hurley create. Winter Scene Maker Stencil Set across the top of a 4 x 5.25“ panel of dark blue cardstock. Apply gray-tinted Ranger Emboss It Ink through the stencil with a Mini Ink Blending Tool, sprinkle with Snowflake Tinsel Embossing Powder, tap off the excess and melt with the Heat It Craft Tool. Set panel aside.

Step 5: Stamp the two polar bears from the Simon Hurley create. Winter Woodland Photopolymer Stamp set twice each in clear Emboss It Ink and emboss with Ranger Black Powder. Cut the four bears out carefully with scissors. Stamp "I love you beary much" twice in Jet Black Archival, trim into neat strips and set aside.

Step 6: Trim two panels of Letter It White Cardstock to 4 x 5.25" and apply Emerald Green Archival Ink generously around all of the edges with a Mini Ink Blending Tool.

Step 7: Trim both embossed panels down to 3.75 x 5“ and round the corners, if desired. Use a 3-inch heart die (or a heart stencil and X-Acto knife) to cut a heart shaped aperture from each panel, approximately .75" from the top. Swap the two heart-shaped diecuts and adhere the blue snowy diecut inside the aperture of the dazzling diamonds panel, and vice versa, securing the hearts at the back with washi tape.

Step 8: Assembly: Using Perfect Card Adhesive, attach each of the diecut panels to an Emerald Green panel. Add a pair of polar bears to each card, at the bottom of the heart shapes, as pictured, using small pieces of Letter It White Foam Roll Tape. Affix the sentiment strips in the same manner. Add the finished design panels to two white A2 cards. Sign, address and send them to people you love BEARY much!
 My name is Lauren Bergold, and I live in central New Jersey with my husband of 30+ years and A LOT of art supplies! My favorite medium is paper, and I especially love making cards. I teach papercrafting classes, as well as collecting and compiling vintage and found papers. You can find me on my blog, All the Good Blog Names Were Taken, and on Instagram as @llaurenb where I love to connect with other artists and makers!
 Related Posts

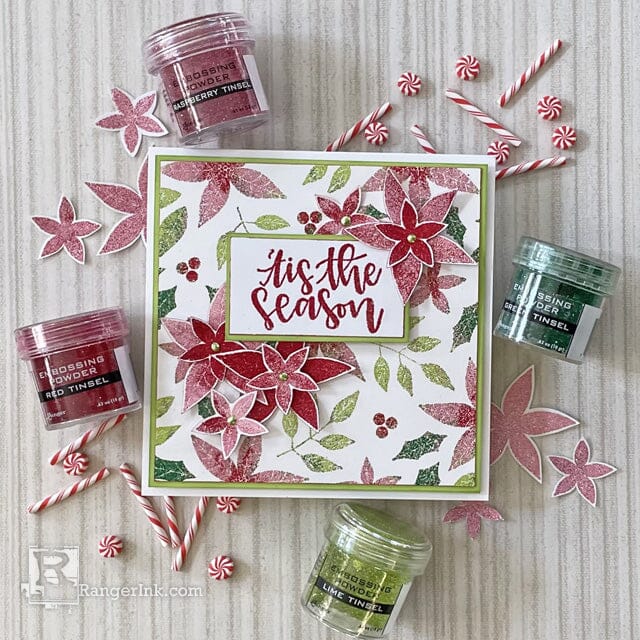
Tinsel Embossing Powder Holiday Card by Lauren Bergold
Ready to make your holiday cards shine with extra charm? It's time for some tinsel magic! Follow along...
Read More