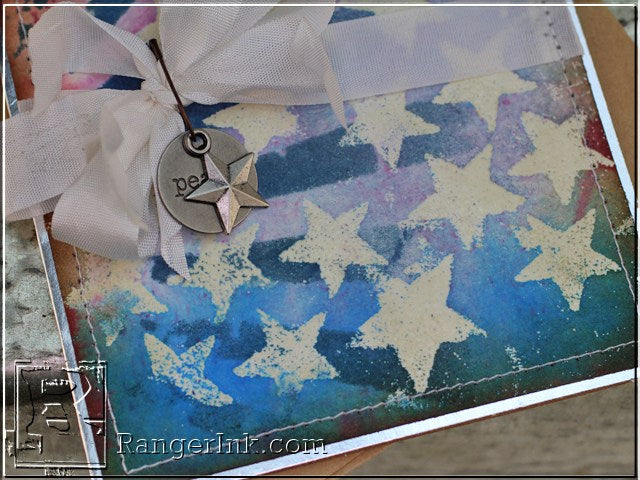
by Tammy Tutterow

Watercolor Blended Background by Tammy Tutterow
- Materials
- Instructions
- Dylusions Ink Sprays: Postbox Red, White Linen, London Blue
- Tim Holtz Distress Ink Pads: Faded Jeans, Embossing Ink
- Ranger Embossing Powders
- Ranger Mini Blending Tool
- Tim Holtz Distress® Sprayer
- Ranger Heat it™ Craft Tool
- Ranger Non-Stick Craft Sheet™
- Tim Holtz Idea-ology- Crinkle Ribbon, Adornments charms
- Tim Holtz Core
- Tim Holtz Layering Stencil- Rays, Stars
Instructions
 Creating a watercolor blended background with ink sprays and mists are so quick, easy, and fun to create. They add great color and pattern to a background that is unique every single time!
 Cut a piece of Mixed Media Cardstock to 4″ x 5 1/4″. Place a Tim Holtz Stars Layering Stencil on top of the cardstock. Dab Distress Embossing Ink onto the cardstock through the stencil using an ink blending tool.
 Sprinkle clear embossing powder over the card onto the cardstock.
 Melt the embossing powder with a Heat it Craft Tool.
 Mist the cardstock with water.
 Mist a stripe of Dylusions White Linen Ink Spray through the middle of the card from left to right.
 Mist a stripe of Dylusions Postbox Red Dylusions Ink Spray across the top of the card above the white. Mist a stripe of Dylusions London Blue Ink Spray across the bottom of the card below the white.
 Cut a piece of Cut n Dry foam about 1″ x 3″ to use as a squeegee. Swipe the black side of the foam through the ink to squeegee the excess ink off of the cardstock. Start in the middle of the white and swipe down through the red. Wipe the edge of the foam off on a dry cloth.
Turn the card around so that the blue is at the bottom. Start again in the middle and swipe down through the white and them blue. When blending wet inks, always swipe the color from light to dark so that you don’t turn your light color to mud.
 When blending wet inks, always swipe the color from light to dark so that you don’t turn your light color to mud.
 Dry the cardstock with a heat tool.
 Place the Rays Layering Stencil over the cardstock. Dab Faded Jeans Distress Ink onto the card front using an ink blending tool with foam.
 Buff over the cardstock using a dry cloth to remove any ink on the embossing powder.
 The embossing powder resist allows you to put the rays behind the stars.
 By using the foam to pounce on the embossing ink, the stars will not be solid. The foam will help create texture in the embossing powder that lets the color in behind the stars.
 Complete the card by embellishing it with ribbons and charms. Adhere to a black card front (Tim Holtz Kraft Core Metallic Collection).
Drawer Title
- Choosing a selection results in a full page refresh.


