


Follow along as Lauren Bergold uses Wendy's "Thank You" and "Autumn Greetings" sets to create these fabulous napkin rings, place cards & votive candle rings.
Wendy Vecchi Autumn Place Setting by Lauren Bergold
- Materials
- Instructions
Other:
Pencils or Markers for details and outlining
Scraps of orange cardstock
Sticky notes for masking
Scissors for fussy-cutting
Instructions
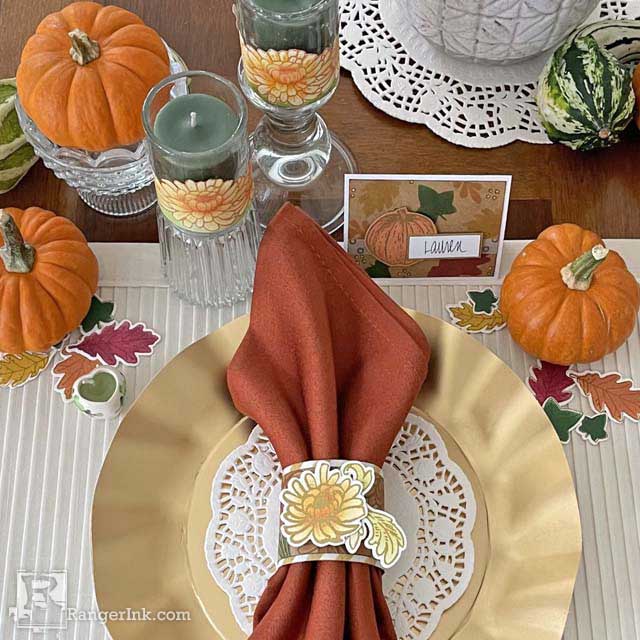
Whether a Thanksgiving feast for the whole family or Tuesday night leftovers for two, a beautiful table makes ANY meal look and feel more special. Chrysanthemums, colorful leaves, and pumpkins are the perfect seasonal touches.

Step 1: Gather your supplies: Wendy Vecchi MAKE ART "Thank You" and "Autumn Greetings" Stamp, Die and Stencil Sets, Washi Tape, and Archival Inks in your favorite Fall shades.

Step 2: Create the floral band for the votive candle ring: Trim a piece of Simon Hurley create. Stark White Cardstock to 8.5 x 3" and using Orange Blossom Archival Ink, stamp the larger mum from Wendy Vecchi's Thank You Stamp, Die and Stencil Set in the center of the panel, just above the lower edge. Mask with a sticky note and stamp the smaller mum on either side, overlapping slightly. Mask the small mums and stamp the larger mum again on either side of those.

Step 3: With all the flowers masked, use a Mini Ink Blending Tool with a Domed Foam to apply Leaf Green Archival to the area below the blooms.

Step 4: Use the coordinating stencil sheet to isolate each mum and apply Sunflower Archival lightly all over each flower. Add some Tea Rose Archival to the centers of the flowers. Use scissors to neatly cut around the tops of the flower band. Leave the Leaf Green area below the blooms intact and flat.

Step 5: Make accent flowers and leaves for the napkin ring: Stamp a few extra mums and the leafy flourish from the Thank You set onto white cardstock in Ranger Emboss It Clear Ink and emboss with Tree Branch Embossing Powder. Color the flowers as above, and the leafy flourish with a light coat of Prickly Pear Archival. Use your favorite markers or pencils to add detail and shading to all the flowers, if desired. Diecut the extra mums and leafy flourish using the set's coordinating dies.

Step 6: Create the decorative panel of the napkin ring: Trim a piece of Dina Wakley MEdia Kraft Cardstock to 7 x 1.75" and stamp the smaller mum from the Thank You set in Acorn Archival so that a few of the lower petals go off the bottom edge. Flip the cardstock around and stamp the same flower from the other side so that it is as close as it can get to the first one but without overlapping. Continue turning the kraft strip back and forth, stamping the mum in the same manner until the panel is filled. Use the coordinating stencil sheet and the Ink Blending Tool to apply Orange Blossom Archival to each flower.

Step 7: Mask the mums with sticky notes and stamp the small solid flourish in English Ivy Archival between the flowers. Turn the stamp around to different angles each time to get a pleasing variety of shapes. Allow some of the flourishes to go off the edges of the panel.

Step 8: Make the base panel for the napkin ring: Trim a piece of white cardstock to 7.25 x 2" and neatly apply strips of the gold and white striped tape from Wendy Vecchi MAKE ART Washi Assortment #1 to both sides. Trim the edges neatly and set them aside.

Step 9: Create the place cards: Trim kraft cardstock to 3.5 x 2.5" and use the stencil sheet from Wendy Vecchi's MAKE ART Autumn Greetings Stamp, Die & Stencil Set to add tumbling leaves in Mulberry, Goldenrod, English Ivy, and Orange Blossom Archival Inks. Stamp the cluster of open dots from the Thank You set in Acorn Archival randomly between the leaves. Add Sunflower Liquid Pearls to the center of each dot. When the Liquid Pearls are dry, wrap a piece of dotted washi tape around the panel, securing the edges at the back, and affix it to a white folded 3.75 x 2.75" card. Stamp the pumpkin from Autumn Harvest in clear ink and emboss with Ranger Gold Embossing Powder; use the coordinating die to cut it out. Write the names with a Letter It Black Fineliner, and trim them into neat strips, matted on scraps of kraft. Add the pumpkins and names to the place cards with Ranger Adhesive Foam.

Step 10: Stencil some extra leaves on scraps of white cardstock in the same Archival shades and use the coordinating dies to cut them out.

Step 11: Assembly: Gently curve the fussy-cut band of mums around a votive candle glass and use double-sided tape on the inside to invisibly secure the edges. Affix the kraft mum panel to the center of the striped washi band with Perfect Card Adhesive; when dry, gently curve into a ring and secure with double-sided tape. Flatten the ring just slightly and add a small mum and leafy flourish to the front.

Step 12: Create your tablescape: Put the rings on the napkins and add them to the center of your plates, with a place card in front of each. Arrange the votive candles and scatter the extra autumn leaves. Be sure to allow extra time before the meal is served for your guests to admire the decor!
 My name is Lauren Bergold, and I live in central New Jersey with my husband of 30+ years and A LOT of art supplies! My favorite medium is paper, and I especially love making cards. I teach papercrafting classes, as well as collecting and compiling vintage and found papers. You can find me on my blog, All the Good Blog Names Were Taken, and on Instagram as @llaurenb where I love to connect with other artists and makers!
 Related Posts

Simon Hurley create. Easter Card by Lieschen Harshbarger
Hop into spring with this adorable Easter card tutorial by Lieschen Harshbarger! Follow along as she uses the latest...
Read More
Distress Thanksgiving Leaves Place Cards by Cheiron Brandon
Set a stylish and rustic tone for your Thanksgiving feast with these beautiful Distress Thanksgiving Leaves Place Cards...
Read More