


Birthday cards are always fun to make and send. In this tutorial, Lauren Bergold uses Wendy Vecchi's Birthday Bash Stamp, Die and Stencil Set to make an extra-inky card with lots of layers.
Wendy Vecchi Birthday Bash Card by Lauren Bergold
- Materials
- Instructions
Isopropyl Alcohol (91% is preferable, but 70% is fine)
Cobalt Blue and Chocolate Brown cardstock
Instructions
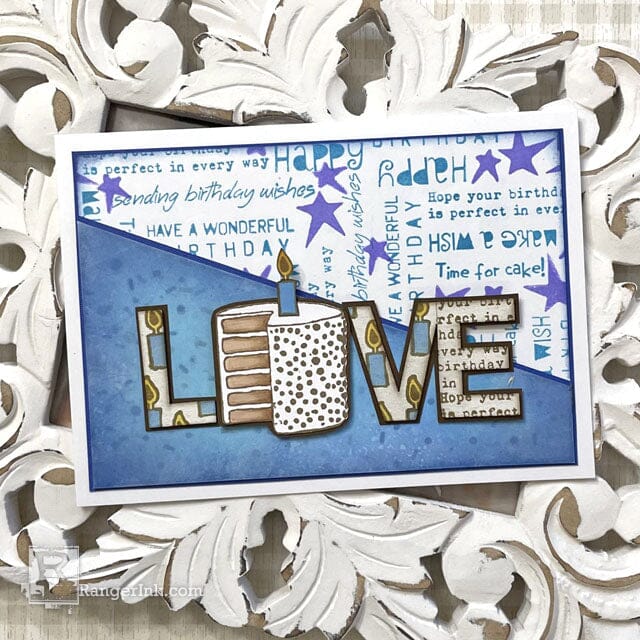
I don't bake, but I'm a huge fan of cake, especially for birthdays. This one, from Wendy Vecchi's Birthday Bash set, has a lot less calories than "the real thing" and is considerably easier to mail!

Step 1: Arrange your favorite sentiment stamps from "Birthday Bash" on the clear acrylic block from Wendy Vecchi's Perfect Stamp Positioner set, and stamp them in Bluebird Archival Ink on a piece of Simon Hurley create. Stark White Cardstock trimmed to approximately 7 x 5". Reposition the block, re-ink and stamp again several times, until the entire panel is covered, with text that reads in different directions. To avoid overlapping, choose a few single sentiments for smaller spaces.

Step 2: Fill in any gaps between groupings of text with the large and small star stamps using Violet Archival Ink.

Step 3: On a smaller piece of white cardstock, stamp the cake and the birthday candle in Potting Soil Archival Ink.

Step 4: Use the coordinating stencils and some Ranger Detail Blending Tools to apply Frayed Burlap Distress Oxide to the cake layers, Periwinkle Archival to the candle, and Sunflower Archival to the flame.

Step 5: Trim a piece of White Alcohol Ink Yupo to just over 5 x 7" and, working in layers, using one color at a time, "smoosh" various shades of blue and purple Archival Inks directly onto a Wendy Vecchi Craft Mat. Spritz the ink lightly with Isopropyl Alcohol in a Ranger Mister, and dip the Yupo into the ink. Continue adding layers, working from lighter shades to darker, until you have a pleasing combination. The sample features Periwinkle, Violet, Bluebird, Garden Patina and Morning Glory, plus a tiny bit of Cactus Flower.

Step 6: Use a Mini Ink Blending Tool and Domed Foams with a tapping motion, to apply darker shades to the edges of the panel, such as Night Sky and Violet. Feather them towards the center of the panel. If colors get too intense, add a small amount of a lighter shade on top, or dampen the Foam very slightly with Isopropyl. If desired, at the end, lightly (lightly!) use the Ranger Mister to spritz the panel with alcohol, then blot immediately with a tissue to lift off some tiny patches of ink. Set aside and allow to dry completely. Trim the panel on a diagonal so that it slants downwards on one side. Sample measures approximately 6" across the bottom; 3.5" on the left side; and 1.25" on the right.

Step 7: Use the Mini Ink Blending Tool and a Domed Foam to apply Night Sky Archival through the "sprinkles" section of the coordinating stencil sheet in the Birthday Bash set. Add a little more Night Sky to the long diagonal edge of the trimmed down panel, if desired.

Step 8: Use a craft knife or guillotine trimmer to carefully remove the letter O from the chipboard "LOVE" embellishment in Wendy Vecchi's Statements Chippies set, without damaging the L, or separating the V from the E.

Step 9: Stamp the small candle from Birthday Bash in Potting Soil Archival on the letters L and V, allowing some of the candles to go off the edge. Stamp the typed birthday sentiment several times on the letter E. Use a sticky note or repositionable craft tape as a mask along the laser line between the V and the E.

Step 10: Use the adhesive side of a sticky note and the Perfect Stamp Positioner Guide to hold the small chipboard letters in place while you use the coordinating stencils and a Detail Blending Tool to color the candles (in Periwinkle) and flames (in Sunflower).

Step 11: Assembly! Mat the letters and cake on brown cardstock and cut out neatly, leaving about a 1/16" border. Mat the diagonal panel and text panel on cobalt blue cardstock and adhere with Wendy Vecchi Perfect Card Adhesive to a white A7 card made from Simon Hurley create. Stark White Cardstock. Affix the L, V and E with Letter It Double Sided Tape, and pop the cake up on a few small pieces of Letter It White Foam Roll Tape.

Step 12: Address and mail your beautiful, calorie-free cake to the birthday boy or girl of your choice!
 My name is Lauren Bergold, and I live in central New Jersey with my husband of 30+ years and A LOT of art supplies! My favorite medium is paper, and I especially love making cards. I teach papercrafting classes, as well as collecting and compiling vintage and found papers. You can find me on my blog, All the Good Blog Names Were Taken, and on Instagram as @llaurenb where I love to connect with other artists and makers!
 Related Posts

Archival Ink Mother's Day Card by Lauren Bergold
With Mother's Day just around the corner, it's time to go above and beyond for the special women in our...
Read More
Simon Hurley create. A Very Hoppy Birthday Card by Lieschen Harshbarger
Hop into birthday fun with this adorable card tutorial by Lieschen Harshbarger! Using the new vibrant Simon Hurley create....
Read More