


Halloween isn't just for kids; follow along as Lauren Bergold uses Wendy Vecchi's MAKE ART Let's Shop Stamp, Die and Stencil Set to create tiny dimensional treat bags that are sweet and sophisticated enough for any age.
Wendy Vecchi Gal-O-Ween Treat Bags by Lauren Bergold
- Materials
- Instructions
Wendy Vecchi Designer Series Archival Inks: Peachy Keen, Tea Rose, Tiger Lily, Orange Blossom, Pink Peony, Rose Posey, Sunflower, Leaf Green
Tim Holtz Distress® Mini Ink Pad Black Soot
Tim Holtz Distress® Mini Ink Pad Black Soot
91% Isopropyl Alcohol
Scraps of Orange and Black Cardstock
Double-Stick Tape
Corner Rounder (optional)
White Tissue Paper (optional)
Instructions
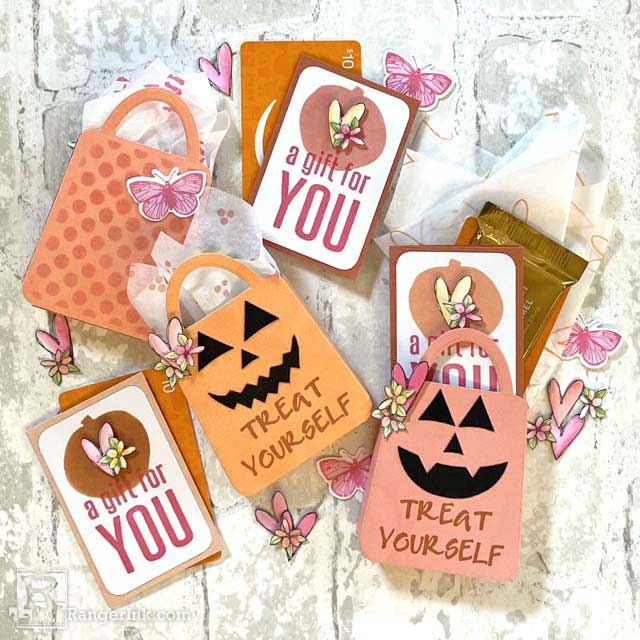
I love Halloween, but most of my friends have outgrown uncomfortable costumes and an overdose of sugar. These tiny Gal-O-Ween treat bags hold a special message, a gift card, and one perfect chocolate square... just right to share with all of my girlfriends.
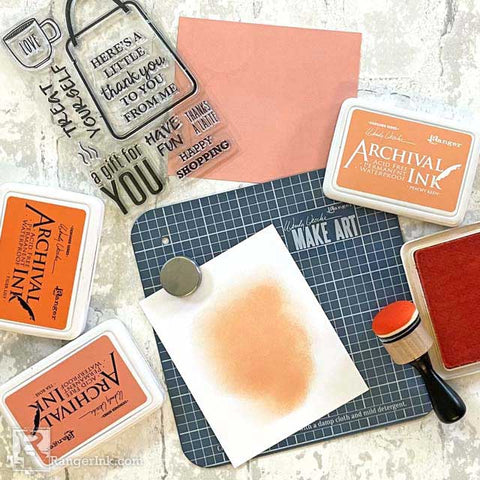
Step 1: Use a Distress Mini Ink Blending Tool and Domed Foam to apply an even coat of Peachy Keen Archival Ink to two 4 x 5" panels of Wendy Vecchi MAKE ART Perfect Cardstock.

Step 2: On the reverse side of the Peachy Keen panels, neatly apply strips of yellow striped tape from Wendy Vecchi's MAKE ART Washi Assortment #2.

Step 3: Using the dimensional shopping bag die from the "Let's Shop" set, diecut two shopping bags that are Peachy Keen on one side and striped on the other.

Step 4: On the Peachy Keen side of one shopping bag diecut, stamp "Treat Yourself" from the "Let's Shop" set in Orange Blossom Archival.

Step 5: On the Peachy Keen side of the other shopping bag diecut, apply Tiger Lily Archival through the coordinating striped stencil; then wipe the stencil off and flip it to the other side to add a second set of perpendicular stripes in Orange Blossom, creating a plaid effect.

Step 6: On a scrap of black cardstock, use a white pencil to draw some Jack-O-Lantern features. The sample has two triangular eyes (approximately .5" tall); a triangular nose (about .25" tall) and a 1.75 x .5" mouth with tiny fangs. Cut out these features and affix them above the sentiment using Wendy Vecchi MAKE ART Perfect Card Adhesive.

Step 7: Use double-stick tape or your favorite strong adhesive to attach the two shopping bag diecuts to each other. For best results, affix the bottom hinge first, and then the sides. The bag looks cutest and stands best if you adhere the flaps for the front of the bag OVER those for the back of the bag.

Step 8: Trim a piece of Wendy Vecchi MAKE ART Perfect Cardstock to 2 x 3" and round the corners if desired. Apply Peachy Keen Archival through the pumpkin stencil in Wendy's Autumn Greetings Stamp, Die and Stencil Set.

Step 9: Stamp "A Gift For You" from the "Let's Shop" set in Rosey Posey Archival so that the sentiment slightly overlaps the bottom of the pumpkin.

Step 10: Stamp the heart and small flower from Wendy's "Floral Doodles" Stamp Set several times in Black Soot Distress Ink. Use a waterbrush full of Isopropyl Alcohol to "watercolor" the images in Rosey Posey, Pink Peony, Sunflower, or Tea Rose, with a little Leaf Green for the foliage. When they are fully dry, cut out with scissors.

Step 11: Create a small portrait-oriented gift card, approximately 2.25 x 3.25" from orange cardstock and affix the stamped panel to the card using Perfect Card Adhesive. Adhere one heart and one flower to the center of the pumpkin with Ranger Adhesive Foam Tape. Add a personal note inside or sign it "Guess Who" as a surprise for your recipient. As an optional step, trim a piece of white tissue paper to approximately 9" square and stamp it with hearts, flowers, or dots in coordinating colors to tuck into the top of the treat bag.

Step 12: Add another heart and a couple of tiny flowers to the top of the treat bag with foam tape. Tuck the enclosure card inside and add a candy square, a gift card to your favorite shop (Ranger Ink, perhaps?), small photos, stickers, or anything tiny and fun you'd like to share. Repeat steps 1 through 12 until you have treats for all your Gal-O-Ween pals!
 My name is Lauren Bergold, and I live in central New Jersey with my husband of 30+ years and A LOT of art supplies! My favorite medium is paper, and I especially love making cards. I teach papercrafting classes, as well as collecting and compiling vintage and found papers. You can find me on my blog, All the Good Blog Names Were Taken, and on Instagram as @llaurenb where I love to connect with other artists and makers!
 Related Posts

Tim Holtz Distress® Paint Golden Summer Card by Dominique Bennani
This card is proof that simple techniques can create breathtaking results. ✨ Dominique Bennani stamped with Tim Holtz Distress®...
Read More
49 and Market 'The Looking Glass' Journal Page by Jessica Mikels
Soft color, beautiful texture, and layers of dreamy detail come together in this stunning journal page by Jessica Mikels!...
Read More