


Wendy Vecchi Holiday Gift Wrap by Lauren Bergold
- Materials
- Instructions
Boxes and Ribbon
Scraps of red cardstock
Red tissue paper (optional)
Instructions
There are some absolutely lovely giftwrap items available in stores, but they can be rather pricey, and a bit impersonal. A few years ago, I realized that the same craft supplies I use to make cards can also be used to decorate the presents as well, and it's a lot more fun too!

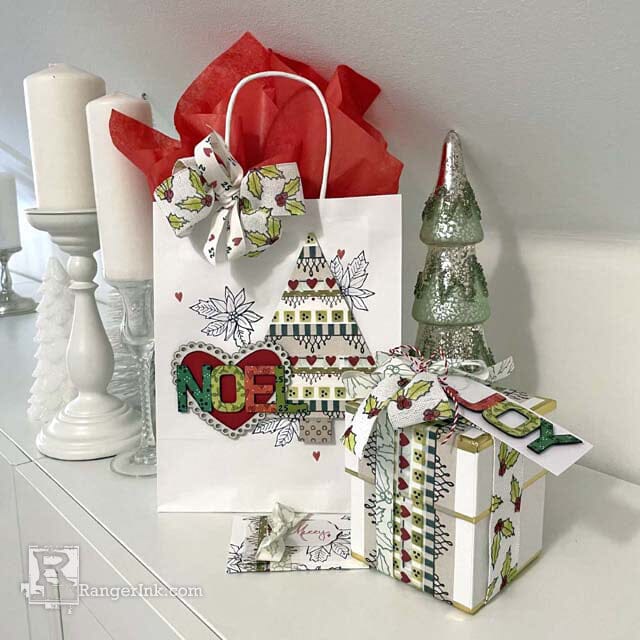
Step 1: Gather your supplies: Wendy Vecchi MAKE ART Doodle Christmas and Doodle Holiday Stamp Sets; Chippies Statements and Bases & Frames; Wendy Vecchi Washi Tape Assortments 1 and 2; Wendy Vecchi Designer Series Archival Inks and Liquid Pearls in various shades of red and green.

Step 2: Trim a piece of Distress White Heavystock to 5.5" x 6.75". Mark the horizontal centerpoint and trim the rectangle into a symmetrical triangle, leaving a 1" x 3/4" tab for the trunk at the bottom. Use the ruler grid on the Stay-tion to effortlessly line up strips of Wendy Vecchi Washi Tape in all of the red and green varieties from Sets 1 & 2, wrapping the edges of the tape neatly around to the back.

Step 3: Apply the same selection of tapes to the top and bottom halves of a white gift box, taking care to keep the strips parallel. Bring the ends of the tape into the interior of the box and trim them neatly.

Step 4: To create a custom gift card envelope, trim a piece of White Heavystock to 4" x 7.5". Score at the 1.75" point and the 4.75" point. Stamp the poinsettia from the Doodle Christmas Stamp Set randomly all over one side of the panel in Jet Black Archival, changing the position of the stamp each time and allowing some of the poinsettias to go off the edge.

Step 5: Flip the gift card holder over and stamp the evergreen branch from Doodle Christmas randomly all over in Fern Green Archival Ink. Add accents in Red Geranium with the tiny heart stamp from Doodle Holiday.

Step 6: Choose two or three of the tapes used on the box and the tree and again use the Stay-tion to line them up perfectly, so that the edges of the tapes start and end on the smallest section of the holder. Fold up the gift card holder on the score lines and carefully secure just the two short 1.75" edges with Perfect Card Adhesive. Take care to use a sparing amount of glue, as this will serve as the pocket where you'll tuck the gift card.

Step 7: Use the laser-etched lines on two Statements Chippies to easily line up a sticky-note mask, and ink each letter in a different color. The NOEL Chippie uses English Ivy, Prickly Pear, Red Geranium and Fern Green; the JOY Chippie has Red Geranium, Prickly Pear and English Ivy. Use the tiny accent stamps from Doodle Christmas and Doodle Holiday to add patterns to the letters as well, if desired.

Step 8: Fancy up some plain white ribbon by stamping patterns in Archival Ink. This works best on smooth styles of ribbon, and you'll want to practice a few times to get the correct amount of ink and pressure, especially if the ribbon has a wired edge. Adding a 9 x 9" Wendy Vecchi Craft Sheet to the back of your Stay-tion, lets you flip the Stay-tion over and work on the wipeable surface, while still using the magnets to secure your ribbon. The sample features the holly cluster from Doodle Holiday stamped in Jet Black Archival on a 1.5" ribbon; as well as .5" ribbon with holly stamped in English Ivy. Another piece of .5" ribbon is stamped with the 25 from Doodle Holiday in Jet Black and the tiny heart from Doodle Christmas in Red Geranium.

Step 9: Add color to your ribbon, if desired, by painting the outline stamps with a fine-tipped Ranger Artist Brush and your favorite shades of Liquid Pearls. The 1.5" holly-stamped ribbon has Prickly Pear leaves and Red Geranium berries. Take care to work on a wipeable surface and apply the Liquid Pearls sparingly, to avoid the color seeping through the ribbon. Place the painted ribbon on a flat surface and allow it to dry thoroughly. Note: You can also add color with inks, markers or pens, but it's important to test the specific coloring media on a small piece of the ribbon you plan to use; making sure that after it is dry, you cannot smudge or lift the color.

Step 10: Stamp a few poinsettias on the background of the bag and/or box in Jet Black Archival. If desired, first take a moment to test the stamp on the bottom of the bag or box to ensure that the surface is compatible with the ink. This will obviously work best on matte surfaces. Though in the case of these samples, which are of seemingly similar materials, the bag stamped very cleanly and dried immediately while the box got quite smeary. It is DEFINITELY a good idea to test each new surface!

Step 11: Assemble and decorate your bag, box and gift card holder! Attach the tree to the right-hand side of the bag with Ranger Adhesive Foam tape; cut a bit of red cardstock to fill in the Chippie Heart Frame and add it to the left of the tree. Use Perfect Card Adhesive to affix the NOEL Chippie on top. Tie a bow around the left handle of the bag. Add a piece of coordinating tissue paper, if desired. Tie the box with bows of two different ribbons, each running in a different direction and meeting in the middle. Add a white Dina Wakley #3 Tag with the JOY Chippie and tie it on with twine. Place the gift card in the holder and tie it shut with a small piece of stamped ribbon. Diecut the small label shape from Wendy Vecchi's Merci and More Stamp, Die and Stencil Set and stamp it with "Merry" from the Doodle Christmas set.

Step 12: Bestow the gifts to your friends and family and get ready to accept a bunch of compliments! (Feel free to pretend this project was a lot more work than it is... we promise never to tell!)
 My name is Lauren Bergold, and I live in central New Jersey with my husband of 30+ years and A LOT of art supplies! My favorite medium is paper, and I especially love making cards. I teach papercrafting classes, as well as collecting and compiling vintage and found papers. You can find me on my blog, All the Good Blog Names Were Taken, and on Instagram as @llaurenb where I love to connect with other artists and makers!
 Related Posts

Make your Santas Sparkle with Stickles Glitter Gels by Kimberly Boliver
Upgrade your holiday cards with Stickles Glitter Gels! In this festive tutorial, Kimberly Boliver makes Santa sparkle with vibrant...
Read More
Simon Hurley create. Woodsy Christmas Card by Lieschen Harshbarger
Still immersed in the holiday card-making spirit? Get inspired with this idea! Lieschen Harshbarger works her magic...
Read More