


In this tutorial, Terri Burson shows you how to paint with Wendy Vecchi Archival Reinkers as she makes this quick and easy set of autumn border cards.
Wendy Vecchi Quick Autumn Border Cards by Terri Burson
- Materials
- Instructions
Wendy Vecchi Perfect Cardstock White Panels 10 pk.
Wendy Vecchi Stamp, Die & Stencil Set: Autumn Greetings
Wendy Vecchi Perfect Cardstock White Cards 80 lb. (portrait)
Wendy Vecchi Archival Ink ™Pad Goldenrod, Periwinkle, English Ivy
Wendy Vecchi Archival Ink™ Pad Re-Inker Goldenrod, Periwinkle, English Ivy, Jet Black
Wendy Vecchi MAKE ART Perfect Stylus Set 2
Wendy Vecchi MAKE ART Stay-tion Craft Sheet 9"x9"
Wendy Vecchi MAKE ART Liquid Pearls Prickly Pear, Periwinkle, Night Sky, Petunia
Wendy Vecchi MAKE ART Stay-tion
Wendy Vecchi MAKE ART Perfect Stamp Positioner Set
Ranger Adhesive Foam Tape White, 2 yards
Wendy Vecchi Perfect Card Adhesive, 2 oz.
Other:
Masking Tape
Trimmer
Isopropyl Alcohol
Paint Brush
Paper Towel
Instructions
Hey crafty friends, Terri here. I often like to create multiple cards that can be quickly replicated. Setting everything up in an assembly-like format is key. We’ll be painting and embellishing some negative space, plus using re-inkers. So grab your Isopropyl alcohol, pull up a seat, and let’s get started!

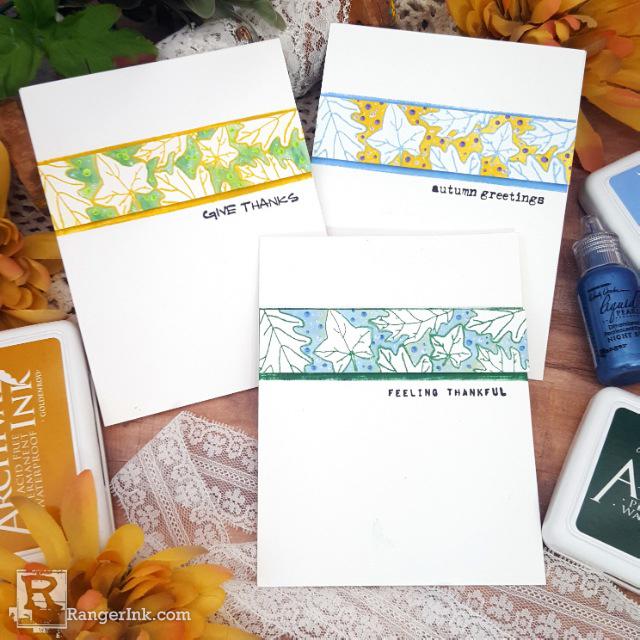
Step 1: To begin, you’ll need four card panels. Trim three 1 x 4.25 inch strips from one of the Wendy Vecchi Perfect Cardstock White Panels. Take the remaining three panels and mask a border section with masking tape that measures 1.25 x 4.25 inch of white space. Make sure the border section is within the upper third of your card panel.
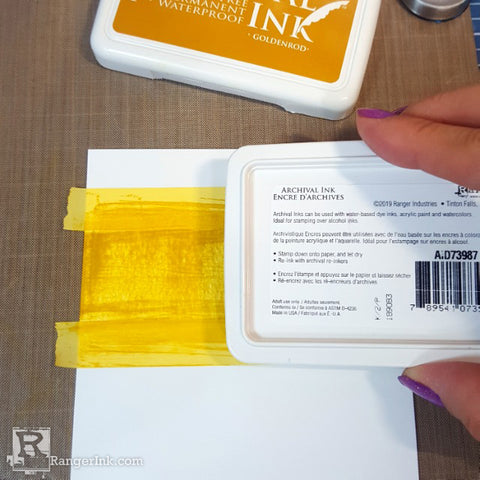
Step 2: Take your Wendy Vecchi Archival Ink Pad in Goldenrod and simply drag it across your masked area. It doesn’t have to look pretty. Drag the ink pad sideways and up and down to get enough coverage. Take care not to go beyond the bounds of your masking tape. Repeat for the next two masked card panels using Archival Ink Pad in Periwinkle and English Ivy, respectively, and set aside.

Step 3: Take one of the cardstock strips and, using the Goldenrod Archival Ink, stamp freehand with your Perfect Stamp Positioner, using various leaves from the Wendy Vecchi Autumn Greetings Stamp, Die and Stencil Set. Repeat the stamping process with the remaining panel strips using the Periwinkle and English Ivy Archival Ink.

Step 4: Place one drop of the Archival Ink Re-inker in English Ivy on your Craft Sheet and mix with a few drops of Isopropyl alcohol. Blend together with a small paintbrush. If you wish to dilute some of the color, pull some of the ink over on your Craft Sheet and dilute with more of the Isopropyl alcohol.

Step 5: Paint the negative space around the leaves with your diluted ink. Clean your brush by dipping in plain Isopropyl alcohol, blotting on a paper towel, then rinse with warm water.
Paint the remaining two panels, alternating the background negative space with the Archival Ink Re-inkers in Goldenrod and Periwinkle. Clean your brush between colors and clean as mentioned above.

Step 6: Next, dip the new Wendy Vecchi Perfect Stylus Tool (now in a larger size) into the Periwinkle and Night Sky Liquid Pearls and dot onto your Periwinkle inked stamp strip. This tool helps eliminate any twirls from appearing on your dots and gives a more flat appearance. Repeat the dotting process pairing the Petunia and Periwinkle Liquid Peals with your Goldenrod inked stamp strip. For the English Ivy painted panel strip, dot with Prickly Pear Liquid Pearls. They dry quickly but make sure it’s completely dry before adhering to your card panel.

Step 7: Stamp your sentiment of choosing from the Autumn Greeting Stamp set to the lower right of each border using Ranger Archival Ink in Jet Black along with your MAKE ART Stay-tion, Perfect Stamp Positioner and Perfect Stamp Block.

Step 8: Adhere each card panel to an accompanying Wendy Vecchi Perfect White A2 card with Perfect Card Adhesive. Add Ranger Adhesive Foam to the back of your stamped cardstock strips and center onto each inked border.

Step 9: With so many color combinations, you can truly mix and match however you see fit, creating with your favorite favorite Fall/Autumn colors. Just have fun with it!
 Hello, my name is Terri Burson. I’m a native New Yorker, transplanted in the deep South. My husband and I are parents to a 19 year old son and numerous fur babies. I’m an avid card make but love dabbling in many forms of art and mediums. You can find me on most social media platforms @wavingmywand and on my blog at wavingmywand.blogspot.com.
 Related Posts

Dylusions Neon Ink Sprays Journal Page by Miranda van den Bosch
Neon color takes center stage on this eye-catching journal page by Miranda van den Bosch! The newest...
Read More
Tim Holtz Distress Paint Summer Card by Tami Bastiaans
Bring the beach to your craft table! Tami Bastiaans created this bright summer card using Distress Texture Paste, Paints,...
Read More