


By Wendy Vecchi

A Little Holiday Art By Wendy Vecchi
- Materials
- Instructions
- Ranger Non-Stick Craft Sheet™
- Ranger Heat it™ Craft Tool
- Ranger Mini Blending Tool
- Ranger Wonder Tape™
- Ranger Multi-Medium: Matte
- Ranger Adhesive Foam Rolls Black
- Tim Holtz® Alcohol Inks: Red Pepper, Mushroom
- Tim Holtz® Distress Spray Stains: Peeled Paint
- Tim Holtz Distress® Glitter Dust
- Wendy Vecchi Embossing Powder: Red Geranium, Orange Blossom, Watering Can, Sky Blue
- Archival Ink™ Designer Series: Wendy Vecchi: Sky Blue, Red Geranium, Fern Green, Watering Can, Potting Soil
- Ranger Pigment Ink Pads: Glacier White
- studio490/wendy vecchi Mat Mini Pine Trees 1 small black, 1 large black (WVMMPV03)
- studio 490 wendy vecchi Stamps: Vintage Text (WVBG025), Spatter Stamp (included in Faux Graniteware starter set WVGRST),
- Tim Holtz Idea-ology: Trophy Antlers, Mirrored Stars (3), Jingle Brads (3), Woodlands Wreathe, Letterpress Holiday, Alpha Parts Frozen
- Other: hardware store metal piece about 3 inches wide and 2 1/2 inches tall (see photo), sandpaper, sandwich bag, hemostat or tweezers, hot glue, Embossing Gun
Instructions

 A trip to the home improvement store with my hubby, inspired this little holiday home decor piece. These are the other pieces I bought and today I’ll show you how to totally transform one.
 Step 1: Create an authentic custom brick embossing powder by mixing 1 part of Red Geranium embossing powder, 1 part Orange Blossom embossing powder, 2 parts Frosted Crystal embossing powder and 1/2 part of Watering Can embossing powder. Stir to mix the colors well.
 Step 2: Sand the metal piece to add some tooth for the embossing powder to stick to. Use the Blending Tool with Foam to add Sky Blue Archival Ink to the metal piece. While the ink is wet, sprinkle with Sky Blue embossing powder and heat with the embossing gun to melt the embossing powder. ***THIS GETS VERY HOT.*** ALLOW about 5 minutes for the piece to cool. Work in sections to cover the entire metal piece.
 Step 3: When the metal has cooled, ink the vintage text background stamp with Watering Can Archival and stamp the piece as shown. Use the Heat-it Tool to dry the ink.

 Step 4: Use Potting Soil with the Blending Tool to add shading to the edges. Dry the ink.
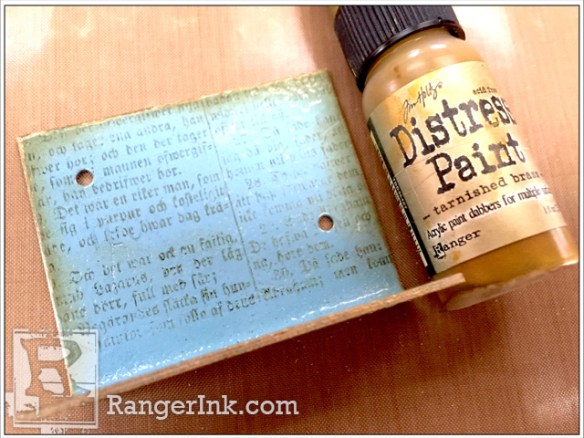 Step 5: Shake the Tarnished Brass Distress Paint and use the dabber top to edge the metal piece. Allow this to air dry.
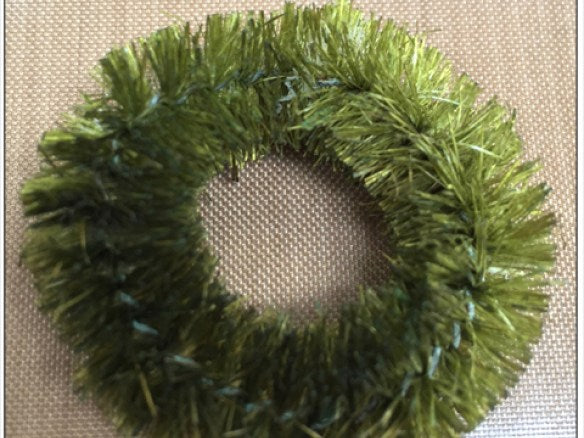 Step 6: Spray the wreath with Peeled Paint Distress Spray Stain and allow to dry.
 Step 7: Snip the Jingle Brad prongs from the bells. Drop them into a sandwich bag and add a few drops of Red Pepper Alcohol Ink, Squish the bag to cover the bells. Remove and allow to dry. When dry, use Multi Medium to add them to the dry wreath.
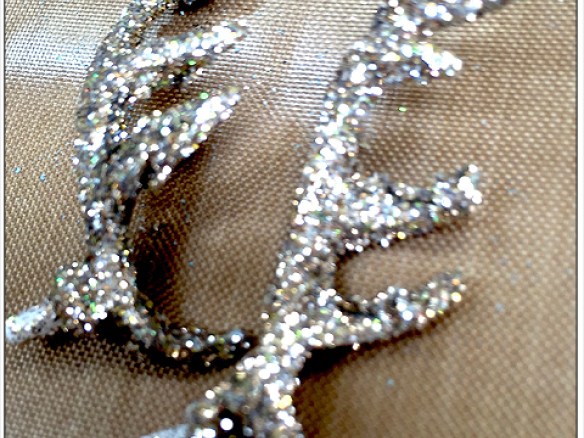
 Step 8: Remove the antlers from the deer head, then ink over the head with Potting Soil.
 Step 9: Paint the antlers with a thin layer of Glue N’ Seal, then dip the antlers into the jar of Distress Glitter Dust and set aside to dry. I found it easier to use a hemostat (yes…old surgery nurse!) to hold them. Replace the antlers into the head, when the glue is dry.

 Step 10: Swipe each of the Letterpress onto the Red Geranium pad. Dip each letter into the custom brick embossing powder and heat to melt the powder.
 Step 11: Snip a 1 1/2 inch piece of the Alpha Parts Frozen and paint on a thin layer of Glue N’ Seal. Sprinkle with the Frosted Crystal Embossing powder and allow to dry. No need to melt the powder. The Glue N’ Seal holds it in place to create the frosted effect.
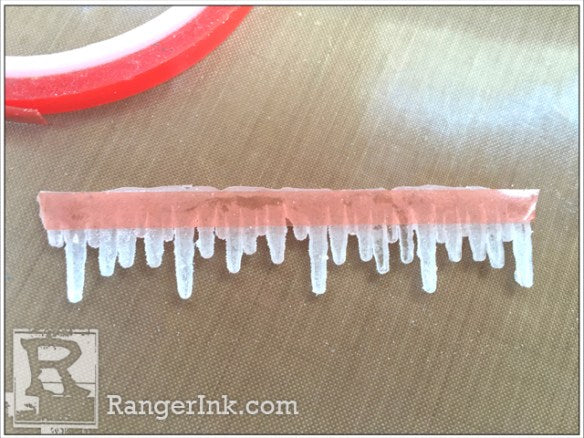 Step 12: Repeat with another section of the Frozen icicle, cut to fit the bottom of the metal piece. Add a strip of Wonder Tape to the back of both sections.
 Step 13: Ink the Mat Mini Pine Trees with Fern Green and sprinkle them with Fern Green embossing powder, while the ink is wet. Heat to melt the powder. Use the spatter stamp with Glacier White to stamp over both trees. Dry.

 Step 14: Add a drop of Mushroom Alcohol Ink to each of the Mirrored Stars. Allow to dry.
To assemble, remove the release backing from the small Frozen icicle and add it to the top right corner. Add the wreath to the top left corner with hot glue. Add the deer head to the center of the wreath. Layer the Pine Trees with Black Foam Adhesive and add them to the right side, over the Frozen icicle.
Add a strip of Wonder Tape under the Letterpress and add them to the base, making sure to cover the holes. Make sure to leave room for the Frozen. Remove the release backing from the tape and add the icicle in front of the Letterpress, so that the icicle hangs off the edge.
Use Multi Medium to add the Mirrored Stars to the Pine Trees and add one to accent the Letterpress.

Won’t this look cute sitting on a shelf or on your holiday table? It also makes a fun hostess gift.
And there you have it…proof that inspiration is everywhere…even the home improvement store.
To see how I used the “fence post top” with the new Distress Paper Mosaic kit, check out this blog post: www.studio490art.blogspot.com
Related Posts

49 and Market Irresistible Curiosities Journal Page by Jessica Mikels
Step into a world of whimsy with this Irresistible Curiosities journal page by Jessica Mikels! Layered with soft ink...
Read More
Make-It™ Chic Birthday Mini Card Set by Lauren Bergold
In this tutorial, Lauren Bergold creates an adorable set of four mini cards using the Make-It™ Chic Birthday Stamp...
Read More