


by Aida Haron

Adventure Layered Canvas by Aida Haron
- Materials
- Instructions
- Ranger Archival Inks: Jet Black, Coffee Aquamarine, Viridian, Rose Madder, Venetian Orange, Crimson
- Tim Holtz® Alcohol Blending Solution
- Ranger Ink Blending Tool & Foam
- Ranger Non-Stick Craft Sheet™
- Ranger Heat it™ Craft Tool
- Flat Back pre-gessoed Canvas 9 x 7 inches
- Background Stamps: Stampers Anonymous (Wendy Vecchi Sentimental Art, Tim Holtz CMS125 Mixed Media
- Tim Holtz Sizzix Alterations Mini Ticket Set, Adventure Thinlits Block Words
- Tim Holtz Idea-ology: Journal Flash Cards, Alpha Parts, Long Fasteners, Numerals
- Tim Holtz Tonic: Kush Grip Scissors
Instructions
 Hello everyone, it’s Aida here and thank you for joining me on the Ranger Blog. Art media techniques are exciting to work with but I will be the first one to say that I like them simple, as *too much* can drown a project and distract rather than enhance the visual appeal.
 The title Adventure sums up the essence of this project – enjoy exploring the layers of colors and going with the flow !
 I work in a scrapbook store and often get the question if Archival Inks can be used for anything else other than stamping. The answer is *YES ! * and I point these crafters to Ranger’s Signature designer Wendy Vecchi who has tons of techniques, backed up by a whole body of work using them.
Today I have a take on her popular rubbing alcohol technique using Archival Ink with Ranger’s Adirondack Blending Solution. We know that Blending Solution is primarily used with alcohol inks to blend or lighten the colors. As Archival Ink is a permanent solvent based ink, Blending Solution works really well with it. The ink colors I’ve used are : Aquamarine, Viridian, Rose Madder, Venetian Orange, Crimson, Coffee an Jet Black. You can use whatever combination of colors that take your fancy.
 Most of my mixed media work are on small flat-back canvases and this time, it’s 7×9 inches piece. What is important : use the heating tool to dry the ink on the canvas between applications. The same principle as in painting applies – drying the layers of colors prevents it from mixing into a muddy tone.
Start with the lightest color which is Viridian. You can tap the blending tool on the canvas or add color in a gentle circular motion, no fixed rules as long as you are comfortable with the skill.
 Continue to add color, blend and dry with the heat tool. Work on the canvas till you get the depth of color you are happy with. I’ve found it’s better to start off with a deeper, vibrant toned canvas rather than light colors.
 Next I squeezed a small amount of Blending Solution into the shallow bottom of a teacup. The liquid is colourless and doing this (rather than pouring directly on to a craft sheet) makes it easier to pick up with a brush, and there’s less wastage. The solution dries fairly quickly.
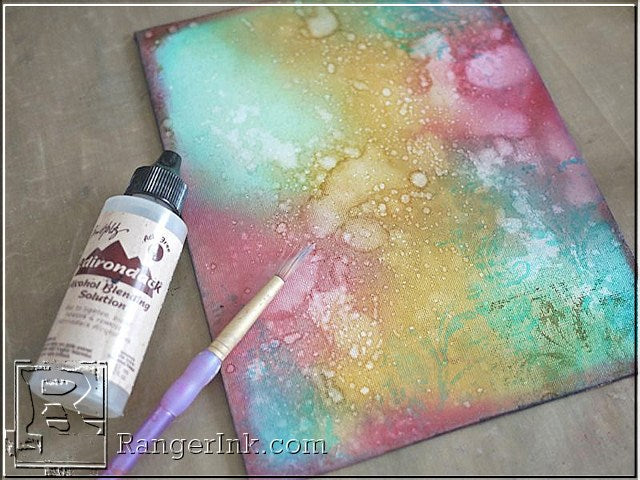 Pick up the Blending Solution with a brush and splatter over the canvas. The reaction of solution to the Archival Ink is almost immediate like magic, this is really the fun part !
 Blot with a kitchen towel, then dry gently a heating tool.
 This is a single layer with blending solution and already you can see how dramatic it looks ! The grains of the canvas are showing through giving you the wonderful texture. Again using the blending tool, I continued to add lighter layers of Archival Ink which will fill in some of the whitened patches, and adjusted with a few more splatters. Remember to dry the layers of color with a heating tool to prevent the tone from getting muddy. Finally, finish with Coffee and Jet Black at the edges to frame the project.
 Stamp background images to add interest. You can add this step anytime you like in between colouring with the inks.
 Add Idea-ology Remnant Rub-ons.
 I love metal embellishments especially these metal numerals. They were painted with Distress Paints Tumbled Glass, Tarnished Brass and edged with Chipped Sapphire.
 The word *Adventure* was die-cut in gold glitter cardstock using the Alterations Thinlits Block Words, then backed on to a cardstock painted with Distress Paint Chipped Sapphire. You can change up this project as you like using other embellishments or elements.
This was a really fun project to try and each piece will be completely different depending on the Archival Ink colors you use and the randomness of the splatters. Thank you for spending this crafty moment with me, happy adventures!

Related Posts

Dylusions Neon Ink Sprays Journal Page by Miranda van den Bosch
Neon color takes center stage on this eye-catching journal page by Miranda van den Bosch! The newest...
Read More
Tim Holtz Distress Paint Summer Card by Tami Bastiaans
Bring the beach to your craft table! Tami Bastiaans created this bright summer card using Distress Texture Paste, Paints,...
Read More