


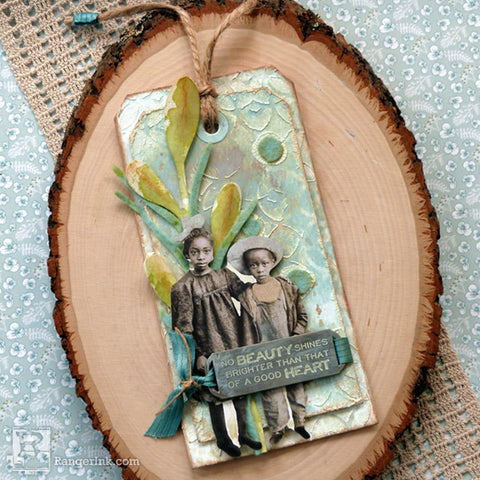
Audrey Pettit shares how she has been using her latest favorite color of Tim Holtz Distress®, Speckled Egg, with this layered tag. The vintage inspired, shabby blue color creates a soft background while working wonderfully in conjunction with the entire Distress palette.

Beauty Shines Distress Art Tag by Audrey Pettit
- Materials
- Instructions
Tim Holtz Distress® Watercolor Cardstock
Tim Holtz Distress® Oxide Ink Pads: Speckled Egg, Old Paper
Tim Holtz Distress® Ink Pads: Old Paper, Shabby Shutters, Gathered Twigs
Tim Holtz Distress® Paint: Antique LinenTim Holtz Distress® Texture Paste: Crackle
Ranger Multi-Medium: Matte
Ranger Mini Ink Blending Tool with Foam
Tim Holtz Distress® Sprayer
Ranger Artist Brushes
Ranger Non-Stick Craft Sheet
Simon Hurley create. Stencil: Bubblewrap
Letter It™ Foam Roll Tape: White
Tim Holtz® Alterations by Sizzix Dies: Stacked Tags, Festive Stems
Tim Holtz® by Stampers Anonymous Layering Stencils: Trellis, Dot Matrix, Latticework
Tim Holtz® Alterations by Sizzix Dies: Stacked Tags, Festive Stems
Tim Holtz® by Stampers Anonymous Layering Stencils: Trellis, Dot Matrix, Latticework
Ribbon/Twine
Felt
Felt
Instructions
Hi everyone, it’s Audrey, and I’m super excited to be back on the Ranger Ink Project Page to share a layered art tag today featuring my new favorite color of Distress, Speckled Egg.

One of the most fun aspects of working with the Ranger Distress line is how unique the finished product turns out. No matter how many times you try to replicate a look, each finish is truly one of a kind. The techniques I used on this tag truly highlight that feature with unique stenciled backgrounds built up with layers of Oxide, Ink, and Texture Paste. You never know what you’ll end up with. Let’s get started!

Step 1: To begin, die cut two stacked tags and one hole re-inforcer from Ranger Watercolor Cardstock. Lightly ink the tags and re-inforcer with Speckled Egg Distress Oxide using an Ink Blending Tool.

Step 2: Place a stencil onto the tag, and ink portions of the tag area with Speckled Egg Distress Oxide. To get a random look, vary the pressure and amount of Oxide that you add in different areas of the tag, leaving some areas quite light and others much darker.

Step 3: Place a different stencil onto the tag, and ink over random areas with Old Paper Distress Ink. You can move the stencil around in different areas at different angles to add to that varied look.

Step 4: Dab Speckled Egg Distress Oxide and Gathered Twigs Distress Ink onto your Craft Sheet. Spray the inks with water, Pick up the inks with a wet Artist Brush, and add the pigments to the tag. Add more water, as needed, to get the inks to blend. Allow the tag to dry. Repeat the process to add darker areas of color.

Step 5: Add yet another stencil onto the tag, and ink in random areas with Speckled Egg Distress Oxide.
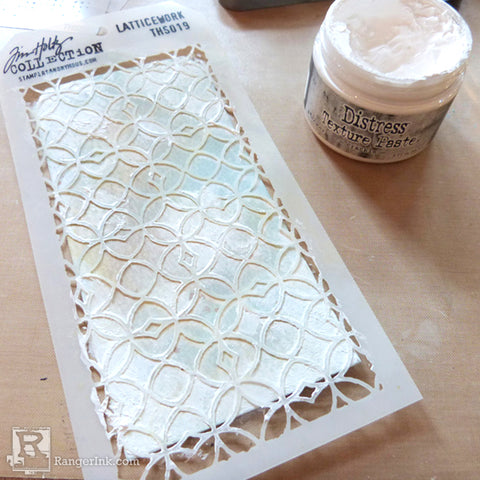
Step 6: Place the stencil onto the tag, and using the tip of your finger, dab Ranger Distress Crackle Texture Paste onto the edges and corners of the tag, as well as a few small areas in the center. Repeat these steps using different combinations of stencils and layers on the second tag. Set them both aside until the texture paste is dry.
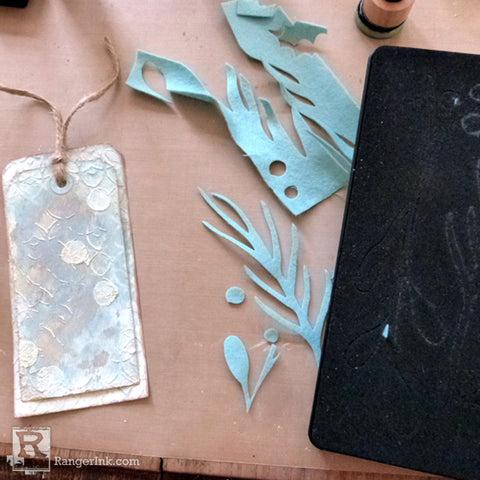
Step 7: Add the hole reinforce to the top of the smaller tag using Ranger Multi Medium Matte adhesive. Punch or die cut the hole in the center of the reinforcer. Add twine to the smaller tag. Die cut the middle stem and the three berries from the Festive Stems Bigz die from light blue felt. Die cut the leaf stem from Watercolor Cardstock.

Step 8: Watercolor the green stem with Old Paper and Shabby Shutters Distress Ink. Bend each leaf lightly in half, and ink the center vein and outer edges with Gathered Twigs Distress Ink. Dab the felt branch into the remaining green ink mixture on your Craft Sheet.

Step 9: Adhere the two branches to the left side of the smaller tag, so that some of the stems hang off the bottom of the tag. Adhere the three felt berries to the right side of the tag.
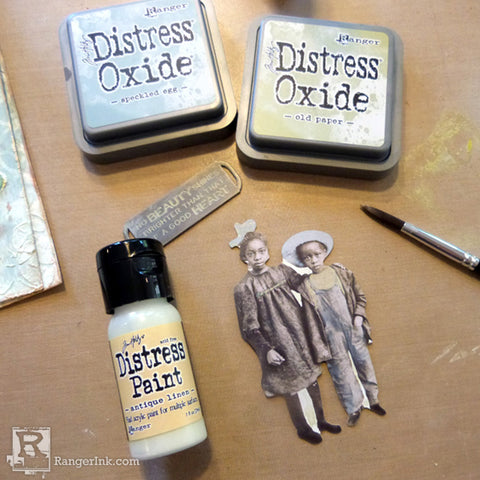
Step 10: Color portions of a paper dolls image with Speckled Egg and Old Paper Distress Oxides. Rub Antique Linen Distress Paint across a quote band. Allow the paint to dry for a few minutes before rubbing the excess off.

Step 11: Thread ribbon and twine through the quote band, and tie it across the bottom of the smaller tag. Add Foam Adhesive onto the back of the tag, and adhere it to the center of the larger tag.

Step 12: Add more Foam Adhesive onto the back of the paper dolls image, and slip it under the quote band. Trim off the excess stems from the bottom of the layered tags.

Enjoy!

Related Posts

"My Cup of Care" Journal Page with Dylusions Pastel Paints by Miranda van den Bosch
Read More

Tim Holtz Distress® Micro Glaze Embossing Resist by Tami Bastiaans
Create gorgeous embossed backgrounds with the Micro Glaze Embossing Resist technique! ✨ Tami Bastiaans pairs Tim Holtz Distress® Micro...
Read MoreDrawer Title
- Choosing a selection results in a full page refresh.