


Carisa Zglobicki creates a mixed media art journal page on the Dina Wakley MEdia Journal burlap page using Dina Wakley MEdia paints, stamps, and stencils paired with the Gel Plates.
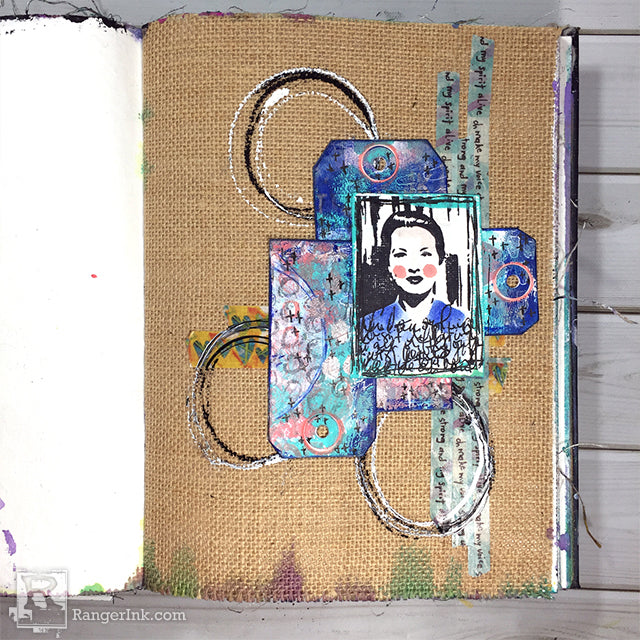
Behind the Face by Carisa Zglobicki
- Materials
- Instructions
- Dina Wakley MEdia Journal
- Ranger Gel Plate
- Ranger Brayer: Small
- Dina Wakley MEdia Tags: #3 & #5
- Dina Wakley MEdia Scribble Sticks: Set 2
- Dina Wakley MEdia Paint: Blushing, Turquoise, Elephant, Lapis, Rosy, White Black
- Dina Wakley MEdia Stencils: Hexagons, Small Alpha
- Dina Wakley MEdia Stamps: Text and Scribbles, Circle Scripts, Quirky People
- Dina Wakley MEdia Washi Tape
- Dina Wakley MEdia Ultra Thick Gel Medium
- Dina Wakley MEdia Brushes
- Wendy Vecchi Archival Ink: Watering Can
- Tim Holtz Distress® Archival™ Ink: Black Soot
- Ranger Fude Ball Pen: Black
- Ranger Heat it Craft Tool
- Tim Holtz by Tonic Studios Kushgrip Snips
Instructions
Hi everyone! Carisa here with you today and I'm so excited to be back as a guest artist on the Ranger Ink Blog with you today! I was super happy when Dina Wakley announced her white mixed media tags and took the opportunity today to do some gel printing on them for a fun journal page on the burlap paper in my Dina Wakley Art Journal. I hope you will enjoy this tutorial and there is a video with the full gel printing process in the end.

Step 1: Start by pulling out the Gel Plate Trio and adding the colors Blushing, Turquoise and Elephant to the larger one with the brayer. For the first layer, add the hexagon stencil and the tags on top to pull a print. I love the white tag for gel printing because my colors remain true. There was no need to add gesso for this step. Continue by adding Lapis, Rosy with different stencils and stamps to create additional layers on the tags.

Step 2: Once you are happy with the prints you created with the Gel Plate, start adding some more texture with stamps and Archival Ink in Watering Can to bring out the Elephant color from the background.

Step 3: Next add some doodles using Blushing and Lapis Scribble Sticks. Go around the different elements with the Scribble Sticks to bring them out from the background and add more color to the tags.

Step 4: The last step for the tags was to add some mark making using the Rosy color paint to add a little more interest and texture.

Step 5: Next, add a stamp as the main focal point on the art journal page. Tear out a watercolor page from the journal and use the Quirky People set and stamp one of the faces on it using Archival Black Soot. Then add a touch of color using the same Scribble Stick colors.

Step 6: It’s time to start building the art journal page. I picked the burlap paper because I love the texture and it really makes my tags pop. To create more interest behind the tags, use washi tape in contrasting and similar colors and just layer them on the page.

Step 7: To add some visual interest to the background, use the black and white paint bottles to scribble circles on the burlap using the tip. Once you are happy with the placement of the tags, I attached them together with washi tape and adhered them on the burlap using Dina Wakley Media Ultra Thick Gel Medium. This is the perfect medium for adhering anything to the burlap texture. Add some journaling to the bottom of the stamp and then adhere that to the tags.

Step 8: To complete the journal page, add a few doodles to the tags using the Black Fude Ball 1.5 journaling pen. This is my go to pen for doodles and journaling in my art journals.


Here are some close ups of my finished art journal page. I love how I was forced to work with the "white" space of the burlap page when creating my design elements. I love the simplicity of the page yet there is still a lot of color and texture with the gel prints on the tags.
If you are interested in learning more about using the Gel Plate to create your own prints, I've filmed a tutorial for you today. I kept the entire gel printing process in real time so you can really see the steps that make it come together. I always have a lot of fun gel printing and think it's the perfect thing to get you out of a creative slump!
Thank you to Ranger again for inviting me back to the blog to share my art with you using my favorite Ranger Ink products. I continue to turn to them time and again during my journey as an artist. I hope you all will be be inspired to create some fun tags to add to those burlap pages!

Related Posts

"My Cup of Care" Journal Page with Dylusions Pastel Paints by Miranda van den Bosch
Read More

Tim Holtz Distress® Micro Glaze Embossing Resist by Tami Bastiaans
Create gorgeous embossed backgrounds with the Micro Glaze Embossing Resist technique! ✨ Tami Bastiaans pairs Tim Holtz Distress® Micro...
Read MoreDrawer Title
- Choosing a selection results in a full page refresh.