


Make your BFF's day with this cheerful folded pocket card! Use as a gift card holder or enclose a sentimental trinket, this card project will put a smile on your best friend's face! Guest designer, Audrey Pettit shares how it all comes together using the Letter It™ collection of products!
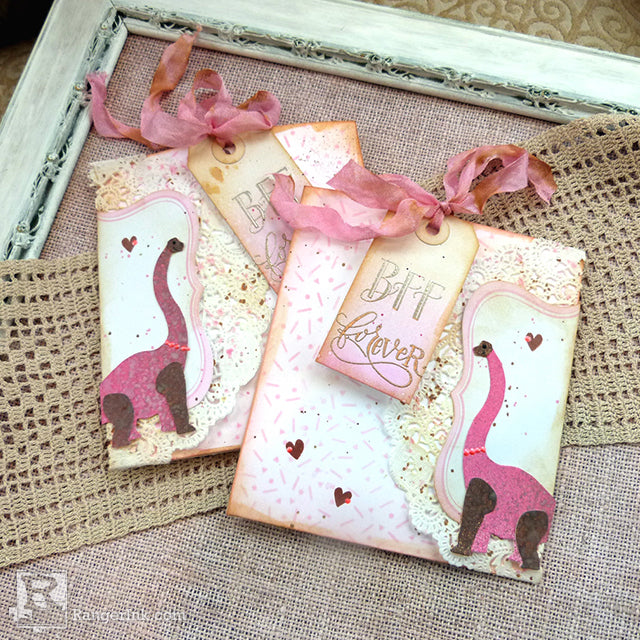
BFF Slider Pocket Card by Audrey Pettit
- Materials
- Instructions
- Letter It™ A2 White Cardstock
- Letter It™ Assorted Tags Black and White
- Letter It™ Clear Stamps: Friendship
- Letter It™ Stencil: Party Time
- Letter It™ Stamping Ink: Sepia
- Ranger Perfect Medium Ink Pad
- Letter It™ Embossing Powder: Liquid Platinum
- Letter It™ Perfect Pearls: Pink Gumball
- Letter It™ Finishing Touches Liquid Pearls: Shocking
- Letter It™ Acrylic Stamping Block
- Tim Holtz Distress® Watercolor Cardstock
- Tim Holtz Distress® Mini Ink Pad: Antique Linen, Brushed Corduroy, Spun Sugar, Picked Raspberry
- Tim Holtz Distress® Oxide® Spray: Picked Raspberry, Vintage Photo
- Tim Holtz Distress® Marker: Black Soot
- Ranger Enamel Accents: Black
- Ranger Heat It Craft Tool
- Ranger Mini Ink Blending Tool with Foam
- Tim Holtz Distress® Sprayer
- Ranger Multi Medium Matte
- Ranger Wonder Tape 1/2"
- Ranger Artist Brushes
- Ranger Non-Stick Craft Sheet
- Simon Hurley create. Stark White Cardstock
- Tim Holtz® Alterations by Sizzix Prehistoric Die Set
- Other: Doily, Label Die Cut, Ribbon, ¼” hole punch
Instructions

Hi everyone, it’s Audrey, and I’m so happy to be back on the Ranger Ink blog to share another project with you. Today I’ve got a quick and easy DIY gift packaging idea that works really well for those smaller gift items you might have, such as jewelry, chocolate or tea, flower seeds, or even a gift card.

This gift holder is a throw-back to a project that I haven’t done for a while, a slider card pocket. I love how fast these are to make, and they add a bit of interactive fun for the gift recipient. Simply pull upwards on the bow and tag and the gift insert slides right up. Very much reminds me of the slider cards that are so popular these days.

Step 1: The tutorial I’m sharing today shows the basic construction of the slider pocket, and once you see how easy these are to make, you can change up the size and dimension of your papers to create pockets in any size. For this project, begin by cutting two pieces of heavyweight white cardstock, one 6x6 and one 5x5.5. Using a scoring board or bone folder, score the 6” square panel at .5” and 5.5”. Rotate the paper 90 degrees, and score again at .5”. Fold the paper along the score lines, and go over the crease with your bone folder. Trim off the two small square corners at the bottom of the panel.

Step 2: Place the Letter It stencil over the front of the scored panel, and secure it with a bit of low-tac tape. Using a Mini Ink Blending Tool, ink over the stencil with Spun Sugar Distress Ink. Ink the edges only with Picked Raspberry Distress Ink.
For this project, you’ll have to start at one edge with the stencil, and then shift the stencil over to complete the pattern.

Step 3: Add a small amount of Pink Gumball Perfect Pearls powder onto your Craft Sheet, and water it down with a few sprays of water from the Distress Sprayer. Pick up the pearls with a paintbrush, and flick the pigment onto the stenciled panel. Spray a small amount of Vintage Photo Distress Oxide Spray onto the Craft Sheet and repeat the process with the paintbrush. Using the tip of your finger, smear some of the Oxide around the fold lines of the pocket front. Cut approximately a 1.5’ length of seam binding ribbon, and use the ribbon to sop up any remaining Perfect Pearls and Oxide Spray on your craft mat. Set the ribbon aside to dry.

Step 4: Fold all of the flaps of the pocket inwards, and add strong adhesive, such as Wonder Tape, to the tops of the flaps. Peel off the protective liner from the tape, and then adhere the pocket back to the pocket front.

Step 5: Create an insert for the pocket with a piece of Letter It A2 White Cardstock, trimmed down to 4.25” x 5.25”. First, lightly ink the entire paper panel with Spun Sugar Distress Ink, and then add a bit of Brushed Corduroy Ink to the edges. Randomly stamp the BFF and Friends sentiment from the Friendship stamp set on the insert using Letter It Sepia ink.

Step 6: Add a small piece of Wonder Tape to the center of the stamped insert, and then attach the gift item. Punch a .25” hole in the top center of the slider pocket. Wrap the ribbon around the bottom of the pocket insert, and thread the ends out through the hole at the top of the pocket.

Step 7: Use a white Letter It Assorted Tag for the gift tag, and ink blend the tag starting with Antique Linen Distress Ink, followed by Spun Sugar, and ending with Picked Raspberry. Stamp BFF Forever onto the tags with Letter It Perfect Medium. Coat the ink with Liquid Platinum, and then melt the embossing powder with a Heat Tool until smooth and shiny. Add the tags to the ribbon at the top of the pocket, and then tie the ribbon into a bow. Trim the ends of the ribbon as needed.

Step 8: Spray Picked Raspberry and Vintage Photo Distress Oxide Spray side by side onto a piece of Distress Watercolor Cardstock. Lightly mist the inks with water using the Distress Sprayer, and set the paper aside to dry.

Step 9: Die cut dinosaurs from the pink Oxide paper, and die cut their accent pieces from the brown. Adhere the detail pieces using Multi Medium Matte. Add an eye and mouth to the dinosaur with a Black Soot Distress Marker. Wrap one edge of the slider pocket with an ink splattered doily and label die cut. Adhere the dinosaurs onto the labels with Multi Medium Matte, wrapping the tails around to the back.

Step 10: Stamp three small hearts from the Friendship stamp set onto the pockets using the Sepia ink. Add dot details to the hearts and the dinosaur’s neck with Shocking Liquid Pearls. Add a dab of Black Enamel Accents to the eye of the dinosaur.

Step 11: To reveal the gift, simply pull up on the tag and bow. No need to even untie.

Enjoy!


