


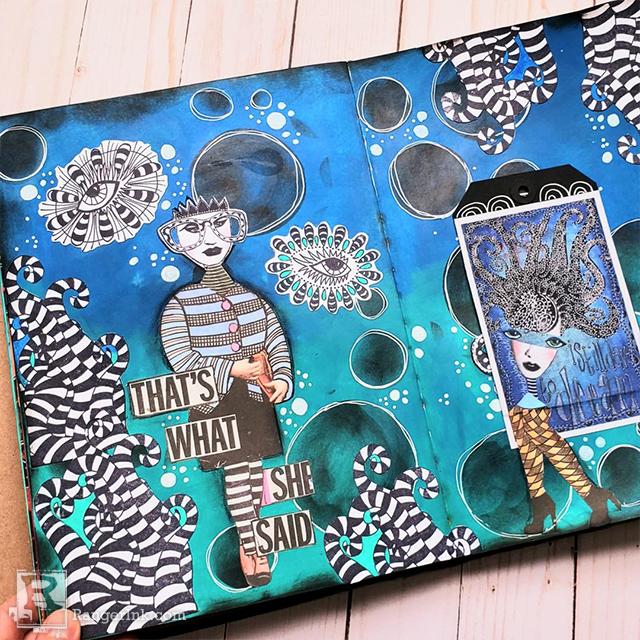
Take your mixed media to the next level with dimension and layers with this tutorial by Megan Whisner Quinlan. Create a turquoise and black themed spread in a Dylusions Creative Journal with added elements such as Dylusions Adhesive Canvas and textures from stencils.
Canvas Flap Journal Page by Megan Whisner Quinlan
- Materials
- Instructions
Scissors
Instructions
There are so many options when using the Dylusions Collage line for your art journaling. The stamps and the bold black and white designs leave you open to really play in a monochromatic color scheme. In this project, we play with black and white stripes and the versatile Dylusions Printed Adhesive Canvas Images. Follow along to find out how to create this fun page to your journal pages.

Step 1: Using a Mini Ink Blending Tool with Foam, blend London Blue paint into the top half of your page and Polished Jade into the bottom half of the page to create an ocean-like background. However, you could always choose 2 different complimentary colors to create a different background effect.

Step 2: Stencil some circles onto your background by lightly blending through the stencil in random spaces onto your background with Black Marble paint. The goal is to create a suggestion of bubbles, and not to make them too bold.

Step 3: Stamp 2 pages worth of Stripy Curlicues on white cardstock with Jet Black Archival Ink, and cut out.

Step 4: Stamp the rest of the 3 stamp sets (Survivor, Black Sheep, and Foliage Fillers) onto white card stock and cut out.

Step 5: Find some fun bits to create a main focal character for your page from the Dylusions Collage Sheets. This is where you can really play and set the tone for your page!

Step 6: Peel back almost all of your backing from your Printed Canvas, leaving about ½ an inch, and stick onto your Black #10 Tag. Trim the bottom of your tag, so that the ½ inch of canvas will hang off the edge. This will allow you to attach your tag to the page.

Step 7: Place your tag on the opposite page from your focal image and stick the front side down. You will now have a hinged flap. Open your flap and glue an image from the Survivor stamp set halfway on your page and over the tag. This will add a little extra surprise when you open your flap!

Step 8: (Optional) Here we added some legs from the Collage Sheets to the bottom of the tag to create another focal character.

Step 9: Now is the time to glue down all of the images onto your page. It’s a good idea to audition your focal images first and then lay out your other images around the page. Clusters look better and make the piece look more cohesive. Once you like your lay out, glue everything to the page with the Creative Dyary Glue Stick. Lastly, have fun with some doodling in white paint pen to really add to your page. Outlining the circles and adding more bubles can really brighten up your spread and pull it toghether.

Step 10: Lastly, it is fun to finish off your page with some doodles in a white paint pen. This can really pull your spread together.

Once you are done, you will really have a great page to enjoy that is bright and colorful, and with a secret flap!
 Hello! My name is Megan Whisner Quinlan. I have been an art journaling and book binding for about 20 years. However I took a 10-year break from paper arts when I had my first 2 children. About 5 years ago, I came back into journaling after some big life changes, including 2 more children. Journaling had always been a part of my life, especially to work things out in life on paper. When I first started out, I really only focused on making books by hand and some basic collage and stamping. I was intimidated by the amazing art journalers out there who had elaborate mixed media spreads in their journals. But when I came back to journaling after such a long break, I decided that I was going to really push myself to learn all the techniques I had been too afraid to try. Painting and drawing have really allowed me to find so much joy in my creative process, and I now almost exclusively create mixed media every day. I feel excited to have joined the art journaling community and you can find me on Instagram @Megan_Whisner_Quinlan.
Related Posts

"My Cup of Care" Journal Page with Dylusions Pastel Paints by Miranda van den Bosch
Read More

Tim Holtz Distress® Micro Glaze Embossing Resist by Tami Bastiaans
Create gorgeous embossed backgrounds with the Micro Glaze Embossing Resist technique! ✨ Tami Bastiaans pairs Tim Holtz Distress® Micro...
Read MoreDrawer Title
- Choosing a selection results in a full page refresh.