


by Audrey Pettit
Crazy Dog Matchbook Valentines by Audrey Pettit
- Materials
- Instructions
- Ranger Manila Cardstock
- Tim Holtz® Distress Watercolor Cardstock
- Tim Holtz Distress® Mixed Media Heavystock
- Archival Ink™ #0 Pads ( Jet Black roduct)
- Tim Holtz® Distress Ink Pads : Tattered Rose, Spun Sugar, Victorian Velvet, Wild Honey, Antique Linen, Brushed Corduroy, Pumice Stone, Black Soot
- Tim Holtz® Distress Markers : Black Soot
- Tim Holtz® Distress Crayon Kits : Set #3
- Tim Holtz® Distress Collage Mediums : Vintage, Crazing
- Ranger Glossy Accents™
- Tim Holtz® Distress Sprayer
- Ranger Mini Blending Tool
- Ranger Heat it™ Craft Tool
- Ranger Non-Stick Craft Sheet™
- Ranger Artist Brush Set
- Ranger Paper Creasers
- Tim Holtz Sizzix Zig Zag Embossing Folder
- Stamper’s Anonymous Mini Crazy Cats & Dogs Cling Stamp Set
- Stamper’s Anonymous Crazy Talk Cling Stamp Set
- Tim Holtz Sizzix Mini Crazy Cats & Dogs Framelits Die Set
- Tim Holtz Sizzix Heartfelt Bigz Die
- Idea-ology Tiny Attacher
- Idea-ology Jute String
- Sanding Tool
Instructions

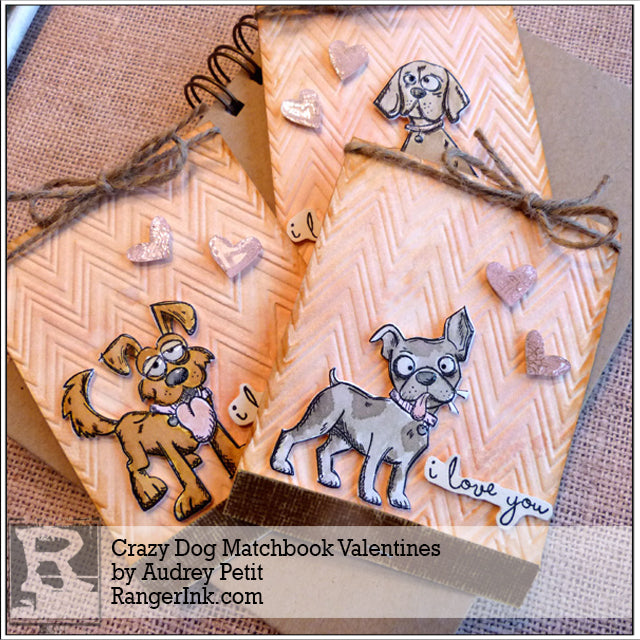
Still like to pass out Valentines to those you near and dear? Then check out these sweet and silly Crazy Dogs matchbook style Valentines cards you can make yourself in no time at all. I absolutely love Tim Holtz’s line of Crazy critters, and with cats, dogs, and birds to choose from, you have tons of fun options for notecards for all the animal lovers in your life.

These matchbook style cards add a fun interactive element, very reminiscent of those fold-and-seal boxed Valentines cards you may have had as a child. Simply tuck and un-tuck the front flap to open and close. The simple staple at the bottom is all you need to keep them sealed. Super easy and so fun.
Let’s take a closer look.

Step 1: For each Valentine, cut a 3 x 8.5 piece of Distress Heavystock cardstock. Using a scoring board or bone folder, score the long side at 4” and 8”. Fold along the crease lines, creating a top folding card with a thin bottom flap and folds up and over the front.

Step 2: Dab Tattered Rose, Spun Sugar, and Brushed Corduroy Distress Ink randomly onto a non-stick craft mat. Spritz the inks liberally with water using the Distress Sprayer. Press the front of the cards down into the ink mixture. Dry the inks with a heat tool, or allow them to dry naturally. Repeat the process if you wish to intensify the colors.

Step 3: Insert the front card panel into the Zig Zag embossing folder, and run the card through your die cutting machine.

Step 4: Apply Spun Sugar Distress Ink to the raised embossed areas using a mini ink blending tool. Apply Brushed Corduroy ink to the edges of each card.

Step 5: Rub a bit of Vintage Distress Collage Medium onto the edges of the cards using the tip of your finger. Set the cards aside and allow them to dry completely.

Step 6: Cut .5” strips of brown Distress Cardstock. Lightly sand the paper, and then adhere them to the bottom flaps. Trim off the excess from the sides. Fold the flaps up, and place a Tiny Attacher staple along the bottom edge. Note: * You may need to trim off about a .25” from the bottom of the front card panel so that it will lay flat once tucked under the bottom stapled flap.

Step 7: Stamp the Mini Crazy Dogs onto watercolor paper using Jet Black Archival Ink.

Step 8: Watercolor the images using Distress Inks. To color with your ink pads, simply press them onto your non-stick craft sheet, mix them with a bit of water, and pick up the color using a wet paintbrush. Allow the ink to dry. Add Glossy Accents to eyes, noses, and dog tags. Set aside to dry. Die cut the images using the matching Crazy Dogs Framelits dies.

Step 9: Stamp a Valentine sentiment from the Crazy Talk stamp set inside the card using Jet Black Archival Ink. Stamp the dog images again onto the inside, as well.

Step 10: Adhere die cut dogs onto the front of the cards using foam adhesive. Stamp sentiment onto watercolor cardstock using Jet Black Archival Ink. Trim out the sentiments by hand, and adhere next to the dogs using foam adhesive. Tie natural jute string around the top of the card front and tie into a simple bow.

Step 11: Ink a piece of watercolor cardstock with Victorian Velvet Distress Ink using a mini ink blending tool.

Step 12: Die cut the three smallest hearts from the Heartfelt Bigz Die from the inked watercolor paper. You will need two hearts for each card. Apply Crazing Distress Collage Medium to each heart die cut, and set aside to dry.

Step 13: Apply Vintage Photo Distress Crayon to the heart die cuts, and smooth the pigment into the crazing cracks using the tip of your finger. Wipe away any excess crayon pigment. Cover the hearts with Glossy Accents, and allow them to dry completely. Add hearts to the card fronts using foam adhesive.
Enjoy!

Related Posts

"My Cup of Care" Journal Page with Dylusions Pastel Paints by Miranda van den Bosch
Read More

Tim Holtz Distress® Micro Glaze Embossing Resist by Tami Bastiaans
Create gorgeous embossed backgrounds with the Micro Glaze Embossing Resist technique! ✨ Tami Bastiaans pairs Tim Holtz Distress® Micro...
Read MoreDrawer Title
- Choosing a selection results in a full page refresh.