


Of course artist tools have their special purpose in the studio or craft room, but did you know you could use them for decoration as well? Follow along with this fun tutorial where Renae Davis shares how she adds life to an old paintbrush to create and inspiring piece for display.
Creative Art Brushes by Renae Davis
- Materials
- Instructions
Small flat paint brush
Ruler
Pencil
Instructions
If you’ve ever been to a flea market or thrift store, you may have seen old paint brushes for sale. You may even have some around the house or out in the garage from old painting projects. Even if you don’t have any- you can easily find some new bristles to play with from the dollar store. Grab a brush, old or new, and let’s give it a brighter, definitely more colorful life than hanging in a barn.

Step 1: The amount of color bands added depends on the number of colors you want, the size of the color bands, and the size of the brush handle. Measure the handle of the brush and mark the lines where you want the bands. For this 5” handle I did bands 1/2” thick.

Step 2: Using a pencil, draw the bands around both sides of the brush handle. This will be painted over later so don’t worry about how dark the lines might be.

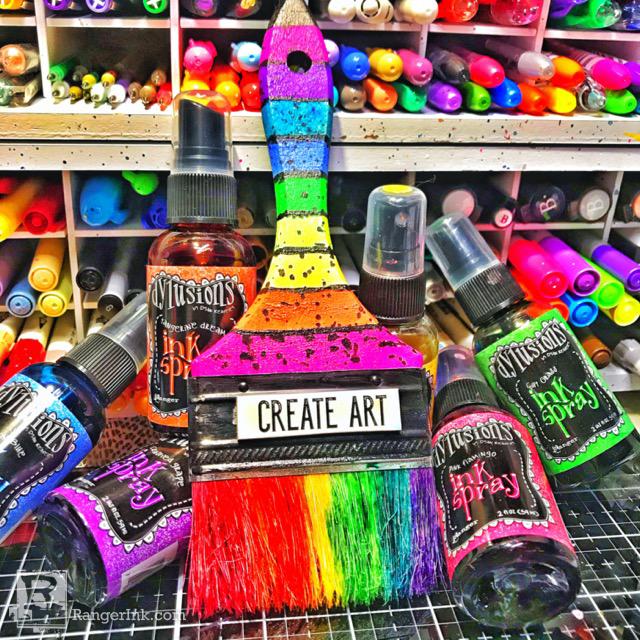
Step 3: Choose your colors of acrylic paint! This particular rainbow sequence includes Bubblegum Pink, Tangerine Dream, Lemon Zest, Fresh Lime, Cut Grass, Periwinkle Blue, London Blue, Funky Fuchsia.

Step 4: Using Black Marble acrylic, paint thin black lines between each different color and the end of the brush tip (if not painted already). I also painted the metal clasp of the brush with Black Marble to tie in the contrast. Use any left over black paint diluted with water to add splatters all over the brush.

Step 5: Coordinate the colors of your bristles to the brush handle by painting the bristles with Dylusions Ink Spray. If doing a traditional rainbow, begin painting with Lemon Zest Yellow with a small paint brush in the middle of the bristles. Don’t forget the reverse side of the brush as well as the ends!
NOTE: If the brush that you are painting doesn’t absorb the ink or the bristles are clogged with layers of paint or medium from previous projects, feel free to paint the bristles with acrylic paint. The ink spray just provides a dyed, worn, and washed out look so the bristles are more distinct.

Step 6: Finish painting the rest of the bristles with the coordinating colors while overlapping each color ever so slightly. Colors used here are: Pink Flamingo, Tangerine Dream, Lemon Zest, Cut Grass, London Blue, Crushed Grape.

Step 7: The nature of painting the bristles with ink spray is not permanent. To seal the ink and make the colors pop even more, seal the bristles (the whole brush if you want) with Tim Holtz Distress Resist Spray.
If you haven’t used this product before, it is a very sticky product that can get everywhere you don’t want if you’re not careful. Place the brush in a shallow box and spray generously over the front and back of the bristles. Hang up the brush to dry for a few minutes before continuing. Don’t forget to completely rinse out the Distress Resist sprayer unit as soon as possible.

You now have a funky brush to hang in your studio, your holiday tree or even to chill in your marker cup on your desk. Add some quote chips, collage, yarn, beads- whatever your creative heart desires. This an easy project you can give as gifts or hoard all to yourself… who wouldn’t want to right? Add some googly eyes and you might have a new best friend.
 Renae Davis.
Art Journaler. Photographer. Daydreamer.
Art journaling is my jam. I started out Bible Journaling a couple of years ago that has now evolved into 20+ active luscious art journals of all sorts, sizes, and themes. I love making my own recycled art supplies and using every bit of scrap paper and pigment that I can get my inky hands on. You can visit Renae's website at www.splendiferossity.com or follow her on Instagram @redhedtm and on YouTube.
Related Posts

Painting with Liquid Pearls by Miriam Prantner
A little Liquid Pearls magic goes a long way! Miriam Prantner keeps this card simple and stunning by painting...
Read More
"My Cup of Care" Journal Page with Dylusions Pastel Paints by Miranda van den Bosch
Read More
Drawer Title
- Choosing a selection results in a full page refresh.