


by Bobbi Smith
Creativity Art Journal Layout by Bobbi Smith
- Materials
- Instructions
- Ranger Sticky-Back Canvas
- Ranger Craft Tags: #5 Manila, #8 Kraft
- Ranger Watercolor Paper
- Dylusions Small Creative Journal
- Tim Holtz Distress Ink Pad: Chipped Sapphire
- Tim Holtz Distress Spray Stain: Cracked Pistachio
- Archival Ink: Jet Black
- Ranger Texture Paste: Transparent, Matte
- Ranger Multi-Medium: Matte
- Tim Holtz Distress® Micro Glaze™
- Dina Wakley Media Brushes
- Ranger Paper Creasers
- Ranger Mister
- Ranger Heat it™ Craft Tool
- Ranger Non-Stick Craft Sheet™
- Tim Holtz Stampers Anonymous Stamps: Papillon CMS106, Nature Walk CMS181
- Tim Holtz Stampers Anonymous Layering Stencils: Bubble THS002
- Tim Holtz Idea-ology Pocket Cards, Small Talk, Big Chat, Symphony Tissue Tape, Passport Design Tape
- Tim Holtz Sizzix Alterations: Feather Duo, Butterfly Duo, Shape Strips
Instructions
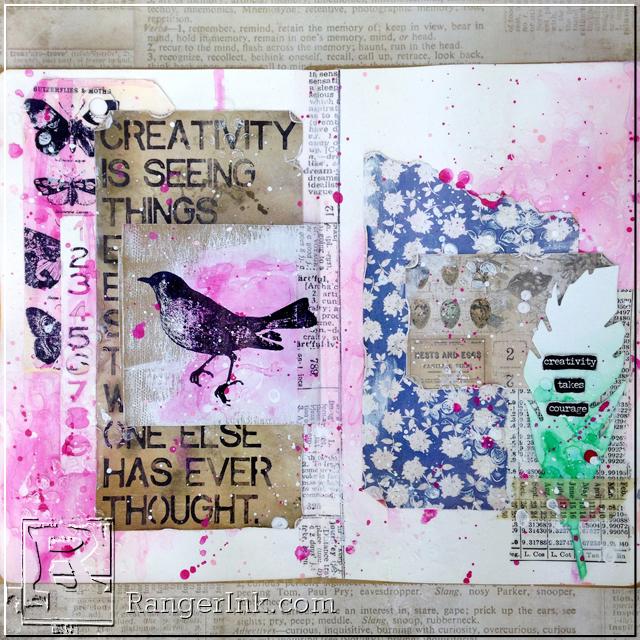
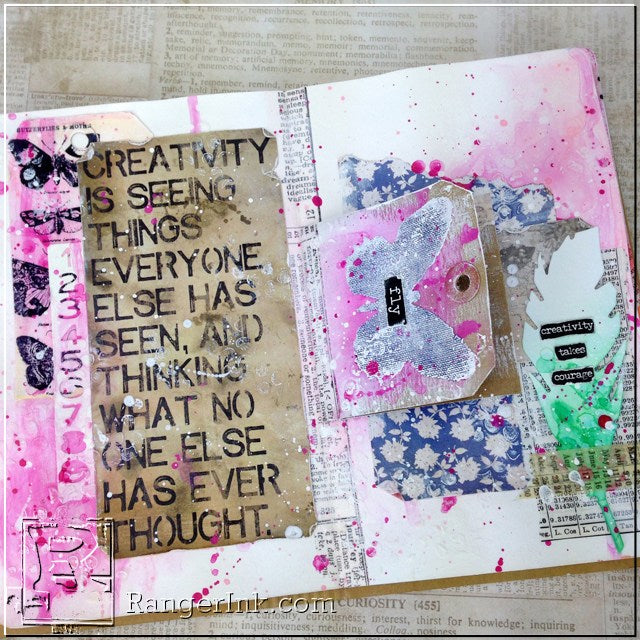 Hi everyone! Bobbi here, and I’ m super excited to be with you here at the Ranger Blog today! I will be showing you how to create a fun art journal page featuring Ranger’s Transparent Matte Texture Paste on several different surfaces. I made an art journal layout in my small Dylusions Creative Journal and created an attached insert tag!
 Spread a thin coat of Dina Wakley Media Gesso on both pages of the small Dylusions Creative Journal and let air dry. Then
 Spread a thin coat of Dina Wakley Media Gesso on a #8 Ranger Kraft tag (front and back) and let air dry.
 Score the kraft tag down the center and fold. Attach the folded kraft tag to center of page/spine with Tim Holtz tissue tape, applying the tape to only the left side. Take a craft knife and cut a slit in top and bottom of tag, so that it’s moveable. Now bend tag to the left and apply a small strip of tissue tape from top of kraft tag to bottom and match up lines with existing tape. Cut off excess tape that hanges over tag with craft knife or scissors. Open tag and apply a small strip of tissue tape to center to give a finished look and cut off any excess tape with scissors or craft knife.
 Apply some Spun Sugar Distress Ink to Journal layout, then spray a little water to get the color moving. Then dry with heat a tool. Repeat this step until you have created a few layers. Add some splatters with Spun Sugar Distress Ink and a little water on a non-stick craft mat using a paint brush and flick onto page then dry with heat tool.
 Now apply Picked Raspberries Distress Ink to Journal layout (a little goes a long way), then spray with water to get the color moving. Then dry with a heat tool. Add some splatters with this color as well and dry with a heat tool.
 Spread a thin layer of Dina Wakley Media Gesso onto a #5 Manila Tag with paint brush, then let tag air dry. After dry apply some Spun Sugar Distress Paint to tag and spritz with water to get color moving thin dry with heat tool. Apply splatters to tag with leftover paint on craft mat using a brush, then dry with heat tool. Repeat this step using Picked Raspberry Distress Paint ( a little goes a long way) then dry with heat tool. Stamp the butterflies from the Tim Holtz Papillon Stamp Set using Jet Black Archival Ink, onto the left hand side of the manila tag.
 Run the “vertical numbers” Thinlits – Shape Strip die thru the Vagabond using Ranger Mixed Media Cardstock. I used the Sizzix Magnetic Platform and the Precision Base Plate, it works like magic. Save the wonderful little numbers that have been cut out to use on another project.
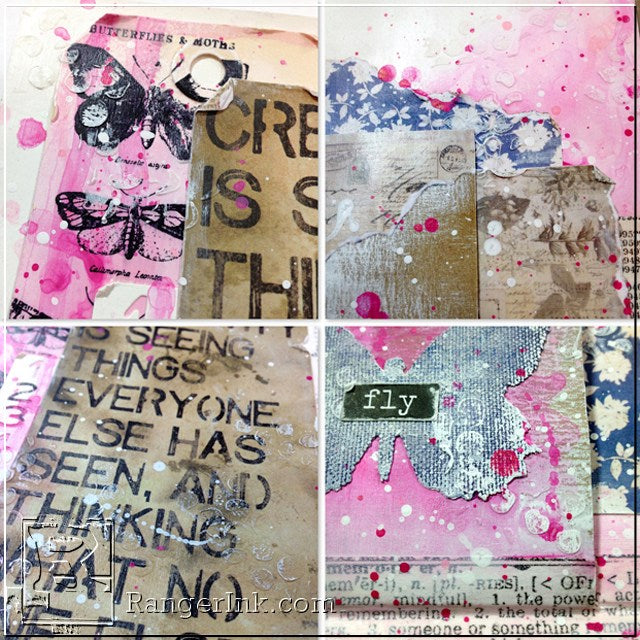
I selected a couple of the large pocket cards from Tim Holtz’s Pocket Cards set, the “Creativity phrase” and the “Blue/White Flowers Card”. I also selected one of the smallest cards, the “Eggs/Foliage Collage Card” from the set. Take the blue/white flowered pocket card and rip off the top portion at an angle ( you might want to flip over the pocket card, they are double-sided and see what portion of the card you want to use for the inside of your kraft tag). About an inch and a half of the top portion and save it for the inside of the kraft tag. Rip a small piece of vintage book paper about 4 1/4 inches long and 1 3/4 inches wide, to use as part of your collage on the right side of your layout. Distress all the paper edges with the bone folder.
Adhere all paper pieces to journal layout with Ranger Multi-Media Matte and a paintbrush, including the ripped portion of the pocket card on the inside and the craft tag. Cut off excess paper hanging off the tag with scissors. Then apply and even coat of Ranger Multi-Media Matte to the entire top surface of art journal layout. Then dry with heat tool. This is really going to steal that surface, to be able to create more layering with inks and paints without bleeding on the paper.
 Taking the Bubbles Tim Holtz stencil lay it flat on journal page. Using a palette knife, start at the top and swipe Transparent Matte Texture Paste down over the stencil and skip several areas so that it’s random and not solid images. Return unused paste to the jar. Immediately lift the stencil off of the journal and clean the paste out of the stencil. Allow pasted journal layout to air dry. Do this to both the left and the right side of your journal layout. After texture paste is completely dry, apply Dina Wakley Media Gesso lightly to raised bubble portions of texture paste. I just used my finger for application and a little goes a long way.
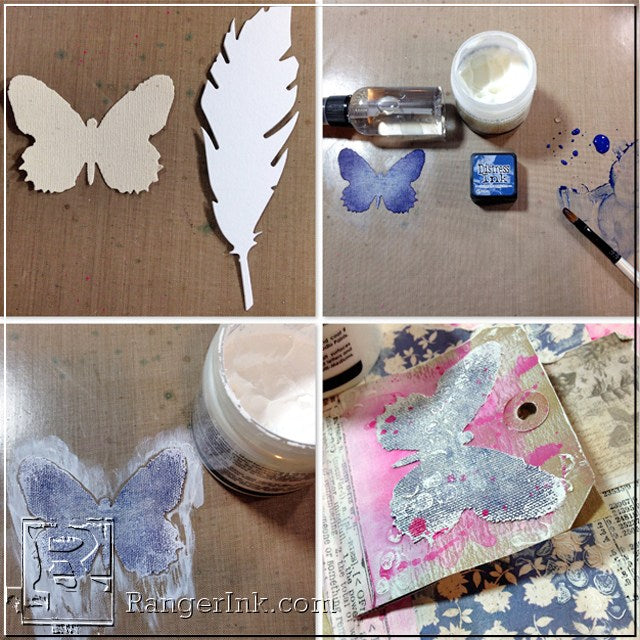 Die cut one of the butterflies using Ranger Natural Sticky Back Canvas and Tim Holtz Butterfly Duo Die running thru the Vagabond. Take backing off of canvas and apply sticky back of butterfly to your ranger nonstick craft mat. Apply a small dollop of Ranger Multi-Media Matte to nonstick craft mat ( about the size of a nickel).
Then apply a couple of drops from your reinker of Chipped Sapphire Distress Ink or swipe your Chipped Sapphire Ink Pad next to the Multi-Medium on the non stick craft mat ( either one would work well ). Mix ink and medium with a paintbrush and a couple of squirts of water from your Mister, until completely blended with a medium body paint consistency. This mixture is going to be extremely transparent with a paint consistency.
Paint your canvas butterfly with a paintbrush concentrating more on wings and less on the body using your Chipped Sapphire mixture. Then dry with a heat tool. Using a paint brush take Dina Wakley Media Gesso and very sparingly apply a thin layer to butterfly concentrating more on outer edges of wings. Dry with heat tool.
Apply Picked Raspberry Distress Ink to front of tag using and a little water to move the color around and dry with a heat tool, now do the same steps to the back of the kraft tag. Lift butterfly from nonstick craft mat and apply to front of kraft tag centered horizontally. Then taking the Bubbles Tim Holtz stencil lay it flat on butterfly/kraft tag use a palette knife, start at the top and swipe Transparent Matte Texture Paste down over the stencil and skip several areas so that it’s random and not solid images. Return unused paste to the jar. Immediately lift the stencil off of the canvas butterfly/kraft tag and clean the paste out of the stencil. Allow pasted tag to air dry. After texture paste is completely dry, apply Dina Wakley Media Gesso lightly to raised bubble portions of texture paste. I just used my finger for application and a little goes a long way.
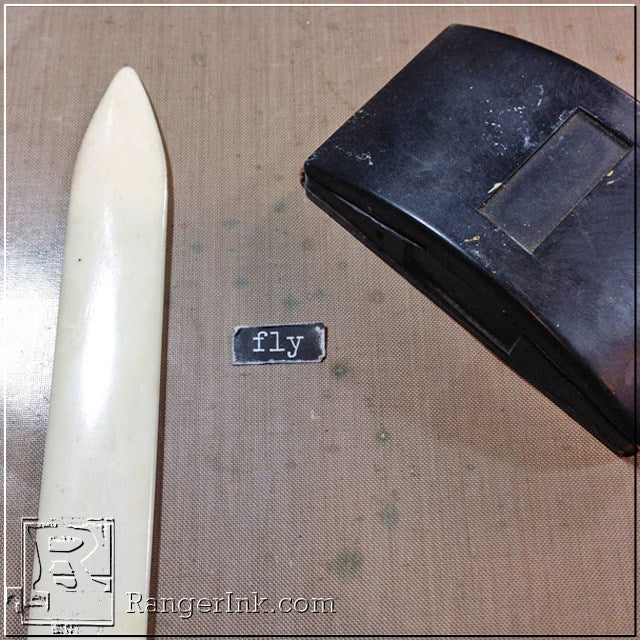 Select the black wording “fly” from the Big Chat sticker collection. Sand edges with sanding grip and distress edges with bone folder. (Be sure to never sand directly on your craft sheet as it will damage the surface.)
 Apply the sticker to the center of canvas butterfly on kraft tag.
 Apply more fun splatters to entire layout with watered down Picked Raspberry Distress Paint and dry with heat tool. Then stamp the leaf image on the inside left page of craft tag using Jet Black Archival Ink and the bird on the back of kraft tag using Jet Black Archival Ink. Then dry with heat tool if needed. Both images are from Tim Holtz’s Nature Walk Stamp Set.
 Die cut a piece of Ranger Watercolor Paper using the Tim Holtz Feather Duo die. Lightly mist feather with water. Mist puddles of Tim Holtz Cracked Pistachio Distress Spray Stain onto the bottom half of feather. Mist again lightly with water to get the colors to move and blend (the more water you add, the less intense the color will be). To achieve the ombre look, tilt the top of the feather so that color pools to the lower half and dry with a heat tool. Now you have all the lovely color still left on your nonstick craft sheet.
To add more distress to the feather, pick up droplets of color off the nonstick craft sheet with watercolor cardstock feather blotting to picking up the color (not swiping) then drying with heat tool.
 Flick water droplets onto feather surface and dry with heat tool, this will achieve an even more distressed look. We know that Distress Ink reacts with moisture, so we want to seal that surface. Apply Tim Holtz Distress Micro Glaze using your finger (a little goes a long way) buff on (like wax) to feathers surface. It will feel slick and your finger will glide across the surface when finished.
Now that we’ve added the Distress Micro Glaze to the feather we can add another layer of paint. Apply splatters of Picked Raspberry Distress Paint to feather. Allow to air dry (DO NOT APPLY HEAT).
Now we have that gorgeous vibrant pink on top of that great pistachio green, without the colors reacting and getting muddy! If you were to apply direct heat to that waxed surface the waxy glaze would soak and disintegrate into the paper. After feather has completely air dried, attach to vintage book paper with Tim Holtz Passport Design Tape. Apply more fun white splatters using Dina Wakley Media Gesso thinned down with a little water. Use heat tool to dry, avoiding feather.
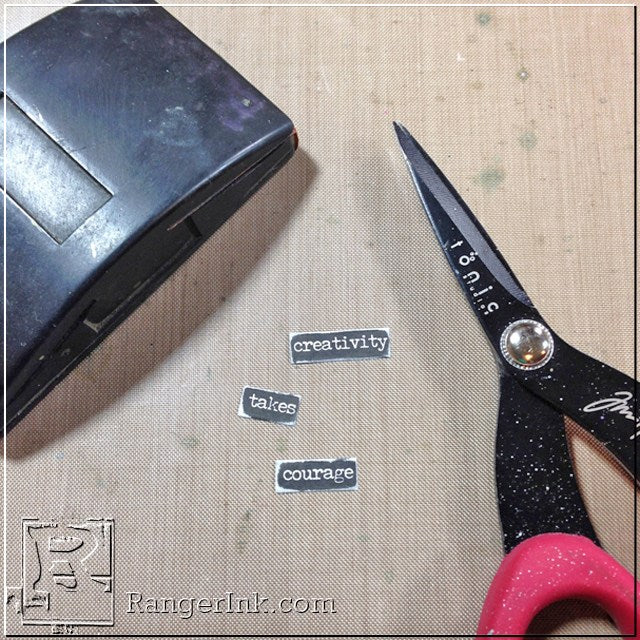 Select the black phrase “creativity takes courage” from the Small Talk sticker collection. Cut the words into 3 sections. Sand edges with sanding grip and distress edges with bone folder. (Be sure to never sand directly on your craft sheet as it will damage the surface.)
 Adhere the stickers to the center of feather.
 Apply additional paint splatters to layout, if desired and dry with heat tool. I have purposely left some blank areas on this layout spread for some possible journaling. The Ranger Fude Ball works wonderfuly for writting in your journal! I hope you have enjoyed time in my art journal today and I encourage you to give it a try!


Related Posts

"My Cup of Care" Journal Page with Dylusions Pastel Paints by Miranda van den Bosch
Read More

Tim Holtz Distress® Micro Glaze Embossing Resist by Tami Bastiaans
Create gorgeous embossed backgrounds with the Micro Glaze Embossing Resist technique! ✨ Tami Bastiaans pairs Tim Holtz Distress® Micro...
Read MoreDrawer Title
- Choosing a selection results in a full page refresh.