


Follow along as Megan Whisner Quinlan shows you how to create these warm and soft-hued positive affirmation tags featuring Dina Wakley MEdia products.
Dina Wakley Positive Affirmation Tags by Megan Whisner Quinlan
- Materials
- Instructions
Other:
Ribbon
Instructions
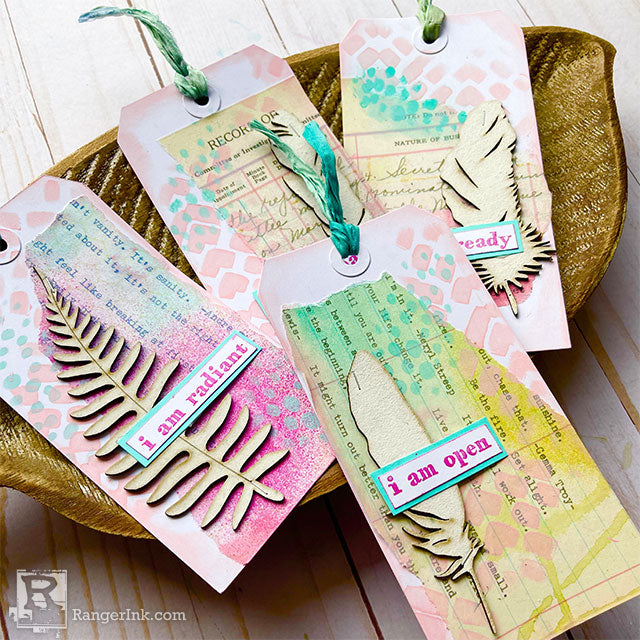
Spring is in the air and so are the colors for this latest tag project with some of the latest Dina Wakley MEdia products. Follow along to see how to create these warm and soft-hued tags.

Step 1: Spray some acrylic sprays onto your ledger paper and immediately add some spritzes of water to help mix the colors and make them more fluid. Hold your paper up and let the drizzle begin. Keep turning your page until the drips run into each other. Set aside and allow to dry completely.

Step 2: Find some interesting spots on your dried ledger sheets and tear into some pieces to add to your tags. Here you will have plenty left over for other projects, always a good thing!

Step 3: Start Gluing your torn pieces onto your tags with Ultra Thick Gel Medium.

Step 4: Stencil some backgrounds onto your tags using the Mosaic Cobblestone and Things That Grow stencils. Here, Carnation and Turquoise were used to add to the subtle hues of the project.

Step 5: Stamp phrases from I Am set onto white cardstock with some Picked Raspberry Archival Ink. Cut out and edge the phrase again with your stamp pad for some depth. Optional: Glue to another color of cardstock for an additional pop of color.

Step 6: Glue everything down with Ultra Thick Gel Medium. For a final touch add some ribbon to the top of your tag.
 My name is Megan Whisner Quinlan. I have been a mixed media maker and book binder for 20 years. I love to experiment and try as many techniques as possible. I live with my family in New Jersey, not too far from Ranger Ink. You can find me on Instagram, on Youtube, and as an Instructor for @fodder.school. I would love to see what you make, if I have inspired you today, tag me!
Related Posts

Stickles & Embossing Powder Christmas Card by Miriam Prantner
This adorable snowman card by Miriam Prantner is packed with festive charm! Created with the Tim Holtz Sizzix Winston...
Read More
Dylusions DIY Christmas Gift Wrap & Tags by Jess Peters
Dress up your holiday gifts with this Dylusions DIY Christmas Gift Wrap & Tags by Jess Peters! Using Dylusions...
Read More