


Celebrate the season with this autumn themed card by Cheiron Brandon. In this tutorial, Cheiron uses vibrant colors from Tim Holtz Distress® Spray Stains and coordinating Embossing Glazes to create a leave themed card perfect for this time of year.

Distress Fall Leaves by Cheiron Brandon
- Materials
- Instructions
Tim Holtz Distress® Ink Pads: Broken China, Fossilized Amber, Vintage Photo
Tim Holtz Distress® Oxides: Crackling Campfire, Peeled Paint
Tim Holtz Distress® Spray Stains: Broken China, Fossilized Amber, Crackling Campfire, Peeled Paint, Vintage Photo
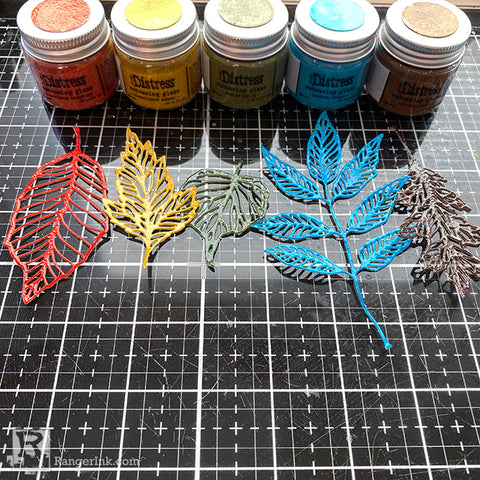
Tim Holtz Distress® Embossing Glaze: Broken China, Fossilized Amber, Crackling Campfire, Peeled Paint, Vintage Photo
Tim Holtz Distress® Watercolor Cardstock
Tim Holtz Distress® Sprayer
Ranger Heat It™ Craft Tool
Tim Holtz® Alterations by Sizzix Dies: Skeleton Leaves
Tim Holtz® idea-ology: Quote Chips, Splat Box
Tim Holtz® by Stampers Anonymous Tiny Text Stamps
Tim Holtz® by Tonic Studios Glass Media Mat
Tim Holtz Distress® Oxides: Crackling Campfire, Peeled Paint
Tim Holtz Distress® Spray Stains: Broken China, Fossilized Amber, Crackling Campfire, Peeled Paint, Vintage Photo
Tim Holtz Distress® Embossing Glaze: Broken China, Fossilized Amber, Crackling Campfire, Peeled Paint, Vintage Photo
Tim Holtz Distress® Watercolor Cardstock
Tim Holtz Distress® Sprayer
Ranger Heat It™ Craft Tool
Tim Holtz® Alterations by Sizzix Dies: Skeleton Leaves
Tim Holtz® idea-ology: Quote Chips, Splat Box
Tim Holtz® by Stampers Anonymous Tiny Text Stamps
Tim Holtz® by Tonic Studios Glass Media Mat
Instructions
Hi there, crafty friends, it’s Cheiron Brandon here with a card to celebrate fall. I love fall colors and have been following along the demos over on Tim Holtz Facebook page each Saturday. I have been experimenting with some variations on a traditional fall palette, (especially with adding a bit of blue) to create a fun layered fall card.
Today, we will create a fun fall card with an inky background and a cluster of shiny fall leaves.

Step 1: The first thing we will do is create the leaves using the Tim Holtz Sizzix Skeleton Leaves Dies and Distress Embossing Glazes in Broken China, Fossilized Amber, Crackling Campfire, Peeled Paint, Vintage Photo.

Step 2: I like to give them a first layer of ink before applying the Distress Embossing Glaze. Take small sheets of Distress Watercolor cardstock and cut them to fit the leaves. Then spray them with Distress Spray Stains in a Splat Box in the same colors of Distress Embossing Glaze used in Step 1. (Broken China, Fossilized Amber, Crackling Campfire, Peeled Paint, Vintage Photo)

Step 3: Once all five of your pieces are sprayed with Distress Spray Stain, you can use a Distress Sprayer filled with water to move the color around a bit before drying with a Ranger Heat Tool. Dry the pieces until they are thoroughly dry.

Step 4: Take the dry pieces and cut out the leaves with the Skeleton Leaves dies.

Step 5: Press the embossing ink pad onto each leaf and emboss each one with the corresponding color of Distress Embossing Glaze.
Step 6: Set aside the leaves you create, we will use these as the embellishment on our card later.

Step 7: Now to create the inky panel for the background of our card, use a combination of Distress Inks and Distress Oxides. I used Distress Inks in Broken China, Fossilized Amber, Vintage Photo and Distress Oxides in Crackling Campfire and Peeled Paint.

Step 8: Press the inks down into the palette area of the glass mat and spray them with water using a Distress Sprayer. Swipe and dip the paper panel into the inks, creating layers, drying between each layer. I did about 4 layers, but you can do more (or fewer!).

Step 9: Using Vintage Photo Distress Archival Ink, ink up the Tiny Text stamp. To achieve the look I ended up with, lay the stamp down and ink it up while flat, leaving little spots here and there uninked to get a fun background where all the words are not showing. Press the watercolor panel onto the stamp and lift instead of bringing the stamp to the panel.

Step 10: Take a paintbrush and use it to pick up some of the leftover watery ink from your mat and spatter it onto your stamped panel. This should not affect the stamped words, as we stamped them in Archival Ink.

Step 11: Now it’s time for the assembly of the card. Add a brown mat to the word panel, and adhere it to the colorful ink panel. Add a cluster of leaves, and in the end I decided to only use 3, but will use the others on another card or in my art journal. To finish the card, I added a Tim Holtz Quote Chip.

I hope you enjoyed this card and hope you will try to make some of these fun glossy leaves on your own. I think they would be great for other seasonal projects too!
 My name is Cheiron Brandon. I live in Bayonne, New Jersey with my husband and our two adorable rescue pups, Big Boy and Oreo. I work in the financial district by day and love to play with stamps, ink and paint at night in my studio. I teach monthly card making and mixed media classes in NYC. You can find me on my blog at www.cheironbrandon.typepad.com and posting more often @cheiron on Instagram!
Related Posts

"My Cup of Care" Journal Page with Dylusions Pastel Paints by Miranda van den Bosch
Read More

Tim Holtz Distress® Micro Glaze Embossing Resist by Tami Bastiaans
Create gorgeous embossed backgrounds with the Micro Glaze Embossing Resist technique! ✨ Tami Bastiaans pairs Tim Holtz Distress® Micro...
Read MoreDrawer Title
- Choosing a selection results in a full page refresh.