


Cheiron Brandon shows you how to make your own colored paper using Tim Holtz Distress® Paint and Dina Wakley Cotton Watercolor Paper to create this gorgeous friendship card that is exploding with color and excitement.
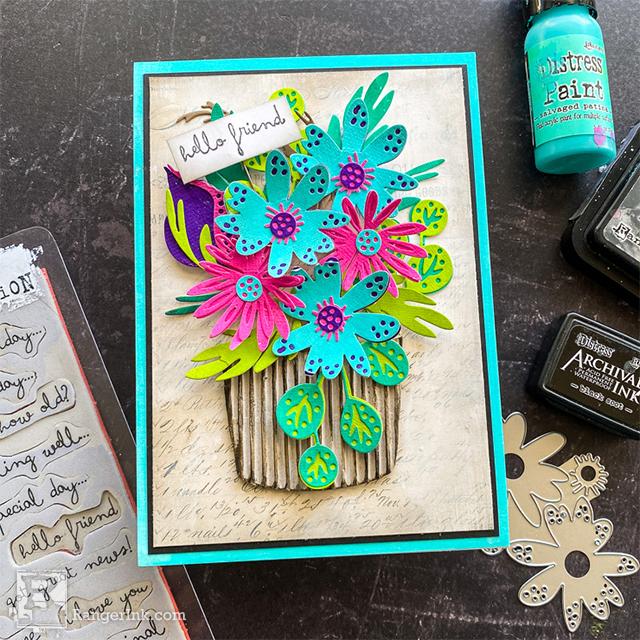
Distress Funky Floral Friendship Card by Cheiron Brandon
- Materials
- Instructions
Tim Holtz Distress® Paint: Salvaged Patina, Picked Raspberry, Wilted Violet, Lucky Clover, Twisted Citron, Picket Fence, Black Soot
Tim Holtz Distress® Ink Pad: Hickory Smoke
Tim Holtz Distress® Mini Archival Ink Kit #3: Black Soot
Dina Wakley MEdia Gesso: White
Dina Wakley Media Cotton Watercolor Paper
Tim Holtz Distress® Collage Medium: Matte
Ranger Adhesive Foam Tape White
Tim Holtz® Alterations by Sizzix: Funky Floral SAL664158
Tim Holtz® Alterations by Sizzix: Potted SAL664184
Tim Holtz® by Stampers Anonymous Stamps: Crazy Talk CMS236
Idea-ology Memo Pin
Idea-ology Backdrops Volume 1
Black Cardstock
Instructions
Hello, Crafty Friends! It’s Cheiron Brandon and I am here to share a card project tutorial with you today using the newest color in the Distress line, Salvaged Patina. Today, I have created a 5 x 7 card with a new favorite Salvaged Patina combo that is perfect for summer.

When I start working with a new color, I like to try out many different color combos with it, from traditional to more funky. For today’s card, I created my own painted papers to die cut the flowers for my card. I wanted to use a color combo I saw recently using bright summery colors. For the paper, I used Dina Wakley Media Watercolor paper, I love the fabric like feel of it and it will be easy to mold the flowers at the end to look more sculptural.

Step 1: Paint several pieces of Dina Wakley Media Watercolor Paper with Distress Paints in Picked Raspberry, Wilted Violet, Salvaged Patina, Lucky Clover and Twisted Citron and let dry.

Step 2: Cut out the flowers and leaves and arrange on your work surface so you are ready to build your piece. Glue the flowers and leaves that have layers together and let dry.

Step 3: Cut out the potted die from a piece of corrugated cardboard paper. Paint with Picket Fence Distress Paint and let dry. Once it is dry, ink the edges and the ridges with Black Soot Distress Paint using a Foam Blending Tool. I like the flat foam for this technique, so I don’t get paint in the recessed areas.

Step 4: Cut a piece of Idea-ology Backdrops Volume 1 paper to 4 ¾ x 6 ¾, then paint over parts of it with gesso to soften the background a bit. Once the gesso is dry, ink the edges with Hickory Smoke Distress Ink.

Step 5: Ink the florals and leaves with Hickory Smoke Distress Ink. Arrange the florals and leaves in and around the pot, using foam tape to add dimension.

Step 6: Create a painted paper for the 5 x 7 panel of the card. Paint about an inch border around the edge (as the rest will be covered up). Let dry or dry with a Heat Tool.

Step 7: Adhere the floral panel to a black mat, and the mat to the 5 X 7 paper. Then adhere the entire thing to a 5 x 7 card base.

Step 8: Stamp the sentiment from the Crazy Talk set onto a piece of white cardstock using Black Soot Distress Archival Ink. Ink the edges with Hickory Smoke Distress Ink.

Step 9: Create a ‘pin’ embellishment to insert into the floral arrangement you created by adhering an Idea-ology Memo Pin to the sentiment. Add Foam Tape to the back, and tuck the pin into the floral arrangement, preferably into the Foam Tape underneath one of the flowers.

 My name is Cheiron Brandon. I live in Bayonne, New Jersey with my husband and our two adorable rescue pups, Big Boy and Oreo. I work in the financial district by day and love to play with stamps, ink and paint at night in my studio. I teach monthly card making and mixed media classes in NYC. You can find me on my blog at www.cheironbrandon.typepad.com and posting more often @cheiron on Instagram!
Related Posts

"My Cup of Care" Journal Page with Dylusions Pastel Paints by Miranda van den Bosch
Read More

Tim Holtz Distress® Micro Glaze Embossing Resist by Tami Bastiaans
Create gorgeous embossed backgrounds with the Micro Glaze Embossing Resist technique! ✨ Tami Bastiaans pairs Tim Holtz Distress® Micro...
Read MoreDrawer Title
- Choosing a selection results in a full page refresh.