


Cheiron Brandon uses Distress Ink and Embossing Glazes to make this super easy, fabulous set of all occasion cards so you will always have extras on hand.

Distress® Embossing Glaze Bold Sayings Cards by Cheiron Brandon
- Materials
- Instructions
Tim Holtz Distress® Ink: Kitsch Flamingo, Fossilized Amber, Rusty Hinge, Prize Ribbon, Rustic Wilderness
Tim Holtz Distress® Embossing Glaze: Kitsch Flamingo, Fossilized Amber, Rusty Hinge, Prize Ribbon, Rustic Wilderness
Tim Holtz Distress® Watercolor Paper
Tim Holtz Distress® Sprayer
Ranger Emboss It Ink Pad Clear
Ranger Heat It™ Craft Tool
Ranger Adhesive Foam Tape White
Tim Holtz® Stampers Anonymous Cling Mount Stamp Floral Outline - CMS430
Tim Holtz® Stampers Anonymous Cling Mount StampStamp Bold Sayings - CMS433
Instructions
Hi there, Crafty Friends! It’s Cheiron Brandon here with another tutorial using Tim Holtz Distress products. Today I have pulled a favorite sentiment set from my stash, Bold Sayings. I decided that I wanted to use all of the sentiments in the set to build up my card stash, so I have a few extra cards on hand for all occasions. This set is super simple to create. I made mine in 5 different Distress colors combining Distress Ink and Distress Embossing Glaze on each card. You could make this project super simple by sticking with one color and even just one sentiment.

Step 1: First, gather your supplies including Distress Watercolor Paper, Distress Inks and Embossing Glazes in Kitsch Flamingo, Fossilized Amber, Rusty Hinge, Prize Ribbon, Rustic Wilderness, and the Bold Sayings and Floral Outline stamps.

Step 2: Cut 5 panels of Distress Watercolor Cardstock to 4 x 5 ¼ and stamp the flowers from the Floral Outline stamp onto each panel.

Step 3: Repeat the same process for each color. Alternate the flowers and the placement of the flowers on each card panel.

Step 4: Stamp a Bold Saying onto the card panel using Ranger Embossing Ink.

Step 5: Emboss the sentiment from Bold Sayings using a coordinating color of Distress Embossing Glaze.

Step 6: Repeat the same process for each color. Use a different sentiment and orientation for each card.
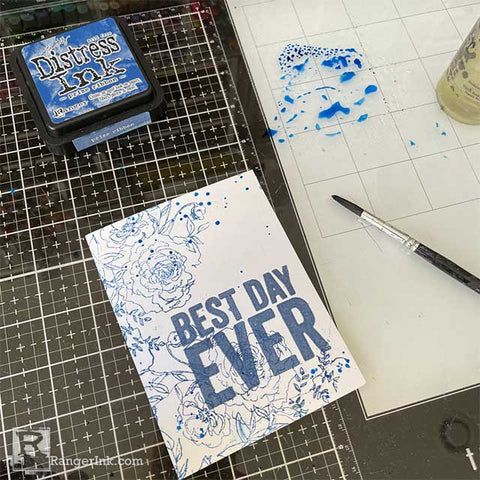
Step 7: You could leave the finished panel just like this, but I thought it needed a little something extra, so I took some Distress Ink, sprayed it with water and splattered it onto the card base (being careful to avoid going too close to the sentiment) and then dried the panel with a Heat Tool.

Step 8: Repeat this for all of the panels.

Step 9: Use foam adhesive to adhere each panel to a note card that measures 4 ¼ x 5 ½.
I hope you enjoyed this fun set of notecards, there are so many possibilities with these Bold Sayings stamps!
 My name is Cheiron Brandon. I live in Bayonne, New Jersey with my husband and our two adorable rescue pups, Big Boy and Oreo. I work in the financial district by day and love to play with stamps, ink and paint at night in my studio. I teach monthly card making and mixed media classes in NYC. You can find me on my blog at www.cheironbrandon.typepad.com and posting more often @cheiron on Instagram!
Related Posts

"My Cup of Care" Journal Page with Dylusions Pastel Paints by Miranda van den Bosch
Read More

Tim Holtz Distress® Micro Glaze Embossing Resist by Tami Bastiaans
Create gorgeous embossed backgrounds with the Micro Glaze Embossing Resist technique! ✨ Tami Bastiaans pairs Tim Holtz Distress® Micro...
Read MoreDrawer Title
- Choosing a selection results in a full page refresh.