


Create this shabby chic Valentine with Tim Holtz Distress Paints and Inks
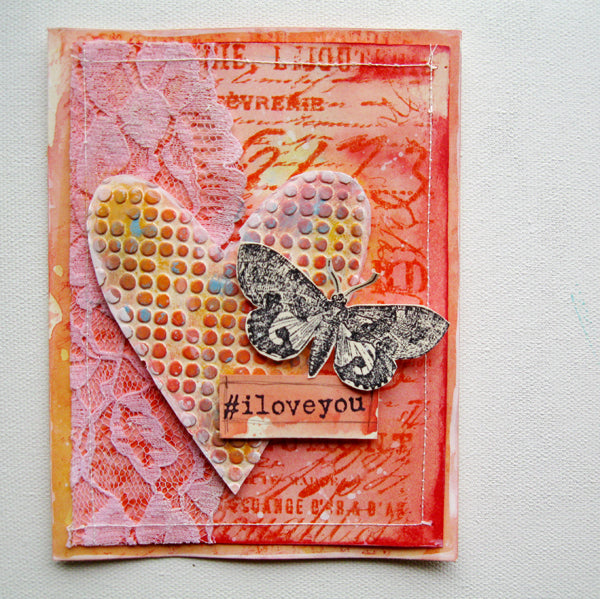
Distress Paint “I Love You” Valentine’s Day by Mou Saha
- Materials
- Instructions
- Archival Ink™ #0 Pads: Jet Black
- Ranger Ink Blending Tool & Foam
- Ranger Mister
- Ranger Non-Stick Craft Sheet™
- Ranger Paper Creasers
- Tim Holtz® Distress Ink Pads: Barn Door, Ripe Persimmon
- Lace Trim
- Sewing machine
- Thread
- Sizzix Big Shot machine
- pencil
Instructions
1. Cut 8½ x 11″ Manila Cardstock in half. Use Paper Creaser to fold one half to make a 5.5″ x 4.25″ card. Cut the other half into a 5.25″ x 4″ piece.

2. On Non-Stick Craft Sheet, dab some Barn Door, Broken China, Mustard Seed and Worn Lipstick Distress Paints.

3. Spritz water over the paints using Ranger Mister.

4. Swipe the cardstock pieces from step 1 and the lace trim over the diluted Distress Paints on the Craft Sheet. Repeat till the surfaces are fully colored. Spray a bit of water with the Mister to help spread the colors on the lace trim.

5. Leaving the Papillon stamps on their backing sheet, generously ink the background stamp with Ripe Persimmon Distress Ink Pad. Press the 5.25″ x 4″ piece of cardstock colored face down on the stamp carefully. Lift off and set aside. Spritz a little water with Mister on the inked stamp. Press the card face down to get a faded second impression of the background stamp.

6. Ink the edges of the 5.25″ x 4″ piece using Barn Door Distress Ink Pad and Ink Blending Tool.
7. Attach the colored lace trim along the left edge of the 5.25″ x 4″ piece using Collage Glue Stick. Be sure to use very little glue to avoid your sewing machine needle gunking up. Trim off any excess lace with Kushgrip Snips scissors.

8. Attach the piece at about the center of the card. Machine stitch in place.
9. Put the remaining cardstock from Step 1 inside the Dot Matrix embossing folder and following your machine instructions, run it through.
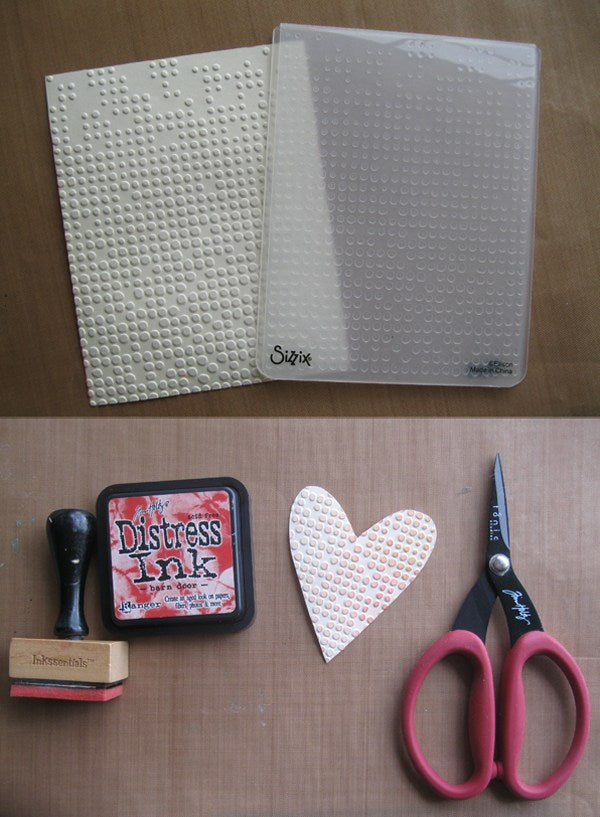
10. Free hand cut a heart out of the embossed piece using Kushgrip Snips scissors.
11. Brush on some Barn Door Distress ink with an Ink Blending Tool on the heart. Also brush on some Distress paints for more color.

12. Attach the heart to the card as shown using Popit Shapes.

13. Using Jet Black Archival Ink™ Pad, stamp a butterfly from the Papillon set and #iloveyou from the Hashtag set on cardstock. Draw borders with pencil around the sentiment. Cut out the stamped images with Kushgrip Snips scissors and attach to the card with Popit Shapes.
Related Posts

Dylusions Neon Ink Sprays Journal Page by Miranda van den Bosch
Neon color takes center stage on this eye-catching journal page by Miranda van den Bosch! The newest...
Read More
Tim Holtz Distress Paint Summer Card by Tami Bastiaans
Bring the beach to your craft table! Tami Bastiaans created this bright summer card using Distress Texture Paste, Paints,...
Read More