


By Kourtney Osborn-Vallee
Distress Snowman Card
- Materials
- Instructions
- Tim Holtz® Distress™ Markers: Black Soot, Barn Door, Vintage Photo, Peeled Paint, Ripe Persimmon, Spiced Marmalade
- Tim Holtz® Distress Ink Pads: Faded Jeans, Chipped Sapphire
- Ranger Ink Blending Tool & Foam
- Ranger Paper Creasers
- Ranger Non-Stick Craft Sheet™
- Archival Ink™ #0 Pads: Jet Black
- Ranger Heat it™ Craft Tool
- Tim Holtz® Waterbrush
- Liquid Pearls™: Onyx Pearl
- Stickles™ Glitter Glue: Christmas Red
- Tim Holtz by Tonic Studios Kushgrip Snips
- Tim Holtz Idea-ology - Silver Tinsel, Tiny Attacher
- Bazzill White Cardstock smooth
- Judikins Micro Glaze
Instructions
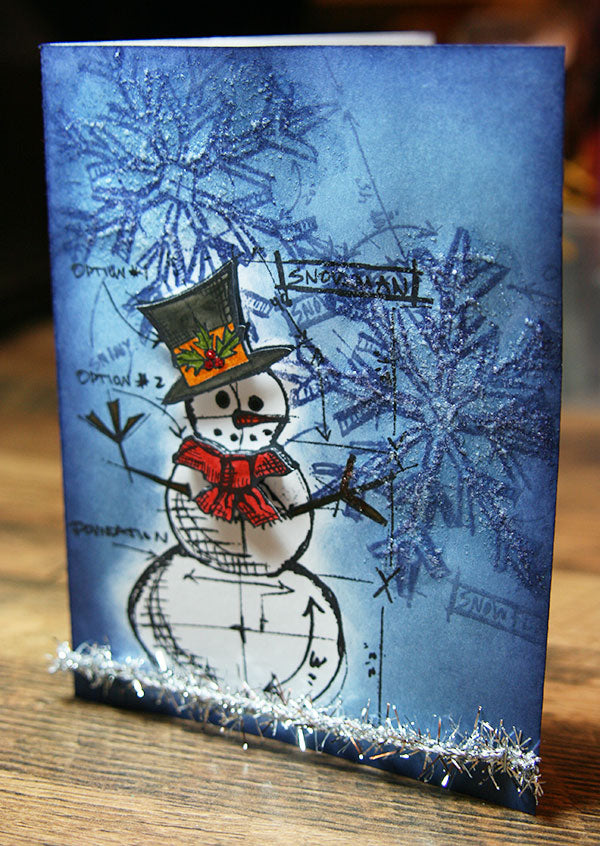
1. Cut white cardstock base to 5 ½ x 8 ½. Fold in half and using bone folder to make a crisp fold. Stamp Snowman onto card base with Jet Black Archival ink. Using your finger, sparingly rub Micro Glaze over the stamped Snowman image and allow to air dry. This will form a protective barrier from the Distress Inks. Stamp the Snowflake image twice onto the card with Chipped Sapphire Distress ink. It’s ok to overlap the snowman image, remember the Micro Glaze will resist the ink.

2. Working on a Non-Stick Craft Sheet, apply Faded Jeans Distress ink with an Ink Blending tool. Work in a circular motion from the non-stick craft sheet to the card and cover all of the white cardstock except for the Snowman image. Then apply Chipped Sapphire with an Ink Blending Tool to the outer edge of the card. This gives it a little darker shaded blue edge. Now take a dry paper towel or rag and wipe the Micro Glaze off of the Snowman image.

3. Apply Clear Rock Candy Distress Stickles to the Snowflake image and spread out with your finger. The wetness of the distress stickles will cause the Chipped Sapphire Distress ink to reactivate and wick out a little. To speed up drying, you can dry Distress stickles with your heat tool.

4. Using Distress Markers, color the Snowman image. Button Eyes and Button Mouth Black Soot; Arms: Vintage Photo; Carrot Nose: Ripe Persimmon.

5. Now for the popped layer of the Snowman. Stamp Snowman onto another piece of white cardstock with Black Archival Ink. Color the scarf using Barn Door Distress Marker and then cut it out with scissors. Using Pop it Shapes, adhere the scarf directly over the snowman’s scarf on the card. For the snowman’s hat color in the holly leaves with Peeled Paint Distress Marker and the berries with Barn Door Distress Marker. Add Christmas Red Stickles to the red berries and allow to air dry. Color the strip across the hat with Spiced Marmalade Distress Marker.
6. The black portion of the hat. Squeeze a small amount of Black Onyx Liquid Pearls onto the Non-Stick Craft Sheet. Pick up a little of the Liquid Pearls with your Detail Water Brush and mix it on The Non-Stick Craft Sheet until you get a pearl paint mixture. Paint this mixture onto the rest of the snowman’s hat. Once hat is dry, cut it out with scissors. Using Pop Its, adhere the hat directly over the snowman’s hat on the card.

7. Run a piece of silver tinsel along the bottom of the snowman and attach by putting a small staple in each end with the tiny attacher.
Related Posts

"My Cup of Care" Journal Page with Dylusions Pastel Paints by Miranda van den Bosch
Read More

Tim Holtz Distress® Micro Glaze Embossing Resist by Tami Bastiaans
Create gorgeous embossed backgrounds with the Micro Glaze Embossing Resist technique! ✨ Tami Bastiaans pairs Tim Holtz Distress® Micro...
Read MoreDrawer Title
- Choosing a selection results in a full page refresh.