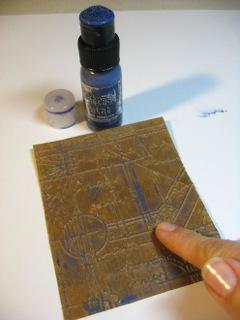
Distressed Father’s Day Card by Annette Green

Use Tim Holtz Distress products to make this handsome Father’s Day Card. Would also make a great birthday card for Dad.

Instructions

1. Cut Kraft Glassine in half to measure 4 x 5 inches. Emboss with Blueprint Texture Fade. Distress the outer edges by curling and bending with your fingernail. Lightly rub Chipped Sapphire Distress Paint over raised edges with your finger. Let dry.

2. Cut a piece of Brown Kraft Core cardstock 4-3/4” x 6 3/4” and sand the outer edges lightly to reveal kraft core. Cut a blue piece of Kraft Core Cardstock 1 1/2 x 4”, sand to reveal kraft core. Stamp Artful Tools image with Archival Black ink onto blue cardstock. Add 8” piece of tissue tape along left edge of card front, wrapping excess around to the back side. Rub Walnut Stain Ink with a Blending Tool and Foam over the surface of the tissue tape.

3. Adhere blue piece to brown piece. Ink edges with Black Soot Distress Ink.

4. Using the tiny attacher, adhere the embossed kraft glassine to the card front, above the blue piece, then distress the top by rubbing Black Soot Distress Ink over the raised areas.

5. From Grungeboard, cut the mini alarm clock, two gears, and a key. Paint the clock with Brushed Pewter Distress Paint, the larger gear with Antiqued Bronze Distress Paint, and the smaller gear and the key with Tarnished Brass Distress Paint. Let dry.

6. Distress the tops of each grungeboard piece with Black Soot Distress ink.

7. To assemble clock, layer the larger grungeboard gear behind the grungeboard clock and insert a large brad (from the buckle Idea-ology pack) through both to secure. Glue a sprocket gear on top and let dry.

8. Ink the edges of a journaling ticket with Vintage Photo and Walnut Stain Distress Inks.

9. Adhere ticket to card. Insert ribbon into buckle and slide into place near the right edge. Adhere the buckle and ribbon to the card with Wonder Tape, folding over excess to the back side. Adhere clock and key to card as desired. Add Alpha Parts letters above buckle.

10. Using a 1/2 inch circle punch, punch out a small clock face from the 2 x 2 page in the Lost & Found paper pack. Adhere to a type charm using Glossy Accents. Affix a clear bubble over the top. Tie a piece of black waxed twine into the type charm and tied into a bow. Adhere type charm to small grungeboard gear and adhere to card. Layer two mini gears and insert brad through card front.

11. Make the card base by cutting black cardstock to 10” x 7” and fold it in half to 5” x 7”. Adhere the card front to the black card base using Pop-it Shapes to pop it up.

Related Posts

Simon Hurley create. A Very Hoppy Birthday Card by Lieschen Harshbarger
April 23, 2024
Simon Hurley create. A Very Hoppy Birthday Card by Lieschen Harshbarger

Hop into birthday fun with this adorable card tutorial by Lieschen Harshbarger!  Using the new vibrant Simon Hurley create....

Read More
Archival Ink & Stickles Birthday Card by Kimberly Boliver
April 18, 2024
Archival Ink & Stickles Birthday Card by Kimberly Boliver

Purrfect Birthday Wishes! In this tutorial, Kimberly Boliver uses the latest Archival Inks and Stickles to whisker up a birthday...

Read More