


In part two of Kristi Nazzaro's Summer Adventure Dyalog tutorial, learn how to create a calendar insert perfect for documenting summer memories with ease. The Dylusions Dyalog program provides you with many options to organize your Dyalog system to fit your needs. The Agenda Dyalog Insert is the perfect way to keep track of summer fun without feeling overwhelmed!
Dylusions Dyalog Summer Calendar by Kristi Nazzaro
- Materials
- Instructions
-
Dylusions Dyalog Inserts: Agenda, Backgrounds
Dylusions Dyalog Stencils: Border It, Stencil It
Dylusions Dyalog Clear Stamp Sets: Blind Date, All the Right Boxes, The Full Package
Dina Wakley Media Paint: Turquoise, Ocean, Lime, Lemon, Heather, Peacock, White, Magenta, Sky, Blackberry
Dylusions Washi Tape
Dylusions Creative Dyary Tape Sheets
Dylusions Postcards 2
Ranger Non-Stick Craft Sheet
Ranger Mini Ink Blending Tool with Foam
Ranger Mini Mister
Ranger Archival Ink Pad: Jet Black
Canvas Scraps
Sewing Machine
Instructions
Hello! It’s Kristi again. In my last tutorial I showed you how I created the cover for my “Summer Adventures” Dyalog Journal. You can view that tutorial here.
In this tutorial, I am going to show you how I prepped the calendar portion of my journal. I love how Ranger gives you so many options to organize the Dyalog system to completely fit your needs. For me, I wanted the ability to keep track of all my summer fun. Often short on time I knew the Agenda Insert would be the perfect way to keep track of the fun without feeling overwhelmed by filling an entire blank page.

Step 1: Begin by adding a light hand of paint to every page of the agenda insert with a baby wipe. Add a small amount of paint onto the Non-Stick Craft Sheet and spritz it with water using a Mini Mister. Then lightly dab a baby wipe into the paint.

Step 2: Very lightly added the color to the page. Careful not rub too hard or use too dark of a color. Allow your pages to dry completely. This will make the next steps easier.

Step 3: The next step is to add the dates to each page. Use All the Right Boxes Stamp Set and a Jet Black Archival Ink Pad. The circles and squares are perfect for this. Alternate the shapes you use on each page. I used squares on this spread.

Step 4: Then use circles. After you have added your circles and squares, go ahead and handwrite the dates inside each circle and square.

Step 5: Using the Mini Ink Blending Tool and Foam add acrylic paint through the stencils from the Border It, Doodle It and Stencil It Sets to give the page a bit more dimension. Do this randomly throughout the insert. You can leave a few pages blank, as well.

Step 6: Add Washi tape and Creative Dyary Tape Sheets to the Pages you left blank. I love the versatility of the washi and tape sheets. Such a simple, easy way to add some color to your pages.


Step 7: I wanted a few tabs for my summer months. Using the Blind Date Stamp Set, Stamp July and August on to a few scrap pieces of canvas and sew them directly onto the edge of your agenda pages.

Step 8: I added the Background Insert to my cover to make memory keeping easy for me. Since the backgrounds are already created – I can just add photos and other pieces of ephemera to my journal without much fuss. Make some pockets on a few pages using Dylusions postcards. Stitch the bottom and left side of each postcard directly into the insert.


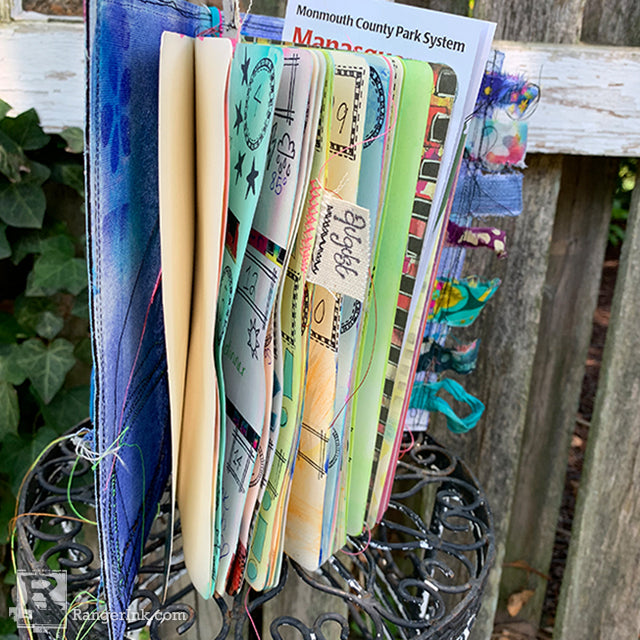
Above are a few pictures of my pages that I have filled with notes, pictures and stamps from The Full Package Stamp Set. I keep a small kit of washi tape, adhesive tape and pens to be able to add to my journal daily.
Here's a quick flip through of the finished Summer Adventures Dyalog Journal!
I hope you enjoyed my two tutorials on how I created my Summer Adventures Dyalog Journal. The versatility and ease of creating exactly what you need makes the Dyalog System a must have for me. Summer can be rushed, your art and memory keeping shouldn’t be. Have a happy, sunny, safe summer!

Related Posts

"My Cup of Care" Journal Page with Dylusions Pastel Paints by Miranda van den Bosch
Read More

Tim Holtz Distress® Micro Glaze Embossing Resist by Tami Bastiaans
Create gorgeous embossed backgrounds with the Micro Glaze Embossing Resist technique! ✨ Tami Bastiaans pairs Tim Holtz Distress® Micro...
Read MoreDrawer Title
- Choosing a selection results in a full page refresh.