


Follow along with Renae Davis as she shows you just how easy it is to make your very own bright and colorful stickers using the vibrant Dylusions "Cocktail" Paints and your favorite stamp sets!
Dylusions Neon Cocktail Stickers by Renae Davis
- Materials
- Instructions
Tim Holtz® idea-ology Craft Mat
Matte white circle sticker paper
Plastic gift/credit card- flexible is better
Small paint brush
Acrylic Stamp Block
Instructions
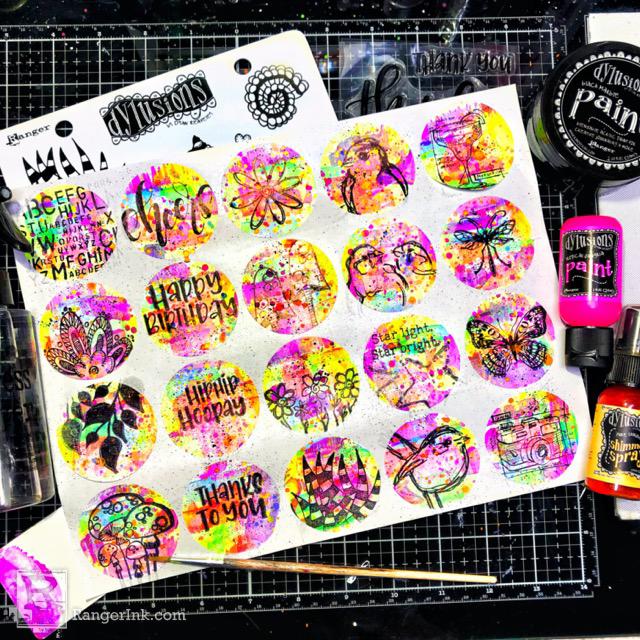
Love stickers but wish you could make your own with what you already have? You CAN! In this project you’re going to use the absolute brightest of paint colors to showcase your favorite stamps for quick and easy to use embellishments for any kind of future project you may have in mind.

Step 1: The surface for this project is matte white circle sticker paper. If you don’t have access to this type of paper, it can be substituted for regular full sheet white sticker paper or white cardstock that can be circle punched. The shapes do not have to be circles - they can be any shape you wish!

Step 2: Any color combinations will work for this project but we're going to specifically focus on the neon rainbow. Starting with the first color of Dylusions Tropical Sangria Paint, squeeze a small line of paint (about 1-2 drops) across the edge of the plastic card.

Step 3: Using a swiping down motion, slide the plastic card with the paint edge lightly in each circle. A little goes a very long way.

Step 4: Continue Step 3 for the rest of the neon rainbow colors of the palette across each circle while being sure to overlap colors. To make a neon purple, mix 1 part Dylusions Crushed Grape Paint with 3 parts Dylusions Tropical Sangria Paint. The purple will be the boldest color in the selection so use sparingly. Save Lemon Drop yellow for the last color to use as a fill in for any last white space and to overlap colors. It is a color that looks good over any of the other colors (especially Tropical Sangria).

Step 5: Since the cocktails are very happy and bright colors, they need toning down just a bit. Dispense a generous amount of Dylusions White Linen Paint onto the plastic card and swipe a thin layer over the entire sheet. If one area is too bold, use more white to help tone it down.

Step 6: Place a drop of each of the colors onto a craft mat and spray 1-2 sprays of water with a Tim Holtz Distress Sprayer. Using a small paint brush, splatter the different colors across the page onto each circle.

Step 7: Shimmer time! Using the spray nozzle, vigorously splatter drops of Dylusions Pure Sunshine Shimmer Spray over the sheet. This spray needs to completely dry before moving onto stamping. When using sticker paper, it is not recommenced to use a heat tool to speed up drying time or else the adhesive will melt from the back of the sticker paper.

Step 8: Carefully peel off the excess part of the sticker paper from the circles. The paint layers may cause the circles to stick on the edges so be sure to press your finger down slightly on top of the circles when tearing away the outer edge. Save the excess to use for an interesting collage background. Also, if you really like the way the painted circles turned out, scan or take a picture of them so you can print them out later for another project.

Step 9: Choose a couple of stamp sets to stamp onto the circles. They can be sentiment stamps, alpha stamps, background stamps - anything that can be stamped with. This a fantastic project to use the stamps that need some extra love and to showcase the smaller stamps that tend to get lost in some other projects. Using Ranger Jet Black Archival Ink and a stamp block, stamp various images onto the circles. Note - a waterbased Ink does not work well on this type of surface.

Step 10: Even though bigger stamps do not fit perfectly inside the circle space, they can still be used with a few sheets of scrap paper to mask off the other circles. This is perfect for background stamps!

Step 11: When every circle has been stamped, dilute Dylusions Black Marble paint with water onto a craft mat. Using a soft, clean toothbrush, gently flick black splatters on the sticker paper. By doing this step after stamping, you are able to control the amount of black splattered onto each and every circle whereas doing so beforehand could have potentially clouded the image with too much black. The black paint helps the stamped image blend into the background just a little so the eye is not drawn completely to a solid black image.

These circle stickers can be used anywhere you wish! They make great art journal elements - focal points or backgrounds. Cardmakers can use them for envelope seals, inside card sentiments and happy mail embellishments. You can even trade and collect them! For my final project, I collaged them together for an easy peasy art journal entry. Feel free to try out different colors, stamps, stencils, sprays - whatever you have to build your collection.
 Renae Davis.
Art Journaler. Photographer. Daydreamer.
Art journaling is my jam. I started out Bible Journaling a couple of years ago that has now evolved into 20+ active luscious art journals of all sorts, sizes, and themes. I love making my own recycled art supplies and using every bit of scrap paper and pigment that I can get my inky hands on. You can visit Renae's website at www.splendiferossity.com or follow her on Instagram @redhedtm and on YouTube.
Related Posts

Simon Hurley create. Ethereal Trees Christmas Card by Cassie Trask
Christmas is almost here! If you’re squeezing in those last handmade cards, let this magical winter scene inspire you....
Read More
Stickles & Embossing Powder Christmas Card by Miriam Prantner
This adorable snowman card by Miriam Prantner is packed with festive charm! Created with the Tim Holtz Sizzix Winston...
Read More