


I enjoy creating projects that challenge me to think outside the box. I knew that the Dylusions Star Struck Stamp Set would be a wonderful catalyst for a new pin for my jacket.
Dylusions Pin Tutorial by Kristi Nazzaro
- Dylusions Paint: Calypso Teal, Bubblegum Pink
- Dylusions Stamps: Star Struck
- Dylusions Stencils: Small Bubbles, Small Holes
- Ranger Mini Blending Tool with Foam
- Archival Ink™ #0 Pads: Jet Black
- Tim Holtz by Tonic Studios Kush Grip Snips
- Brother Sewing Machine Model JX2517
- Canvas Pieces
- Felt Fusible Web
- 1” Pin Backs
- E6000 Epoxy
- Felt Scrap Piece ¾” x 2 ¼”
- Palette Knife

Instructions
I enjoy creating projects that challenge me to think outside the box. I knew that the Dylusions Star Struck Stamp Set would be a wonderful catalyst for a new pin for my jacket.


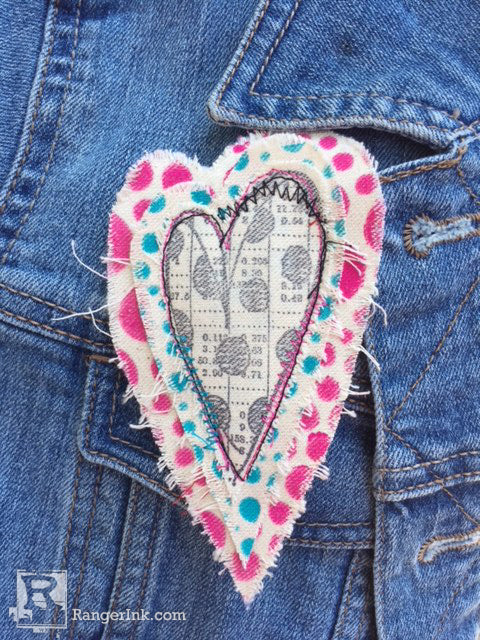
Step 1: Begin by inking the heart image with Jet Black Archival Ink and stamping it onto a piece of canvas.

Step 2: I knew that for this pin I wanted a layered look. With the Mini Blending Tool and Calypso Teal Dylusions paint stencil Small Bubbles onto a canvas piece. Then stencil Small Holes with Bubblegum Pink Dylusions onto another canvas sheet.

Step 3: Once the paint dries, iron the felt fusible web onto the back of the Bubblegum Pink Small Holes stenciled canvas. The reason for the fusible web is to ensure that the foundation of the pin is a bit sturdier than just a piece of canvas. If you do not have felt fusible web, regular felt cut to fit and fabric glued to the back of the canvas would work as well.

Step 4: Cut out the stamped heart image.

Step 5: Place the heart on top of the Calypso Teal stenciled canvas. Loosely cut out the heart shape leaving a small border so the vibrant color and stencil peek out.

Step 6: Do the same for the Bubble Gum Pink stenciled piece.

Step 7: Fray all the edges of each piece. For some pull the strings completely off. Others can be left in disarray.

Step 8: Stitch the pieces together using a sewing machine. If you do not have access to a sewing machine, hand stitching would work just as well. Don’t worry about straight stitching. Follow the lines of the heart, but add some zig zag stitches as well. Change the thread color a few times to add pops of color. Stitch only on the stamped image. Not on the stenciled pieces.

Step 9: Although I LOVE when strings hang off my projects, for this pin I trimmed all the strings from sewing. Flip the heart over and use E6000 Epoxy to glue a 1-inch pin back onto the piece. Using a pallet knife add epoxy to the black felt.

Step 10: Glue the piece of felt over the pin back for additional adhesion and let it dry overnight. In the morning the pin was all ready to go.

I hope you enjoyed this tutorial. I can’t wait to see the pins you make.

Related Posts

Tim Holtz Distress® Micro Glaze Embossing Resist by Tami Bastiaans
Create gorgeous embossed backgrounds with the Micro Glaze Embossing Resist technique! ✨ Tami Bastiaans pairs Tim Holtz Distress® Micro...
Read More
Dina Wakley Media Flower Pastel Journal Page by Doreen Dilger
In this art journal tutorial, Doreen Dilger demonstrates a mixed media flower pastel journal page using a pink, yellow...
Read More