


by Anna-Karin Evaldsson

Frozen Deer Canvas by Anna-Karin Evaldsson
- Materials
- Instructions
- Ranger Mini Blending Tool
- Dina Wakley Media Palette Knife
- Tim Holtz Distress® Sprayer
- Ranger Non-Stick Craft Sheet™
- Ranger Shiny Foil Transfer Sheets: Frozen
- Ranger Glossy Accents™
- Ranger Texture Paste: Transparent Gloss
- Tim Holtz® Distress Marker: Black Soot
- Dina Wakley Media Heavy Body Acrylic Paints: White
- Dylusions Paints: London Blue, White Linen, Black Marble
- Archival Ink™ Jet Black
- Dylusions Stencils: Country Large 9 x 12, Holes Large 9 x 12
- Tim Holtz by Stamper’s Anonymous– Dots & Floral Stamp Set
- Tim Holtz idea-ology: Silver Tinsel Twine; silver pearls
- Tim Holtz Alterations by Sizzix – Big Shot or Vagabond, Holiday Words Script Die
- 6 x 8 canvas board
Instructions
Hi everyone! I am happy to be here to share a mixed media tutorial using a whole bunch of fun techniques and products to create a wintery canvas, which would be great as a gift. I used Dylusions stencils and paint by Dyan Reaveley, as well as foil and texture pastes.

Christmas is coming very soon and I am working on some gifts, and this 6 x 8 in canvas will be one of them. I aimed for a cool winter feeling, but the techniques in the tutorial can be used for many different themes if you change the colours and stencils. I took step photos.
 Step 1: Start by coating your canvas, or maybe an art journal page, with White Gesso. Press the lid of a Distress Paint bottle into the wet gesso to create circles.
 Step 2: I used Dylusions Paints and, as any acrylic paint, they can easily be mixed into many different shades and colours. I wanted a lighter blue and mixed a little London Blue paint into White Linen.
 Step 3: I mixed too much paint and since I don’t want to waste any paint, I used the remainder in my 8 x 8 in Creative Journal, as a base for a future art journal page.
 Step 4: Before the blue paint is completely dry, place the Large Country Stencil on the canvas and wipe off paint with a slightly moist cloth to create a frame.
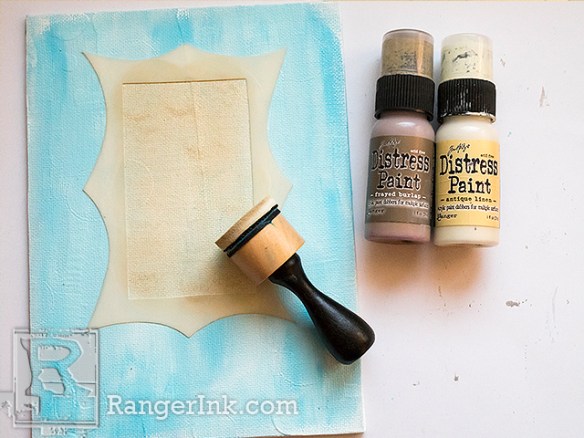 Step 5: Place the coordinating inner mask on the canvas and paint with Antique Linen and a little Frayed Burlap.
 Step 6: Place the frame mask back on the project and with a dry brush, add a darker blue shadow around the frame.
 Step 7: Leave the frame mask on the canvas and also add the inner piece, place the Holes Large Stencil over the canvas and sponge London Blue Paint through it.
 Step 8: Add a darker shadow around the frame with a Black Soot Marker. I later also added a shadow on the inside of the white frame.
 Step 9: Place the masks back on the canvas again and sponge White Paint through the stencil. Place the stencil a little above and to the left of the original blue dots, since we want the blue to be a shadow.
 Step 10: Add some random stamping with Tim Holtz Dots background stamp, still leaving the masks in place.
 Step 11: Place the Holes Stencil back on the canvas and line up with the white dots. Apply Transparent Gloss Texture Paste through the stencil with a palette knife. This adds subtle shine and dimension to the dots.
 Step 12: Smear white Texture Paste through the stencil to create the deer. Let dry.
 Step 13: I wanted the deer a little whiter and painted it. You could also mix a little white paint into the paste before applying it through the stencil.
 Step 14: Mix a tiny bit of Black Marble into White Linen Paint to create grey. Dry brush on the deer and also paint some around the deer to create a shadow. Dry brush Black Paint around the edges of the canvas.
 Step 15: Now comes the really fun part. Add shine to the project with Foil. Place the stencil back and apply Collage Glue through it. Wash the stencil. Let the glue dry just a little bit, you’ll have to experiment with how much. Press the matte side of foil sheets onto the glue and repeat until you are happy with the look. I used four different sheets from the Frozen set.
 Step 16: Apply a little Collage Glue around the edges and foil with a silver sheet.
 Step 17: All the layers of paint, stenciling, stamping and foil gives the look of a dimensional piece.
 Step 18: I just love the look of the random applications of various foil sheets.
 Step 19: Here you can see the effect of the foil on the deer a little better. The five foil sheets in the Frozen set look wonderful together.
 Step 20: The silver foil edge with the black paint underneath gives a great frame to the canvas.
 Step 21: Die cut a sentiment from white and black cardstock and glue together to create a shadow.
Thank you so much for watching! I hope the tutorial inspired you to play around with stencils, paint, Texture Paste and of course Shiny Transfer Foil Sheets.
Happy crafting!


