


Get a head start on Valentine's Day creating with this extra special heart card by Audrey Pettit. Learn how to use Tim Holtz Distress® Oxides and a few Sizzix dies to piece together this card for someone special.
Heartbeat Love Card by Audrey Pettit
- Materials
- Instructions
Tim Holtz Distress® Watercolor Cardstock
Tim Holtz Distress® Oxide Ink Pad: Tattered Rose, Spun Sugar, Brushed Corduroy, Vintage Photo
Tim Holtz Distress® Oxide Ink Pad: Tattered Rose, Spun Sugar, Brushed Corduroy, Vintage Photo
Tim Holtz® Alterations by Sizzix Dies: Heartbeat, Brushstroke Flowers #1, Bloom Colorize
Seam Binding Ribbon
Seam Binding Ribbon
Paper Towels
Instructions
Hi everyone, it’s Audrey, and today I’m here to share a little love with this fun Valentine-themed card project and tutorial.

What I love about the grungy world of Distress is that the look works equally well for masculine and feminine projects, making today’s card perfect for anyone on your Valentine card list. Let’s get started and take a closer look.

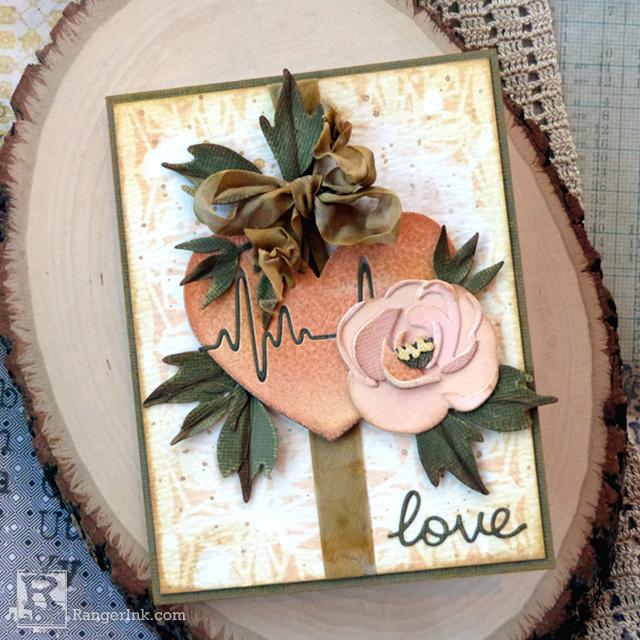
Step 1: To begin, trim a 4x5.25 piece of Distress Watercolor Cardstock. Place the Simon Hurley create. Stained Glass Stencil onto the cardstock, and hold it in place with a bit of low-tack tape. Working in stripes across the cardstock from left to right, apply alternating bands of color using Tattered Rose and Spun Sugar Distress Oxide Inks. Remove the stencil and clean it.

Step 2: Create a standard A2 card base from white cardstock. Trim a piece of green-brown Distress Cardstock to fit the front of the card base. Lightly sand the edges of the cardstock, and then adhere it to the card base. Ink around the edges of the stenciled panel with Brushed Corduroy Distress Oxide. Dab some of the ink onto your work surface, and spritz it with water using a Distress Sprayer. Pick up the ink mixture with a wet paintbrush, and flick it over the panel to create ink droplets. When you are happy with the look, flick clear water onto the panel, and blot it dry with a paper towel. Trim a piece of seam binding ribbon that is long enough to wrap around the card panel and tie into a bow. Drag the seam binding through the remaining ink on your craft mat, and set it aside to dry. Once dry, tie the ribbon around the center of the card panel.

Step 3: Dab Tattered Rose and Brushed Corduroy Distress Oxide onto your Silicone Mat. Spray the inks with water. Press a panel of Distress Watercolor cardstock into the ink mixture. Dry it with a Heat Tool, and repeat the process until you have the color you’d like. While the paper is still wet the final time, cover the panel with Tattered Rose Distress Glaze, and heat set the powder with the Heat Tool.

Step 4: Die cut the heart from the Heartbeat die set from the glazed cardstock. Die cut the separate script love line from the same green cardstock used for the card base. Ink around the edges using Brushed Corduroy and Vintage Photo Distress Oxide Inks. Snip out the word LOVE from the die cut. Insert the remainder of the love heartbeat lines into the opening of the heart die cut. Hold the pieces together on the back side with a bit of cello tape.

Step 5: Adhere the card panel to the card base. Add Foam Adhesive to the back of the die cut heart, and attach it to the card below the knot in the ribbon. Add small dots of adhesive to the backside of the love die cut, and adhere the sentiment to the bottom right corner of the card. Die cut several sets of leaves from the same green-brown cardstock used for the base of the card. Tie the ends of the ribbon into a bow at the top of the heart.

Step 6: Die cut all the layers of the Bloom Colorize rose from a variety of inked watercolor cardstock and/or Distress Kraft Stock cardstock. Assemble the rose.

Step 7: Adhere a set of leaves behind the rose die cut. Attach the rose to the bottom right side of the heart using a combination of Perfect Adhesive and Foam Tape, as needed. Adhere remaining leaves around the rest of the heart and above the bow.

Enjoy!

Related Posts

"My Cup of Care" Journal Page with Dylusions Pastel Paints by Miranda van den Bosch
Read More

Tim Holtz Distress® Micro Glaze Embossing Resist by Tami Bastiaans
Create gorgeous embossed backgrounds with the Micro Glaze Embossing Resist technique! ✨ Tami Bastiaans pairs Tim Holtz Distress® Micro...
Read MoreDrawer Title
- Choosing a selection results in a full page refresh.