


Hi everyone, Bobbi here. I’m so happy to be with you on the Ranger blog today! I’m sharing a really fun ombre Hello Love Valentine card, with a little shimmer and shine! Hope you’ll join me.
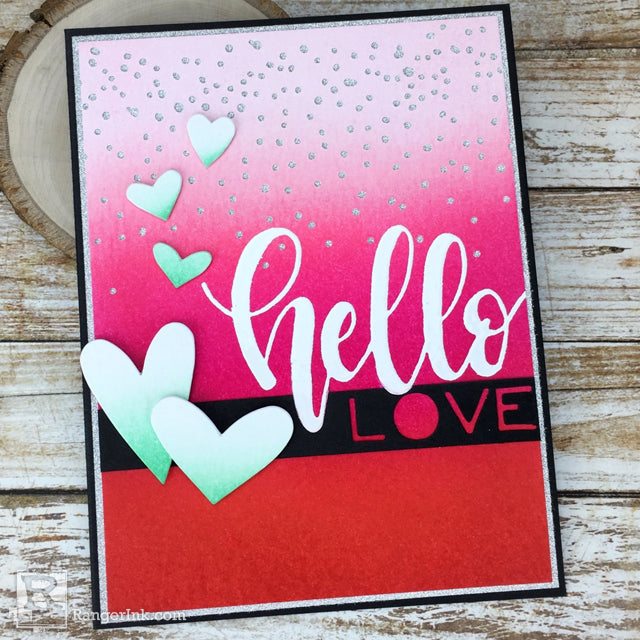
Hello Love Valentine Card by Bobbi Smith
- Materials
- Instructions
- Tim Holtz® Distress Ink Pads: Spun Sugar, Worn Lipstick, Picked Raspberry, Candied Apple, Festive Berries, Cracked Pistachio
- Tim Holtz® Distress Watercolor Cardstock
- Letter It™ Embossing Ink Pad
- Ranger Embossing Powders: White
- Tim Holtz® Distress Collage Mediums: Matte
- Ranger Mini Blending Tool with Foam
- Ranger Non-Stick Craft Sheet™
- Ranger Heat it™ Craft Tool
- Letter It™ Acrylic Stamp Block
- Letter It™ Stamp Sets: Greetings, Baby
- Ranger Paper Creasers
- Ranger Adhesive Foam Rolls
- Black Cardstock
- Tim Holtz by Tonic Studios Kush Grip Snips
- Tim Holtz Idea-ology Deco Sheet (Silver)
- Tim Holtz Sizzix Heartfelt Bigz Die, Winter Wonderland Thinlits Die and Sentiment Words Thinlits Die
Instructions

Step 1: Working on the Ranger Non-Stick Craft Sheet, we’re going to start adding color to a sheet of 4 1/4” x 5 1/2” Distress Watercolor Cardstock to create that fun ombre working from lightest ink to darkest. Lightly ink up a Blending Tool with Foam using, Spun Sugar Distress Ink (remember you can always add more ink, but you can not take away). Swirl Blending Tool in circular motion onto Non-Stick Craft Sheet to work color in foam (this will help to ensure no hard lines of color). Now very lightly swirl color onto first inch and a half top of watercolor cardstock in circular motion. Building intensity with each additional layer. You’re wanting to achieve gradient ombre color with most concentration on bottom portion of that 1 1/2 inch strip, fading to lightest. If there are any hard lines, just keep swirling color and it should blend and soften. Continue adding a light application of next color (Worn Lipstick) just remember to stay within that next inch and a half of space on watercolor cardstock, working from right to left or left to right. Next color is Picked Raspberry Distress Ink, this one is super intense and really makes the card pop! Repeat process adding color lightly, you can always go back and add more…but can’t take away.

Step 2: Continuing process with 4th color, add a strip of Candied Apple Distress Ink working from left to right. Swirl, swirl, swirl till all the color is blended. I added a little bit of Festive Berries Distress Ink at the very bottom of the watercolor cardstock to add a little more depth to the reds. After all color has been added to watercolor cardstock, dry well with Heat It Tool. Don’t skip this part, because you don’t want embossing powder to stick everywhere you don’t want it.

Step 3: Swirl some Cracked Pistachio Distress Ink on bottom portion of a 1 1/2” x 4 1/4” piece of Distress Watercolor Cardstock to create an ombre. Dry with Heat It Tool. Diecut a selection of small hearts from the Sizzix Tim Holtz Heartfelt Bigz die, using colorized Cracked Pistachio watercolor cardstock. Next, diecut the dotted background on the top 2 1/2 inches of ombre pink/red watercolor cardstock, using snow die from Sizzix Tim Holtz Winter Wonderland Thinlits set. This is one of those die sets that have so many uses, not just winter what it was meant for.

Step 4: Diecut a word strip about 5/8” x 5 1/2” out of Ranger Black Cardstock, using the “Love” sentiment from the Sizzix Tim Holtz Sentiment Words Thinlits die set. Make sure the “love” placement is more to the right side of cardstock strip. Place the “Hello” stamp from the Ranger Letter It Clear Stamps-Greetings set onto the Ranger Letter It Acrylic Stamp Block. Ink the “Hello” stamp with Letter It Embossing Ink and stamp just below the diecut dots and to the right of ombre Distress Watercolor Cardstock.

Step 5: On a scrap piece of paper, generously sprinkle Ranger White Embossing Powder over the stamped image. Shake off excess Embossing Powder and return to jar. Heat stamped image with Heat Tool to melt Embossing Powder.

Step 6: Working on a protected glass or self-healing mat, cut the bottom silhouette portion of the “h” and 1st “l” in “hello” with craft knife. Slide the “love” border in undercut portion of “hello”. Snip excess border off with scissors and glue in place with Distress Collage Medium.

Step 7: Cut a piece of Ranger Black Cardstock 5 1/2” x 8 1/2.” Score and fold at 4 1/4” x 5 1/2” to create an A2 cardbase. Cut a piece of silver Ideaology Deco Sheet 4 1/8” x 5 3/8,” remove backing to expose adhesive and mount to cardbase. Trim ombre cardfront to 4” x 5 1/4” and adhere to deco sheet with Distress Collage Medium. Now you have a fun glittery border and it’s super sparkly thru all those tiny holes! Attach diecut hearts with Ranger Adhesive Foam to give a bit of dimension.

You’re all ready for Valentine’s Day. I think I’m going to make a few more of these cuties, they were so much fun to make and I love the sparkle and shine! I hope you’ll give this fun card a try!

Related Posts

Dylusions DIY Christmas Gift Wrap & Tags by Jess Peters
Dress up your holiday gifts with this Dylusions DIY Christmas Gift Wrap & Tags by Jess Peters! Using Dylusions...
Read More
Tim Holtz Distress Mini Oxides Christmas Wreath Card by Dominique Bennani
Step into a Winter Wonderland with this charming Christmas wreath card created by Dominique Bennani using the latest...
Read More