


Signature Artist Wendy Vecchi shares a tutorial for how to create a wooden holiday ornament perfect for your tree or as gifts.

Holiday Ornament with Wendy Vecchi
- Materials
- Instructions
- Archival Ink™ Jet Black
- Archival Ink™ Designer Series: Wendy Vecchi: Fern Gree, Red Geranium
- Tim Holtz® Distress Stains Tarnished Brass
- Tim Holtz® Distress Spray Stains: Peeled Paint, Broken China
- Tim Holtz® Distress Ink Gathered Twigs
- Ranger Ink Blending Tool & Foam
- Ranger Mini Blending Tool
- Ranger Adhesive Foam Rolls
- Ranger Brayers
- Ranger Heat it™ Craft Tool
- Ranger Non-Stick Craft Sheet™
Instructions

Shake the Tarnished Brass stain then stain the ornament top.

Place the polka dotty stencil over the ornament and use the mini blending tool to stencil with Red Geranium. Sprinkle with Red Geranium embossing powder while wet, Heat to melt the embossing powder.

Mask off the ornament top with masking tape.

Spray over the ornament with Peeled Paint Distress Spray Stain & then Broken China Distress Spray Stain and dry.

Ink the edges with Gathered Twigs Distress ink, using the blending tool.

Swipe the Tarnished Brass dabber along the edge of the ornament and dry. Use Watering Can Archival Ink with the polka dot stamp to stamp over the ornament top.

Use Jet Black Archival to stamp the sentiment at the bottom of the ornament.

Swipe the Letterpress onto the Fern Green Archival ink pad, then sprinkle with Fern Green Embossing powder and heat to melt the powder.

Use Jet Black Archival to stamp the polka dots over the Letterpress and dry.

Paint a thin layer of Glue N Seal over a piece of Clearly For Art (CFA) cover with vintage dictionary page, brayer and dry. Use Jet Black to stamp the holly on the paper side of the CFA.

Place the coordinating stencil over the stamped image.

Use Fern Green Archival with the mini blending tool to ink the leaves.

Reposition the stencil and use Red Geranium Archival to ink the berries.
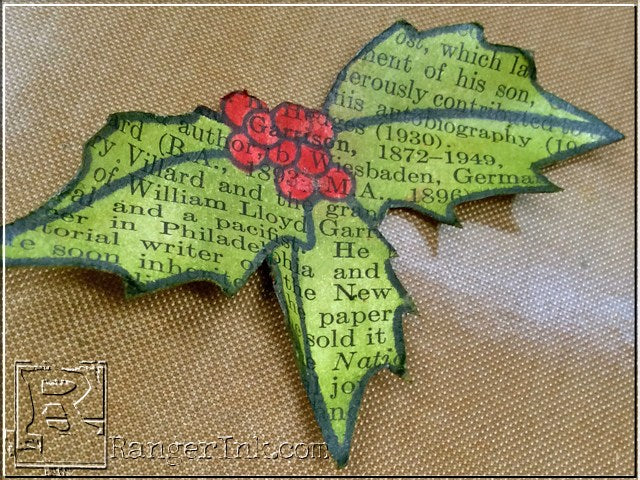
Cut out holly. Heat to soften the CFA & shape the leaves.

Test drive the holly placement to determine where to stamp the flourish two times, using Jet Black Archival.
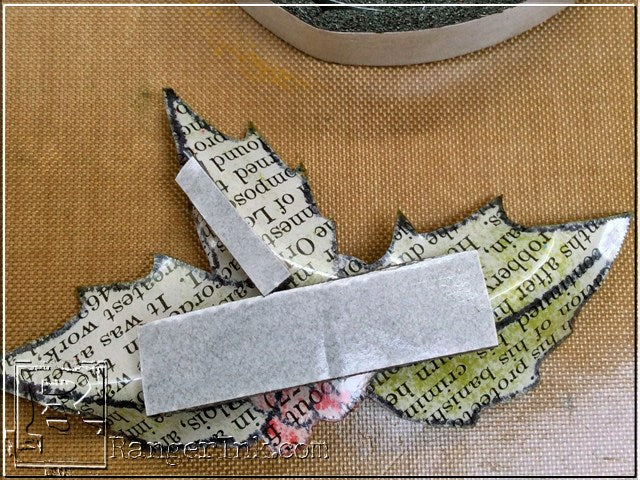
Add adhesive foam to the back of the holly and glue over the stamped flourishes.

Use MultiMedium to glue the Letterpress above the sentiment. Lightly ink a piece of the trimmings with Gathered Twigs. Tie a small bow and glue to the top of the ornament. Sign and date the ornament on the back.
This ornament can hang on your tree or can be used as a holiday gift box embellishment for a special someone.
Want to see the same wood ornament done another way? Pop over to my blog at www.studio490art.blogspot.com I have another tutorial thereto share.
Things to note:
- Embossing powders can be used on any surface that can “take the heat”.
- Glue N Seal is THE BEST adhesive for gluing paper to any surface.
- Use archival inks to stamp OVER embossing powder & heat to make permanent.
- Distress Spray Stains make it super easy & FAST to ink bare wood.

Related Posts

"My Cup of Care" Journal Page with Dylusions Pastel Paints by Miranda van den Bosch
Read More

Tim Holtz Distress® Micro Glaze Embossing Resist by Tami Bastiaans
Create gorgeous embossed backgrounds with the Micro Glaze Embossing Resist technique! ✨ Tami Bastiaans pairs Tim Holtz Distress® Micro...
Read MoreDrawer Title
- Choosing a selection results in a full page refresh.