


by Jen Cushman
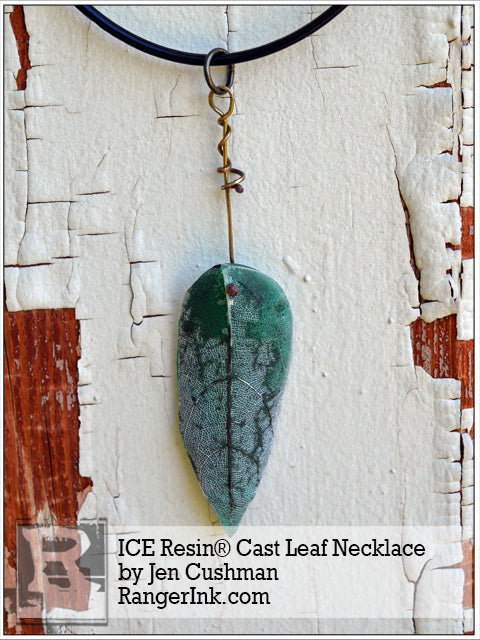
ICE Resin® Cast Leaf Necklace
- Materials
- Instructions
- Dina Wakley Media Heavy Body Acrylic Paint: Umber
- ICE Resin® Studio Sheets
- ICE Resin® Plunger
- ICE Resin® Foil Sheets
- ICE Resin® Tints: Lolite
- ICE Resin® Molding Putty
- Skeleton leaf
- 18 gauge bronze round wire, dead soft
- 1 leather neck cord
- 1 10 mm brass jump ring
- Scissors
- Hand file
Instructions


Gather your supplies. Don’t forget your studio sheet (important tool because the resin will not stick to the surface).
 Step 1: Remove two equal amounts of molding putty and roll into two balls. This will allow you to “eyeball” your amounts to ensure you have as close to a one-to-one measurement as possible. If one of the balls is a little larger than the other, remove a pinch of putty now and put back into the container.
 Step 2: Begin folding the balls of putty together and blending the two components together until they form a light grey color with no striations. Blend quickly, as you have an open working time with the putty of under 5 minutes.
Once the putty is ready to cast, shape the putty the approximate length and width of the skeleton leaf to cast.
 Step 3: Place the leaf inside the molding putty, gently pushing the delicate into the putty to create a cup-shaped mold. Remember, the ICE Resin® is liquid, so you must create a mold with walls on all sides and enough depth to re-create the leaf shape. The finely veined details of the leaf will imprint themselves in the molding putty and create the texture of the leaf in the resin casting. Optional: For even more texture in your first casting, leave the skeleton leaf in the mold and allow it to embed itself into the resin. Additional castings will not have the actual texture of the leaf, but will have the undercuts, aka fine details from the veins. Mold can be reused 20-30 times as long as it remains pliable.
 Step 4: Use the plunger to pour equal amounts of Part A Resin and Part B Hardener into a calibrated mixing cup. Use minimum ½ ounce of ICE Resin® (one-half of the plunger) to ensure proper ratio of resin to hardener for proper cure. Use plastic mixing spoon to gently fold the resin for two minutes.
 Step 5: Squeeze two to three drops of “Lolite” tint into the mixed resin and gently stir color to blend.
 Step 6: To add a bit more dimension to your leaf, rub a drop of Dina Wakley Umber acrylic paint into the fine details of the mold and give it a few minutes to dry.
 Step 7: Gently pour tinted resin into the mold. Let air cure six to 10 hours. Do not worry about small bubbles on the surface of your mold. ICE Resin® is self-leveling. Bubbles will naturally release as curing process takes place.
 Step 8: Once the resin has dried to the touch, squeeze the sides of the mold to release casting. Resin will be dry to the touch but still bendable. After three days, the resin will be fully cured and hard like glass. You will not be able to bend your casting after full cure. Use scissors to cut off any raw or unfinished resin edges to make the leaf look more natural. File the sides to sand down any rough edges or corners as well.
 Step 9: To add even more color to your casting, back it in foil. To do so, trace the shape of the leaf on a piece of foil and cut with scissors. Use Glue n Seal to adhere to the back of your resin casting. Allow to dry.

 Step 10: Use a flexible shaft or rotary drill to drill a hole into the top of your leaf casting. Cut a 6 inch piece of 18 gauge bronze wire and, using a torch, draw a bead on one end of the wire. Insert the headpin into the hole to make the wire attachment. If you wish, draw a bead on the opposite end of the wire for a decorative finish. Use round nose pliers to make a wrapped loop and then gently wrap the remaining piece of wire around the headpin to create a tendril effect.
 Step 11: Attach cast resin leaf pendant to leather neck cord with a 10 mm jump ring.
Reuse your mold along with ICE Resin and Tints to make multiple leaves. Use them as individual designs or group them together by the dozens to create one large, sculptural necklace in the style of Susan Lenart Kazmer.

