by Jenn Shurkus

Inspirational Media Board by Jenn Shurkus
- Materials
- Instructions
- Ranger Glossy Accents™
- Ranger Adhesive Foam Rolls
- Ranger Mister
- Ranger Non-Stick Craft Sheet™
- Ranger Heat it™ Craft Tool
- Ranger Texture Paste
- Ranger Multi-Medium Matte
- Tim Holtz Distress® Watercolor Cardstock
- Dina Wakley Media Stamps: Silhouetted Women, Primitive Icons
- Dina Wakley Media Stencils & Masks: Hey You, Mighty Wave, Mini Favorites
- Dina Wakley Media Palette Knife
- Dina Wakley Media Brushes
- Dina Wakley Media 1 oz. Mica Sprays
- Dina Wakley Media Heavy Body Acrylic Paints: Ocean, Cheddar, Fuchsia, Night
- Dina Wakely Media Board
- Tim Holtz Idea-ology Tissue Wrap
- Tim Holtz by Tonic Studios Kushgrip Snips
- Baby Wipes
Instructions

Hello Everyone! It’s Jenn Shurkus again from Shurkus.com. As always I am wicked exited to be sharing on the Ranger Blog again!
Today I am sharing with you a mixed media inspirational canvas board where we will be playing with a bunch of fun Dina Wakley Media products!
I hope this will inspire you to get a little painty and create an inspiring piece of art!
Let’s get started with today’s tutorial!
 Step 1: Using a Palette Knife, spread some Gesso around the Media Board. Don’t try and cover it all evenly and feel free to leave some Gesso thicker in some areas. Set aside to dry.
 Step 2: Squeeze a little bit of Ocean Dina Wakley Media Heavy Body Acrylic Paint onto the canvas board. Spread the paint with a Palette Knife. Note: I misplaced my palette knife in between step 1 and step 2 so I grabbed an old hotel room key.

 Step 3: Lay down the Dina Wakley Media Mighty Wave Stencil and wipe with a baby wipe. Wipe as little or as much as you want. Note: This works better if your Ocean paint is still wet and if your baby wipe isn’t too wet.

 Step 4: Once dry use some Matte Multi Medium and adhere torn strips of Idea-ology Tissue Wrap. Note: Don’t forget to wrap the tissue around the edge to show movement across your canvas board.

 Step 4: Lay down the Mini Favorites Dina Wakley Stencil and spread Ranger Opaque Matte Texture Paste through it with a Palette Knife. I chose to just use the spilt circles here and there.


 Step 6: Spritz some Dina Wakley Media Mica Spray in Lapis onto the Textured Paste areas.
 Step 7: Mix a little bit of Fuchsia Dina Wakley Media Heavy Body Acrylic Paint with Dina Wakley Media Glazing Medium. Using a palette knife spread the glaze onto your canvas. I concentrated on the texture paste and then I did some swipes of paint along the edges. Note: Glazing Medium is a fluid, multi-functional medium that can be used to extend open time of Heavy Body Paints, thin out paint and increase transparency.


 Step 8: This is where I wasn’t loving how my canvas was coming out. It didn’t seem to have a cohesive feel. So I did what Dina Wakley has taught me in classes. I covered the whole thing with Gesso. I then took a baby wipe and wiped away the Gesso as much or as little as I wanted. I fell in love with how this turned out. I got that cohesive feel I wanted.


 Step 9: Next I took one of the stamps from Silhouetted Women and dabbed some Night and Fuchsia Dina Wakley Media Heavy Body Acrylic Paint directly onto it. I stamped the image onto Distress Watercolor Cardstock, then before cleaning the stamp I gently misted it with water and stamped it again onto the Distress Watercolor Cardstock. You can do this again and again to get multiple images with different looks.
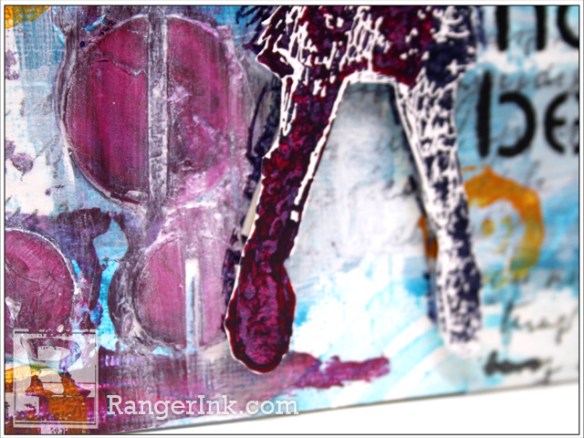
Lastly, ink it up again with the paint and stamp it directly onto the canvas. I did this because I know when I fussy cut out the image I was going to lose some of the details on the edges.
Note: This technique works best with red rubber stamps and be sure to clean your stamp right away so that the paint doesn’t try into the details of the stamp. I just run it under the sink since they are cling and not on a wood block.
 Step 10: Using the circle from Primitive Icons Dina Wakley Media Cling Stamps and Cheddar Dina Wakley Media Heavy Body Acrylic Paint I stamped a few orange circles here and there. I squeeze a little bit of the paint onto my craft sheet and tap the stamp into it. Note: Again, be sure to clean the stamp right away so the paint doesn’t dry on it.
Step 11: Fussy cut out the Silhouetted Woman and adhere it to your canvas. I used doubled up foam tape and then to be sure it stays on the canvas forever I use Glossy Accents to actually adhere it to the canvas over the previously stamped image.
 Step 12: Lastly I added some inspirational words by dry brushing Black Gesso through Dina Wakley Media’s Hey You 6×9 Stencil. I love using Dina’s Stiff Bristle Brushes for this and be sure to have a dry brush.