


Use the Ink Blending Tool and Adirondack Acrylic Paint Dabbers to create this colorful journal!
Inspired by Color Journal By Lisa Dixon
- Materials
- Instructions
- Archival Ink™ #0 Pads
- Ranger Paper Creasers
- Ranger Glossy Accents™
- Ranger Heat it™ Craft Tool
- Ranger Non-Stick Craft Sheet™
- Ranger Ink Blending Tool & Foam
- Watercolor paper
- Patterned Paper, Zsiage, zsiage.com
- Composition Notebook, Staples, staples.com
- Manila Shipping Tags, Avery, avery.com
- Black Brads, Making Memories, makingmemories.com
- Alphabet Stickers, Me and My Big Ideas, meandmybigideas.com
- Rubber Stamp, Autumn Leaves (For the Record, AL2619), autumnleaves.com
- Black Pen
- Other, white silk flowers, small scraps of ribbons, sandpaper
Instructions
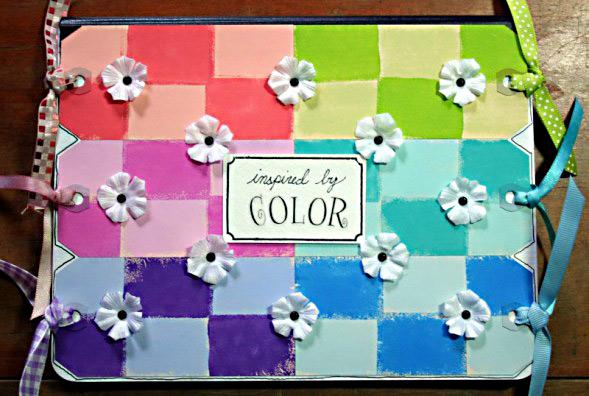
(1) Use sandpaper to lightly sand the glossy covers of the composition book. Wipe off sanding residue using a damp paper towel. Paint the front cover using the SnowCap Paint Dabber and set aside to dry. Apply a second coat of paint when the first coat has dried completely.
(2) Use the Ink Blending Tool with Foam attachments to stamp paint onto six manila shipping tags using coordinating colors of Lights and Brights Paint Dabbers. Attach a foam square to the Ink Blending Tool and use the Paint Dabbers to dab paints onto the entire surface of the foam, then stamp a checkerboard pattern alternating Light and Bright colors onto each tag. Use a clean piece of foam for each color:
Tag 1 – Pink Sherbet and Raspberry
Tag 2 – Cloudy Blue and Sail Boat Blue
Tag 3 – Willow and Citrus
Tag 4 – Aqua and Pool
Tag 5 – Cool Peri and Purple Twilight
Tag 6 – Salmon and Mountain Rose
(3) When the painted tags have dried, tie on bits of ribbon scraps in coordinating colors to the top of each tag.
(4) With the composition book placed horizontally, line up the six tags on the front cover of the composition book with the ribbons facing toward the edges of the book. Adhere each tag to the cover using Glossy Accents.
(5) Using Jet Black Archival inkpad, ink only the outside frame section of the journaling record stamp and stamp onto watercolor paper. Trim to a 3″ x 1¾” rectangle. Add alphabet stickers to spell “COLOR”, and use Black Pen to write “inspired by” inside the stamped frame. Adhere to the center of the composition book cover using strong double-sided tape.
(6) Use a paper piercing tool to pierce holes in the cover tags in a pattern where the coordinating colors of paint intersect on the tags. Skip every other rectangle. Attach twelve small white silk flowers securing them to the cover with a black brad through each center.
(7) Use the black pen to outline the tag shapes on the front cover.
(8) Cut a 7″ x 9″ rectangle of patterned paper and adhere to the inside front cover with glue stick to cover the brad backs. Burnish with the bone folder.
(9) Cut a 7″ x 10″ inch rectangle of second patterned paper and adhere to the back cover with a glue stick. Burnish with the bone folder then trim off the excess edges to complete the journal.
Related Posts

"My Cup of Care" Journal Page with Dylusions Pastel Paints by Miranda van den Bosch
Read More

Tim Holtz Distress® Micro Glaze Embossing Resist by Tami Bastiaans
Create gorgeous embossed backgrounds with the Micro Glaze Embossing Resist technique! ✨ Tami Bastiaans pairs Tim Holtz Distress® Micro...
Read MoreDrawer Title
- Choosing a selection results in a full page refresh.