


Send an extra special happy birthday with this mega candle card by Terri Burson! This easy to create card is perfect for creating multiple at a time to create a colorful stash of birthday wishes.

Mega Candle Card by Terri Burson
- Materials
- Instructions
Masking tape
Microfiber cloth
Instructions
Hello crafty friends, Terri here. I’m so happy to bring you my first project as a guest artist. With a new year, it’s the perfect time to begin building your stash of all occasion cards. I’ve got a super easy stenciled birthday card for you, featuring lots of Wendy Vecchi products and a handy sketch design for reference. Let’s get started!

Step 1: For your top fold card base, trim an 8” x 11.5” piece of Simon Hurley create. Stark White Cardstock to 4 1/8”W x 11”L, scoring in the center at 5.5”. Trim a coordinating panel to 3 7/8”W x 5 ¼”L , and a strip for your sentiment measuring 4”W x 1”L.

Step 2: For this next step, you will need masking or painter’s tape and the stencil from the Wendy Vecchi Stamp, Die and Stencil Set: Birthday Bash. Mask around the striped stencil with the tape, measuring 3.5”L to just under 1”W. This will prevent excess ink from blemishing your panel. Using your Wendy Vecchi Make Art Stay-tion, anchor your panel and stencil with the accompanying magnets, offsetting your masked stencil just below the card panel.

Step 3: Using the Tim Holtz Distress Blending Brush, apply ink from the Wendy Vecchi Blendable Dye Ink, Red Geranium, blend out from the left with a darker ink intensity, leaving white space at the far-right edge for a light effect. Use a different blending brush for each color of ink. Take care to clean the front and back of your stencil between each inking, to avoid muddying the colors. You can use a microfiber cloth for this, or a damp stamp shammy. Gently peel your masking tape and stencil from the cardstock when repositioning, to avoid any tearing.
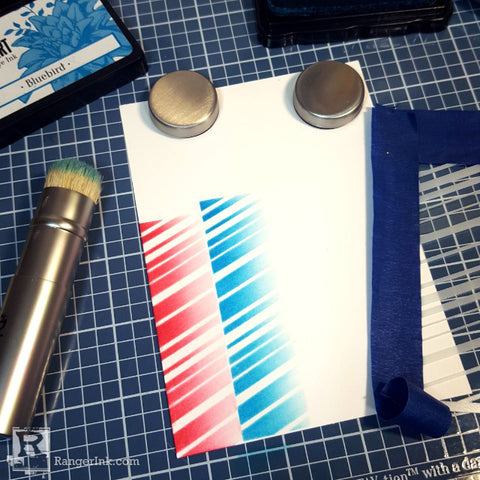
Step 4: For the next stenciled candle, move your stencil up to the bottom edge of the cardstock and to the right edge of your first candle, repeating the inking process using the Wendy Vecchi Blendable Dye Ink, Bluebird. Repeat the next two candle inkings (as the first two), using the Wendy Vecchi Blendable Dye Ink, Sunflower and Tea Rose, respectively.

Step 5: To create the candle flame, you will need the leaf petal stencil from the Wendy Vecchi Stamp, Die and Stencil Set: Warm Wishes. Blend just above each candle, using the Tim Holtz Distress® Blending Brush and Wendy Vecchi Blendable Dye Ink in Sunflower. Next, blend in Tim Holtz Distress® Ink in Crackling Campfire, from the bottom of the flame to approximately one third of the way upwards. You will need to mask the edge of the stencil near the flame, to once again avoid blemishing your paper with ink.

Step 6: Grab your Wendy Vecchi Stamp, Die and Stencil Set: Birthday Bash again, using the confetti portion of the stencil at the top of your panel. Randomly blend color with the inks used for your candle and flames, along with your Tim Holtz Distress® Blending Brushes. Again, remember to wipe down your stencil between inkings.

Step 7: Using your Wendy Vecchi Make Art Stay-tion, anchor your sentiment strip with the Wendy Vecchi MAKE ART Perfect Stamp Positioner Set. Center your stamp on your sentiment panel and stamp using the Wendy Vecchi Make Art Perfect Stamp Block with Ranger Archival Ink™ in Jet Black.

Step 8: Trim your sentiment strip to your desired width using Tim Holtz Tonic Haberdashery Scissors 5”. Adhere trimmed strips of Ranger Adhesive Foam Tape White to the back of your sentiment strip and panel, and adhere to your card base.
 Hello, my name is Terri Burson. I’m a native New Yorker, transplanted in the deep South. My husband and I are parents to a 19 year old son and numerous fur babies. I’m an avid card make but love dabbling in many forms of art and mediums. You can find me on most social media platforms @wavingmywand and on my blog at wavingmywand.blogspot.com.
Related Posts

Make-It™ You're The Zest Card by Miriam Prantner
Bright, bold, and full of summer vibes! Miriam Prantner created this cheerful citrus-inspired card using the Make-It Fun with Fruit...
Read More
Dylusions Neon Ink Sprays Journal Page by Miranda van den Bosch
Neon color takes center stage on this eye-catching journal page by Miranda van den Bosch! The newest...
Read More