


It's beginning to look a lot like Christmas...so why not make a shaker journal page to get into the spirit! Renae Davis shares how she uses Dylusions Paints and Stencils to create a winter themed shaker page filled with fun glitter and snowflake embellishments!

Merry Winter Shaker Card by Renae Davis
- Materials
- Instructions
Winter Shaker Embellishments (glitter, snowflakes, confetti, sequins…)
Double Sided Tape (Score Tape) 1/8”
9x12 Plastic Packaging (or acetate, transparency film, sheet protector..)
Cutting Knife + Cutting Mat
Palette Knife
Ruler
Instructions
It’s Christmas time peeps! Depending on where you live, you may or may not have a winter wonderland around this magical time of the year but that doesn’t mean you can’t create your own whenever you like in an art journal!
For this project you will need four consecutive pages in your art journal. The two sheets in the middle will be cut out then glued together to make a window. The left side of the journal will be an outside setting and the right side will be an inside setting.

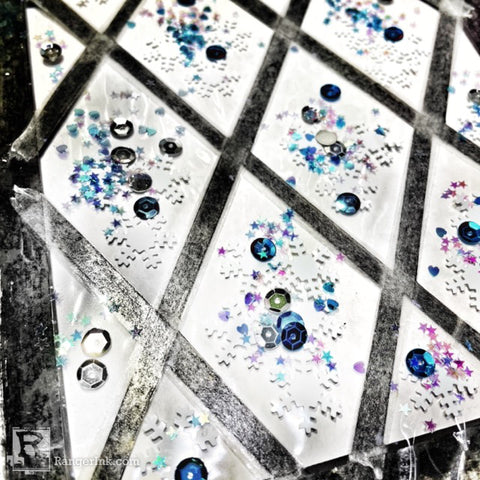
Step 1: Draw a 1” - 1.5” border all around the second page of the layout which will be the first page for the window. Using the diamonds from the 9x12 2” Inch Large Quilt Stencil, create a window pane structure within the inside of the rectangle you just drew. Leave at least 1/8” spacing between each diamond to create a lattice structure.

Step 2: Place a cutting mat underneath the page. Cut out the diamond shapes with a cutting knife while being sure not to separate the outside diamonds completely from the edge of the window. (If that happens, just tape them back together on the backside of the window).
Using this page as a template, trace through the lines you just cut for the second window sheet. Cut out the lines with a blade- don’t forget the mat underneath the paper!
There should now be two identical pages sandwiched between the art journal layout. Place a craft mat or a sheet of scrap paper underneath the pages and paint BOTH pages on BOTH sides with Black Marble acrylic paint.
*The inside of the window (between the two pages) doesn’t haven’t to be painted completely as long as the lattice cross sections and borders are covered. See next photo*

Step 3: Time to make the shaker window. On the bottom page of the window (the second sheet you cut), adhere double sided tape anywhere you see paper.
Repeat this for the opposite adjacent side. With the book open, laying flat the pages in front of you (the middle of the window) should be covered in double sided tape.
Once the tape is adhered, place sheets of plastic on top of the tape. I used the packaging from one of Dyan’s 9x12 stencils and it worked perfectly! Other options: sheet protector, transparency sheet, acetate, vellum, other clear packaging, or cling wrap.
Step 4: Only on the bottom page of the window (the second sheet you cut), adhere double sided tape where you see paper- including the lattice structure. (This is the last of the taping, I promise!)
Within each of the diamond windows, place a pinch of a mix of different shaker elements such as glitter, embossing powder, sequins, snowflake confetti, Distress Mica Flakes…. Whatever you have. Don’t add too much so you will be able to see through the window once assembled.

Step 5: Moving very carefully as to not move the shaker embellishments, press down the top sheet of the window to close down and secure the window. Press down firmly the lattice structure and borders so none of the embellishments will be tempted to escape later on (they are cheeky little things!)
On top of the black lattice, front and back, I sponged on some White Linen Acrylic paint through a wood grain stencil and added white paint splatters to help break up all the blackness of the window pane.

Step 6: Place the diamond stencil used in Step 1 back on top of the first sheet of the lattice window. Using a palette knife and Ranger Texture paste, apply a generous layer through the bottom half of the diamond stencil to create a snowy look on the outside window pane. For a more textured look, pat and press the palette knife on top of the paste after applying.
Repeat this for all the bottom parts of the lattice structure. Feel free to add a couple of swipes along the border of the window as well.

Step 7: While the texture paste is still wet, add in some Perfect Pearl, glitter or even Distress Mica flakes on top to help really lock in that icy, snowy feel to this wonderland window.
Let dry completely. Do not heat set- doing so will melt the plastic sheet as well as puff up the texture paste.

Step 8: Now that the window is done, let’s move on to the really fun part!
On the left side of the window, paint an outside scene of your choosing. I went with a simple winter scene using a blend of Dylusions After Midnight and Black Marble acrylic paint for the background with Ranger Texture paste through the 5x7” Dylusions snowflake stencil on top. The snow bank and the moon were made from scrap white paper and sprayed with Dylusions White Linen shimmer spray ink.

Step 9: On the right side of the window, create an inside scene of your choosing. This background picture here was so easy and so much fun to create! Using the Dylusions Quiltalicious Stamp Set, I stamped two of the diamond patterns onto scrap pieces of background paper made with the Ranger Gel Plate and spray inks (featuring the beautiful Funky Fuchsia and Pure Sunshine sprays). Once stamped, I cut them out and glued them in a wallpaper-like pattern. I then placed thin black masking tape on top of the borders to cover up any misalignments with some Dylusions white paint pen dots on top.

Step 10: I cut a Christmas tree shape from a green alcohol ink background I made on photo paper. Before adhering it onto the page with Matte Medium, I traced around the pages and painted a black border with Black Marble paint to add more contrast to help it stand out from the busy but bright and beautiful background. I added some stickers and circle confetti to the tree along with some ornament stickers behind the tree and this scene is complete.

How fun was that?! This is a great little project to break up any monotony you may have in your art journal without adding too much bulk and.. it’s a great use for all that plastic packaging that tends to accumulate. Have fun creating even more merry interactive scenes within your creations. The possibilities are endless no matter what supplies you have!
 Renae Davis.
Art Journaler. Photographer. Daydreamer.
Art journaling is my jam. I started out Bible Journaling a couple of years ago that has now evolved into 20+ active luscious art journals of all sorts, sizes, and themes. I love making my own recycled art supplies and using every bit of scrap paper and pigment that I can get my inky hands on. You can visit Renae's website at www.splendiferossity.com or follow her on Instagram @redhedtm and on YouTube.
Related Posts

"My Cup of Care" Journal Page with Dylusions Pastel Paints by Miranda van den Bosch
Read More

Tim Holtz Distress® Micro Glaze Embossing Resist by Tami Bastiaans
Create gorgeous embossed backgrounds with the Micro Glaze Embossing Resist technique! ✨ Tami Bastiaans pairs Tim Holtz Distress® Micro...
Read MoreDrawer Title
- Choosing a selection results in a full page refresh.