


Learn how to create a cheerful mixed media tag using Dina Wakley MEdia Acrylic Paints and Stamps with this tutorial by Cheiron Brandon. Once completed, Cheiron shares how you can turn them into cards, perfect for any occasion.
Mixed Media Tag by Cheiron Brandon
- Materials
- Instructions
Dina Wakley MEdia White Tag Assortment: #8 Tags
Dina Wakley MEdia Paints: Olive, Turquoise, Apricot
Dina Wakley MEdia Gloss Sprays: Gilt, Turquoise, Night, Carnation
Dina Wakley MEdia Stamp Sets: Be Willing, Together, Change
Dina Wakley MEdia Stencil: Mantras
Dina Wakley MEdia Collage Paper: Just Words
Dina Wakley MEdia Ultra Thick Gel Medium
Dina Wakley MEdia Fudeball Pen: Black
Ranger Mini Ink Blending Tool with Foam
Archival Ink™ Pad: Jet Black
Foam Tape
Tim Holtz® idea-ology: Tiny Attacher, Glass Mat
Instructions

Hi there, crafty friends. It’s Cheiron Brandon here and today I have a project for you to use all those mixed media tags you may create. I know I love to take a stack of tags and play with all my mediums and stencils, but I often find myself asking what to do with them when I am done.
For my project today, I took some of my favorite creations and turned them into cards. It’s like being able to mail a mini piece of art to a friend, and who couldn’t use more happy mail right about now?
I have been taking a lot of Dina’s online Facebook Live classes and storing away different stamped pieces and collage papers in my stash. I thought it would be fun to play and experiment with these pieces by layering them onto a few tags that I painted and stenciled, but then what would I do with them? I love sending out happy mail, and simply adding these to a card base would be the perfect way to share some art with a friend.
Here’s what you will need to gather to create this project: Dina Wakley #8 tags, paints, gloss sprays, stamps, stencils scissor and a tiny attacher. I am going to walk you through the steps of creating elements for all of your tags, then go through each tag to explain what elements I used for each one.

Step 1: Take three tags and give them a base layer of color using Dina Wakley MEedia Paints. Use Olive, Turquoise and Apricot and water them down on the glass mat to create a wash. Swipe each tag through the wash and let it dry. For the Apricot-colored tag, press the Mantras stencil into the wash and print it onto the tag.

Step 2: Create some layers for your tags using Collage Paper. Tear pieces from the Just Words Collage Paper Pack and paint each one of those in a wash on the front and back sides also in Olive, Turquoise and Apricot.

Step 3: Create a collection of focal images for your tags. Stamp some of the images using paint and a foam applicator tool and others using Jet Black Archival Ink. Stamp multiple sheets of paper, so you can use any leftover images on future projects. Cut them all out and place them to the side.

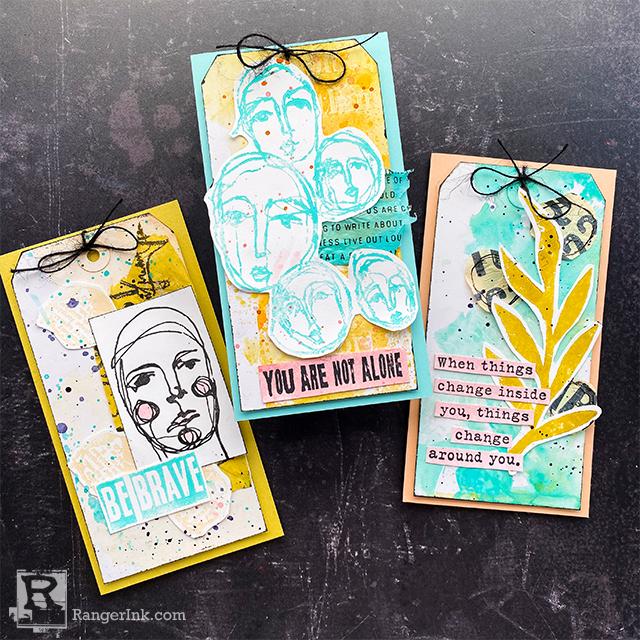
Step 4: Now we are ready to create the tags. These are fairly simple ones, but you could certainly add as many layers as you like. For the first tag, use the turquoise base, the Apricot- colored collage paper cut into circles and then draw circles on with a Fudeball pen, some leaves from Be Willing, and a sentiment from Change. Paint over the sentiment with Carnation Gloss Spray to turn it pink.

Step 5: Layer the circles onto your tag using Ultra Thick Gel Medium, I used my finger to apply all the medium to the pieces. Then apply the leaves piece on top of that and finish with the sentiment. Splatter the tag with a bit of Night Gloss Spray.

Step 6: To create the Olive tag, you will need the Turquoise tissue,the cut out faces and sentiment from the Better Together stamp set. Go over the stamped sentiment with Carnation Gloss spray for this tag too.

Step 7: For assembly of this tag, add the Turquoise tissue with the Tiny Attacher, then adhere the faces on top, and add the sentiment to the bottom. Splatter the entire tag with Carnation and Gilt Gloss Spray.

Step 8: For the Apricot tag, use the Olive-painted tissue, a sentiment and some stamped dots from Be Willing and a face as the focal image from the Change stamp set. Color the cheeks and lips in on this image with some of the Carnation Gloss Spray. Then ink the edges of the face image with Jet Black Archival Ink.

Step 9: The layering on this tag is pretty similar to the first 2. Add the Olive tissue with the Tiny Attacher. Next, add the dots, followed by the face image. Put the sentiment on the top of all the layers and added splatters of Night and Turquoise Gloss Spray.

Step 10: The finished tags measure 3 1/8 x 6 1/4, so they are perfect to add to a 3 ½ x 6 ½
card base. To assemble the cards, ink all of the edges of each tag with Jet Black Archival Ink. Tie a little black twine bow through the hole on each tag, then use foam tape to mount all of my tags to a card base cut from a coordinating color of cardstock. Now they are ready to put in the mail!
 My name is Cheiron Brandon. I live in Bayonne, New Jersey with my husband and our two adorable rescue pups, Big Boy and Oreo. I work in the financial district by day and love to play with stamps, ink and paint at night in my studio. I teach monthly card making and mixed media classes in NYC. You can find me on my blog at www.cheironbrandon.typepad.com and posting more often @cheiron on Instagram!
Related Posts

Tim Holtz Distress Paint Summer Card by Tami Bastiaans
Bring the beach to your craft table! Tami Bastiaans created this bright summer card using Distress Texture Paste, Paints,...
Read More
49 and Market From The Garden Journal Page by Jessica Mikels
Step into the garden with this beautifully layered journal spread by Jessica Mikels! Created with the 49 and Market...
Read More