


Follow along as Lieschen Harshbarger creates this stunning card filled with vibrant hues and fluttering beauty! Crafted using the mesmerizing Simon Hurley create. Neon Lunar Pastes, every detail bursts with color.
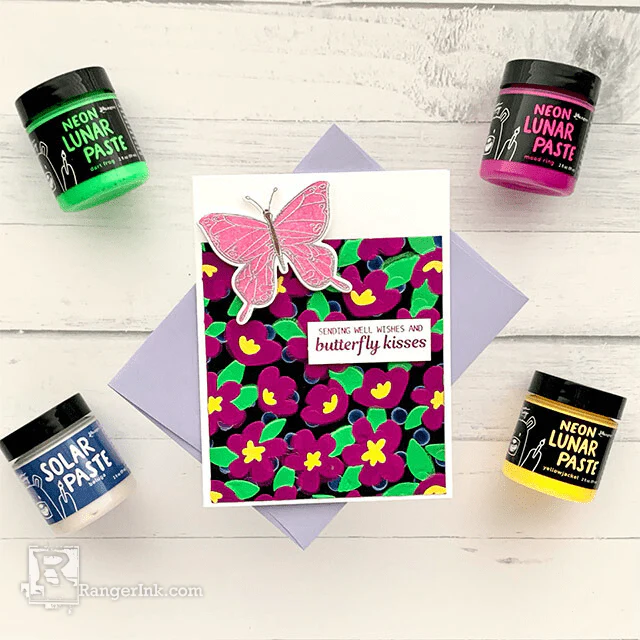
Simon Hurley create. Neon Lunar Paste Butterly Card by Lieschen Harshbarger
- Materials
- Instructions
Simon Hurley create. Stencil Pretty Petals
Simon Hurley create. Stencil Polka Dot Assortment
Simon Hurley create. Butterfly Kisses Stamp & Die Set
Simon Hurley create. Solar Paste Beluga
Simon Hurley create. Neon Lunar Paste Yellowjacket
Simon Hurley create. Neon Lunar Paste Mood Ring
Simon Hurley create. Neon Lunar Paste Dart Frog
Simon Hurley create. Dye Ink Pad Prom Queen
Simon Hurley create. Dye Ink Pad Triple Berry
Simon Hurley create. Dye Ink Pad Weeping Willow
Simon Hurley create. Paste Tool Set
Simon Hurley create. Stark White Cardstock
Simon Hurley create. Acrylic Stamping Blocks
Tim Holtz Distress® Black Heavystock
Wendy Vecchi MAKE ART Perfect Card Adhesive
Archival Ink™ Pad Aubergine
Ranger Heat It™ Craft Tool
Ranger Anti-Static Pouch
Ranger Silicone Mat
Ranger Mini Ink Blending Tool
Ranger Mini Ink Blending Tool Domed Replacement Foams
Emboss It™ Ink Pad Clear
Embossing Powder Clear
Embossing Powder Silver
Tim Holtz® Tools by Tonic Studios – Trimmer
Other:
Die Cutting Machine
Scor board
Envelope
Low Tack Tape
Foam Adhesive
Instructions
Hello crafty friends! Today’s card tutorial is all about the Neon Lunar Pastes. I got to use some of the new Neon Lunar Pastes as well as a Solar Paste to create today’s card. I hope this tutorial gives you inspiration to do something fun and creative today!

Step 1: Start by creating an A2 card base out of Stark White Cardstock. Cut the 8½ x 11 card stock at 5 ½, then score it at a 4 ¼. Cut another piece out of Tim Holtz Distress Black Heavystock measuring 4 x 5¼ to be your front panel.

Step 2: Next, use one of the Polka Dot stencils on the front panel piece and apply Beluga Solar Paste with a mini blending tool and let it dry. You can also use the heat crafting tool to speed up the drying process.

Step 3: Use the stencil with petals from the Pretty Petals stencil on the front panel piece and apply Mood Ring Neon Lunar Paste. Let it dry.
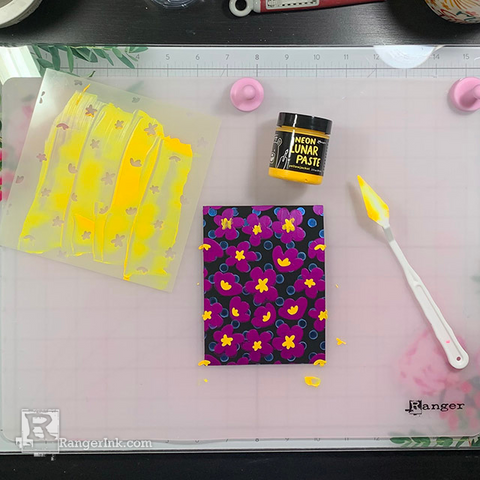
Step 4: Once front panel is dry, use the stencil with the center piece for the petals from the Pretty Petals stencil set on the front panel piece and apply Yellow Jacket Neon Lunar Paste. Let it dry.

Step 5: Next, once front panel is dry, use the leaves stencil from the Pretty Petals stencil set on the front panel piece and apply Dart Frog Neon Lunar Paste. Let it dry.
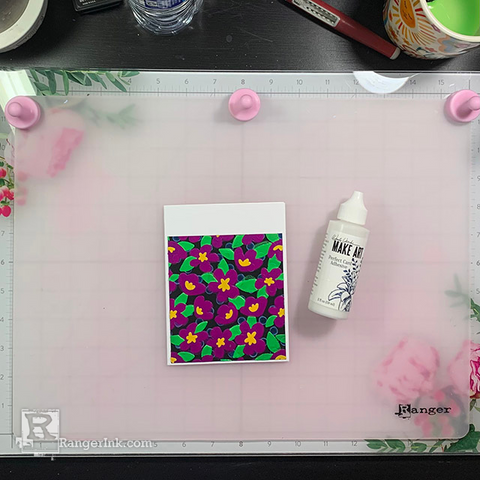
Step 6: Trim about 2½in from the top of the front panel piece then glue it to the card base. You can use this piece for another card.
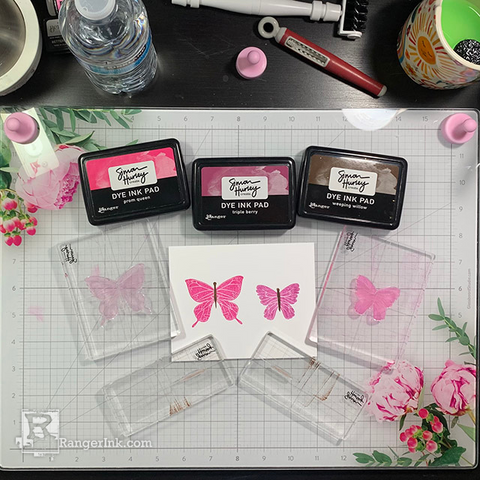
Step 7: On a separate piece of card stock, stamp two solid butterfly images from the Butterfly Kisses stamp set using Prom Queen, Triple Berry, and Weeping Willow inks.

Step 8: Next, stamp the outline of the butterfly images with Emboss It Clear ink pad. Then, heat emboss with silver embossing powder.
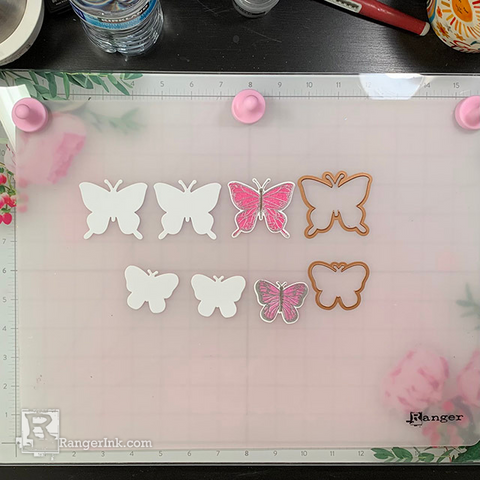
Step 9: Die cut the butterflies with the Butterfly Kisses coordinating dies. Die cut extras and glue together for dimension. You will only use one of the butterflies for today’s card.
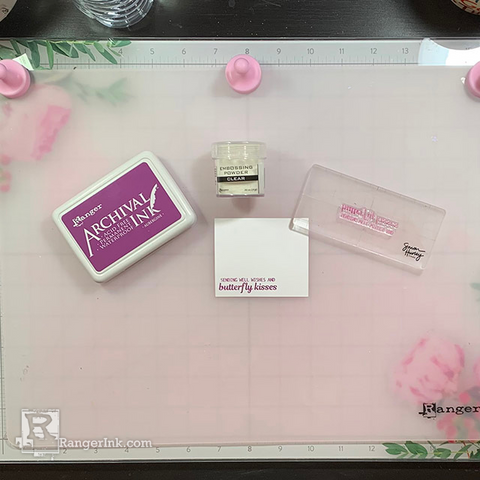
Step 10: On a separate piece of card stock, stamp one of the sentiments from the Butterfly Kisses stamp set with Aubergine archival ink. Then, heat emboss with clear embossing powder. Then, trim it to fit the card.

Step 11: Put foam adhesive on the back of the butterfly and sentiment.
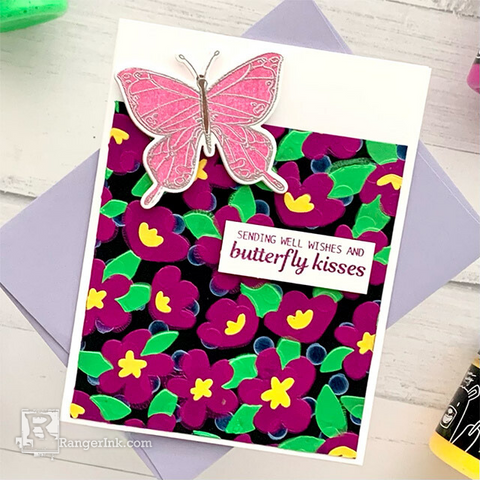
Step 12: Next, tape the butterfly and sentiment on the front panel piece. To finish the card, match it with a complimentary envelope and it is ready to be sent to a loved one!
 Hi! My name is Lieschen Harshbarger. I’m married to my best friend and even though we don’t have children yet, our dog Sophie fills our hearts with lots of love and joy. By day, I work for the State of Texas, but during my evenings and weekends you’ll find me in my craft room – making cards and trying out new techniques with my crafty supplies. I enjoy being creative, but mostly I have enjoyed getting to know others and learning fun new things in this wonderful crafty industry! You can see more of my crafty projects on my blog Harshgurl and Instagram at @harshgurl.
 Related Posts

Dylusions Neon Ink Sprays Journal Page by Miranda van den Bosch
Neon color takes center stage on this eye-catching journal page by Miranda van den Bosch! The newest...
Read More
Tim Holtz Distress Paint Summer Card by Tami Bastiaans
Bring the beach to your craft table! Tami Bastiaans created this bright summer card using Distress Texture Paste, Paints,...
Read More