


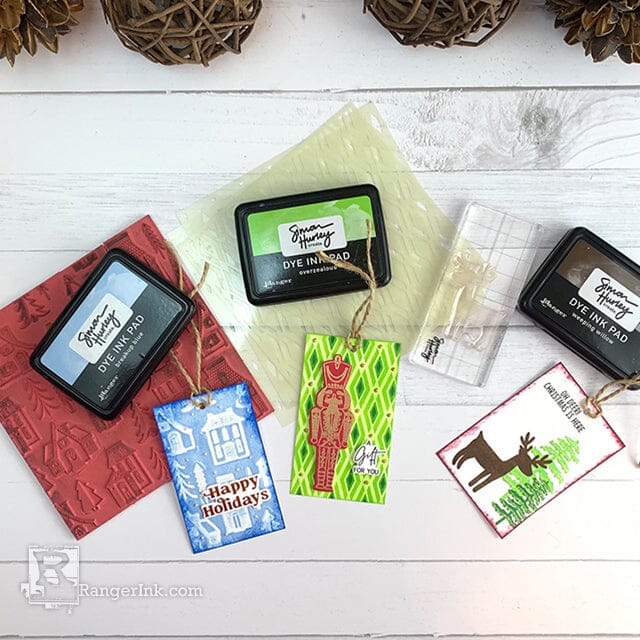
In this tutorial, Lieschen Harshbarger uses Simon Hurley products to create fun and festive gift tags to add to your Christmas presents.
Simon Hurley Christmas Gift Tags by Lieschen Harshbarger
- Materials
- Instructions
Simon Hurley create. Background Stamp Christmas Village
Simon Hurley create. Folk Art Ornaments Stamp & Die Set
Simon Hurley create. Spellbinders Joyful Christmas Sentiments Hot Foil Plate & Die
Simon Hurley create. Photopolymer Stamp Oh Deer!
Simon Hurley create. Layering Stencil Dazzling Diamond
Simon Hurley create. Dye Ink Pad: Breakup Blue, No Diving, Game Over!, Love Struck, Fake Plant, Later Gator, Overzealous, Weeping Willow
Simon Hurley create. Stark White Cardstock
Simon Hurley create. Stamping Foam 4.5" X 5.75"
Simon Hurley create. Acrylic Stamping Block 5X6
Simon Hurley create. Acrylic Stamping Blocks
Archival Ink™ Pads Jet Black
Ranger Heat It™ Craft Tool
Wendy Vecchi MAKE ART Perfect Card Adhesive
Ranger Silicone Mat
Ranger Mini Ink Blending Tool
Ranger Mini Ink Blending Tool Domed Replacement Foams
Emboss It™ Ink Pad Clear
Embossing Powder Gold
Tim Holtz® Tools by Tonic Studios – Trimmer
Liquid Pearls™ White Opal
Liquid Pearls™ Marigold
Stickles™ Glitter Glue Unicorn
Other:
Scissors
Foam adhesive
String
Hole Puncher
Die Cutting & Embossing machine
Glimmer Hot Foil System
Glimmer Hot Foil Roll – Gold
Instructions
Hi crafty friends! I hope all of you are having a great day. The weather in Texas is finally a bit chilly (for us Texans) so I cannot help but feel the Christmas spirit in the air. And of course, this gives me more reason to keep creating crafty projects with a Christmas theme. Today I’m sharing how I made three different gift tags that can be easily made using Simon Hurley products. I hope you enjoy this tutorial as much as I enjoyed making these gift tags!

Step 1: Using a trimmer, trim Simon Hurley create. Stark White Cardstock to 4¼ x 2½ pieces to create gift tags. Or you can trim them in different sizes depending on how wide/long you want your gift tag to be.

Step 2: For the first gift tag, use the stamping foam and heat it for about 15 seconds. Then press the stamping foam onto the Christmas Village background stamp to make an impression.
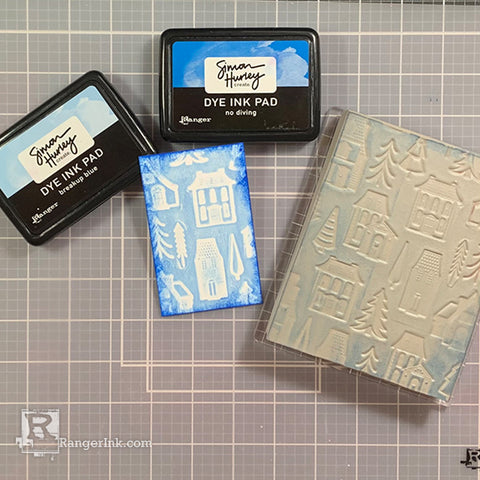
Step 3: Ink the stamping foam with Breakup blue ink and stamp it onto the gift tag. Then rub the No Diving ink pad around the edges of the gift tag to add more color.

Step 4: On a separate piece of cardstock, use the Joyful Christmas Sentiments Hot Foil Plate & Die with gold foil. After running it through the glimmer foil system and die cutting machine, glue one of the sentiments on the gift tag. Next, add some White Opal Liquid Pearls for embellishment.

Step 5: For the second gift tag, stamp images from the Oh Deer stamp set using Weeping Willow, Later Gator, and Fake Plant. Next, rub the Game Over ink pad around the edges of the gift tag to add more color. Stamp one of the sentiments from the stamp set using Jet Black archival ink.

Step 6: To add more embellishment to the gift tag, add some Unicorn liquid pearls on the trees.

Step 7: For the third and last gift tag, use the Dazzling Diamond layering stencil to create a background. For the first layer use Overzealous, then Later Gator, and for the last layer Fake Plant ink. Then, use the same blending tool used with the Overzealous ink to ink the entire background.

Step 8: On a separate piece of cardstock, stamp the nutcracker image with Emboss It Clear and heat emboss with gold embossing powder. Then ink the entire image with the Love Struck ink. On the same piece, stamp one of the sentiments and run it through the die cut machine to get the die cut of the sentiment and the nutcracker.
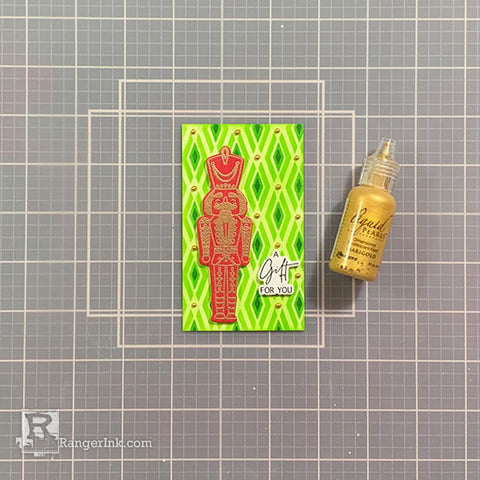
Step 9: Add foam adhesive to the nutcracker and sentiment and tape them onto the gift tag from step 7. Add Marigold liquid pearls on the background for embellishments.

Step 10: Use a hole puncher to create a hole in the gift tags and add some string. Now they are ready to be tied to a cute gift bag for a loved one!
 Hi! My name is Lieschen Harshbarger. I’m married to my best friend and even though we don’t have children yet, our dog Sophie fills our hearts with lots of love and joy. By day, I work for the State of Texas, but during my evenings and weekends you’ll find me in my craft room – making cards and trying out new techniques with my crafty supplies. I enjoy being creative, but mostly I have enjoyed getting to know others and learning fun new things in this wonderful crafty industry! You can see more of my crafty projects on my blog Harshgurl and Instagram at @harshgurl.
Related Posts

Make-It™ Chic Birthday Mini Card Set by Lauren Bergold
In this tutorial, Lauren Bergold creates an adorable set of four mini cards using the Make-It™ Chic Birthday Stamp...
Read More
Using Dina Wakley Media Scribble Sticks to Make Fun Backgrounds by Laura Dame
Bright color, bold marks, and lots of creative play! In this fun tag tutorial, Laura Dame...
Read More