


by Bobbi Smith

Spring Vignette Tray by Bobbi Smith
- Materials
- Instructions
- Tim Holtz Distress Oxide Ink Pads : Fossilized Amber, Peeled Paint, Cracked Pistachio, Broken China, Vintage Photo, Walnut Stain
- Tim Holtz® Distress Ink Pads : Wilted Violet, Walnut Stain
- Tim Holtz® Distress Markers : Worn Lipstick, Fossilized Amber, Broken China
- Tim Holtz® Distress Paint : Picket Fence, Pumice Stone
- Dina Wakley Media Gesso : Black Gesso
- Tim Holtz® Distress Watercolor Cardstock
- Ranger Surfaces Kraft Cardstock
- Ranger Non-Stick Craft Sheet™
- Ranger Ink Blending Tool & Foam
- Ranger Heat it™ Craft Tool
- Tim Holtz® Distress Splatter Brush
- Ranger Paper Creasers
- Ranger Glossy Accents™
- Ranger Adhesive Foam Rolls : Black
- Dina Wakley Media Brushes
- Tim Holtz Kraft-Core #24 Black Cardstock
- Tim Holtz Idea-ology: Sanding Grip, Vignette Tray (Smaller Tray: 4 3/4 x 9 x 1 inch), Vignette Panel (Smallest Panel 2-1/4 x 3-1/4 inch), Paper Dolls, Textured Surfaces (Burlap), Deco Sheets (Silver), Typography, Rose Design Tape, Snippets Ephemera Pack, Craft Thread
- Tim Holtz by Stampers Anonymous: Flourish Layering Stencil THS032, Newsprint & Type Stamp CMS266
- Tim Holtz Alterations by Sizzix: Sentiment Words 661807 & Wildflowers 661190 Dies, Quilted Texture Fades Embossing Folder 660999
Instructions

Hi everyone, Bobbi here! I’m so happy to be with you on the Ranger Blog today! I’ll be creating this Vignette Tray perfect for spring!

Step 1: Working on a Non-Stick Craft Sheet white wash the Vignette Tray and Vignette Panel front, back and sides using some watered down Picket Fence Distress Paint. You want the paint to be somewhat transparent on the wood. Allow to air dry or you can speed up the process with the Heat It Tool. After dry, splatter the Vignette Tray and Vignette Panel with Picket Fence Distress Paint using the Distress Splatter Brush. Load bristles with the paint then pullcback bristles with fingers and release to create the splatters. That is such a fun tool. Allow to air dry or use Heat It Tool.

Step 2: Take a piece of burlap from the Textured Surfaces pack. Trim it down to 6 3/4 x 4 1/4 with non-stick scissors. Paint a thin layer of Dina Wakley Media Black Gesso on burlap leaving some areas still exposed. Allowed to air dry thoroughly or use Heat It Tool. Place the Flourish Layering Stencil over top of gessoed burlap and tack down with tape to Non-Stick Craft Sheet. Using a Mini Ink Blending tool with foam, pick up Fossilized Amber Distress Oxide Ink from pad. Working in a circular motion, apply Oxide Ink with Blending Tool over layering stencil to the burlap. Move layering stencil to the right to continue the pattern.

Step 3: Carefully lift the layering stencil and dry inked burlap with Heat It Tool. To really activate that oxide look, spray droplets of water using Distress Sprayer onto inked surface of burlap. Then dry with Heat It Tool. Add splatters for additional interest using Picket Fence Distress Paint and the splatter brush to burlap. Then dry with Heat It Tool.

Step 4: Cut a piece of Ranger Kraft Cardstock 4 1/4 x 5. Apply Flourish pattern with Layering Stencil using Fossilized Amber Distress Oxide and blending foam to Ranger Kraft Cardstock, moving stencil to continue pattern. Lift stencil and dry Ranger Kraft Cardstock with Heat It Tool. Spray droplets of water using Distress Sprayer onto inked background to activate oxide look then dry with Heat It Tool. I just can’t help but say it…“that is so cool”!

Step 5: Using the Quilted Texture Fade, run the Ranger Kraft Cardstock through a diecut machine to create the raised texture on the surface. Cut Ranger Kraft cardstock in half, so you have two 4 1/4 x 2 1/2 pieces. Then shade edges of cardstock with Walnut Stain Distress Ink and a Blending Tool. Then dry with Heat It Tool.

Step 6: I added a few more water spots with just a bit more water droplets using the Distress Sprayer onto the Ranger Kraft Cardstock. Then dry with Heat It Tool. I have so much fun adding layers upon layers of interest to a piece. Swoosh a little Vintage Photo Distress Oxide onto the Non-Stick Craft sheet along with water droplets using the Distress Sprayer and pick up color with splatter brush. Splatter ink onto Kraft Cardstock and dry with Heat It Tool. Distress edges of cardstock with Ranger Bone Folder.

Step 7: Adhere both pieces of Ranger Kraft Cardstock to the top and bottom of the Vignette Tray with Glossy Accents. Then take the paper backing off of the burlap exposing the adhesive. Adhere burlap to center of Vignette Tray, leaving equal distance from top to bottom.

Step 8: Add Distress Oxide Cracked Pistachio to the Non-Stick Craft Sheet. Spray droplets of water onto the ink using a Distress Sprayer. Press or swipe a Distress Watercolor Cardstock through the ink, picking up the color.

Step 9: While the Distress Watercolor Cardstock is still wet, slowly pull the trigger of the Distress Sprayer to add larger water droplets. Then dry with Heat It tool. To add more distress, pick up droplets of color off the Non-Stick Craft Sheet with the Distress Watercolor Cardstock, blotting to pick up the color (not swiping), then drying with Heat It Tool.

Step 10: Add additional colors separately to add more definition to each color. Swipe Peeled Paint and Vintage Photo Distressed Oxides onto Non-Stick Craft Sheet, making sure the colors do not to touch. Spray droplets of water onto the ink using a Distress Spray bottle. Pick up droplets of color off the Non-Stick Craft Sheet with the Distress Watercolor Cardstock, blotting to pick up the color (not swiping). While the Distress Watercolor Cardstock is still wet, slowly pull the trigger of the Distress Sprayer to add larger water droplets. Then dry with Heat It Tool.

Step 11: Color four or five different sheets of Distress Watercolor Cardstock with the various Distress Oxide Ink colors combinations, using the same coloring techniques. You can also accent your Distress Oxides with original Distress Inks too. Here I used Fossilized Amber Distressed Oxide Ink alongside Wilted Violet Distress Ink. They work beautifully together.

Step 12: Cut a piece of Ranger Kraft Cardstock 4 1/4 x 5 1/2. Using the Stampers Anonymous Newsprint Stamp and Fossilized Amber Distressed Oxide Ink, stamp the image onto Ranger Kraft Cardstock. Dry with Heat It Tool.

Step 13: Spray large droplets of water using Distress Sprayer on stamped image, then dry with Heat It Tool.

Step 14: Repeat steps using various Distress Oxide Inks on additional Ranger Kraft. Cardstock.

Step 15: Using the Distress Watercolor Cardstock that you colorized and the Ranger Kraft Cardstock that you stamped, die cut wildflower images using the Tim Holtz Sizzix Wildflower Thin dies. Swipe Broken China Distressed Oxide Ink onto Non-Stick Craft Sheet, then add droplets of water to ink. Pick up droplets of color off the Non-Stick Craft Sheet with the die cut wildflowers, blotting to pick up the color (not swiping), then drying with Heat It Tool.

Step 16: Add shading to wildflowers with Walnut Stain Distress Ink and a Blending Tool with foam. Dry with Heat It Tool, if needed.

Step 17: Start layering all of the wildflowers using small pieces of Ranger Black Adhesive Foam adhered to back of the largest part of flower. Making sure not to add any flowers past the bottom portion of the burlap. You can tack the bottom of the stems to the burlap with a little Glossy Accents.

Step 18: Add Design Tape to edge of Vignette Tray and burnish with Ranger Bone Folder. Snip the corners of the tape with scissors and fold along all edges.

Step 19: Use Distress Markers to tint Paper Doll by coloring the image and then blotting with towel or rubbing away the excess ink with a cotton swab. Then dry with Heat It Tool.

Step 20: Color Typography using a little Pumice Stone Distress Paint. Then let air dry or dry with the Heat It Tool. Diecut the word “happy” from small strip of black Kraft Core Cardstock. On a scratch piece of paper, sand the black Kraft Core to expose the underlying kraft. Cut a small V on right side of word strip, to create a banner. Back with a small piece of silver Deco Sheet.

Step 21: Adhere some Design Tape to the Vignette Panel. Then tie off a little Eclectic Elements Craft Thread to the Vignette Panel. Flip the panel over and build up 3 stacks of Ranger Black Adhesive Foam in each corner, for height.

Step 22: Attach the “enclosed” Snippet Ephemera with the craft thread to the wildflowers. Attach the Vignette Panel. Then adhere the banner, Typography, Paper Dolls and Butterfly Snippets using Glossy Accents.
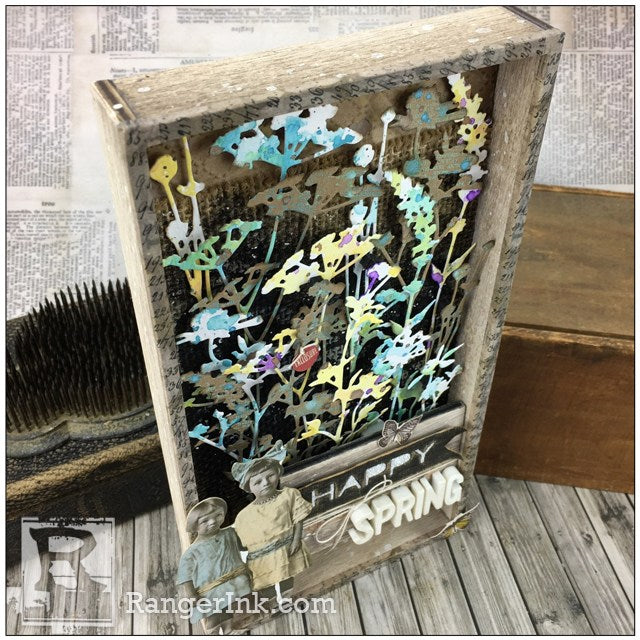
I just love the dimension this sweet little Spring Vignette Tray creates. Distress Oxide Inks are so much fun to experiment with, I truly hope you give it a try!

Related Posts

"My Cup of Care" Journal Page with Dylusions Pastel Paints by Miranda van den Bosch
Read More

Tim Holtz Distress® Micro Glaze Embossing Resist by Tami Bastiaans
Create gorgeous embossed backgrounds with the Micro Glaze Embossing Resist technique! ✨ Tami Bastiaans pairs Tim Holtz Distress® Micro...
Read MoreDrawer Title
- Choosing a selection results in a full page refresh.