


Guest Designer Shelly Hickox shares an easy embossing resist technique that you can use on cards, tags, and home decor projects!

Stenciled Embossed Resist by Shelly Hickox
- Materials
- Instructions
- Tim Holtz® Waterbrush
- Tim Holtz Distress® Watercolor Cardstock
- Ranger Heat it™ Craft Tool
- Ranger Non-Stick Craft Sheet™
- Ranger Ink Blending Tool & Foam
- Ranger Wonder Tape™
- Ranger Glossy Accents™
- Ranger Embossing Powder: Weathered White
- Ranger Emboss It™ Dabber
- Archival Ink™ Jet Black
- Archival Ink™ Designer Series: Wendy Vecchi: Watering Can
- Tim Holtz® Distress Glitter Clear Rock Candy
- Tim Holtz® Distress Spray Stains: Barn Door, Broken China
- Tim Holtz® Distress Stains: Wild Honey
- Tim Holtz® Distress Ink Pads: Worn Lipstick, Wild Honey, Tumbled Glass
- Stampers Anonymous Classics 9 Stamp
- Studio 490 Clearly For Art Film
- Tim Holtz Stampers Anonymous- CMS213 Perspective Stamp
- Tim Holtz Idea-ology Industrious Stickers
- Dollar Store Masonite Plaque
Instructions
 Hi all! It’s Shelly Hickox with you today sharing a quick and easy resist technique. I love working with embossing powder and experimenting with new techniques. Weathered White embossing powder has a very unique texture and finish – perfect for an aged effect that mimics the look of texture paste, but without the drying time!
 1. Begin by cutting a piece of watercolor to fit the plaque. Stamp script randomly using Watering Can Archival ink.
 2. Next, lay stencil over paper and pounce with Emboss It Dabber. Reposition stencil as required to cover entire surface.
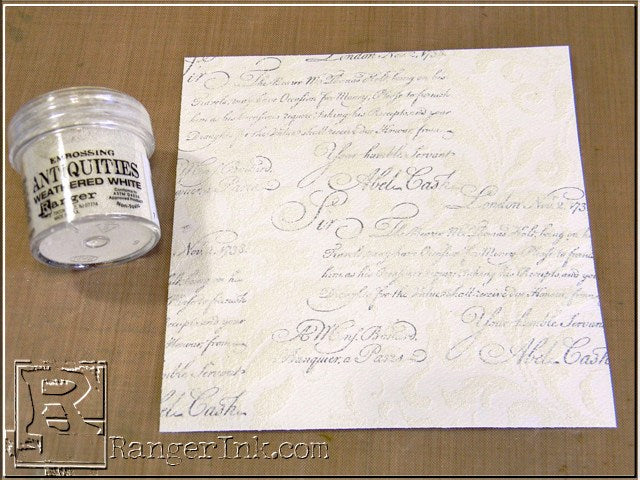 3. Remove stencil and immediately cover inked surface with Weathered White Embossing Powder. Use heat gun to melt powder.
 4. Spray/dispense Distress Stains onto a Non-Stick Craft Sheet. Spritz lightly with water. If you want a lighter shade of stain, spray more heavily to dilute.
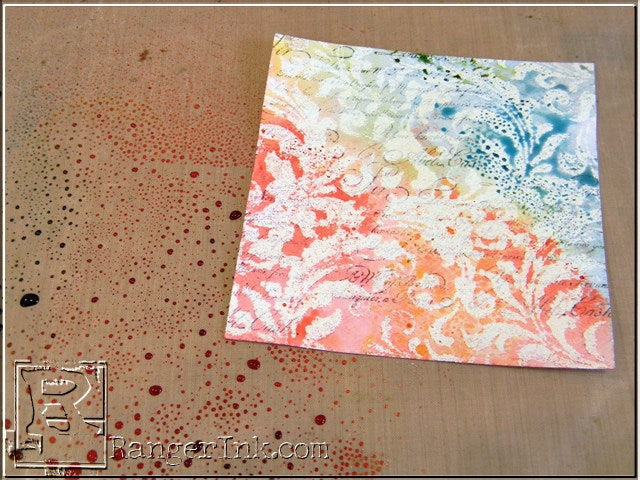 5. Lay your embossed watercolor paper face down onto the ink and press to transfer stain to paper. Lift paper off the sheet. If the stain isn’t spreading enough, spritz with more water. If more layers of color are desired, repeat the process until you’re happy with the look. Let air dry or use heat gun to dry.
 6. Use Mini Distress Inks and Ink Blending Tool to intensify color. Because the Weathered White embossing powder has a matte finish, it won’t totally resist the ink. If you’d rather keep the embossed areas white, you can gently wipe the ink off with a baby wipe.
 7. Prepare the plaque by removing the existing paper and lightly sanding the edges. Prime the edges with white gesso and, when dry, paint with Glacier White Paint Dabber. Set aside to dry.
 8. Stamp butterfly onto plastic film using permanent ink. When dry, cut out.
 9. Spread a thin layer of Glossy Accents on to back side of butterfly. Cover with Rock Candy Distress Glitter. Let dry.
 10. Stamp sentiment onto a watercolor paper scrap using Watering Can Archival Ink. Color using a water pen and Distress Ink.
 11. Now let’s put it all together! Cover the back of the embossed paper with Glue ‘n Seal and adhere to plaque. Use a brayer to smooth it and get rid of any air pockets. When dry, adhere butterfly to plaque using Wonder Tape. Heat lightly with heat tool and bend up wings. Cut individual words from stamped sentiment and adhere them to the plaque using Glue ‘n Seal. Finally, add idea-ology Industrious Stickers to top and bottom of plaque.
 How fun and easy was that? Be sure and check out Ranger’s entire range of embossing powders – I know you’ll be as inspired as I am!

Related Posts

"My Cup of Care" Journal Page with Dylusions Pastel Paints by Miranda van den Bosch
Read More

Tim Holtz Distress® Micro Glaze Embossing Resist by Tami Bastiaans
Create gorgeous embossed backgrounds with the Micro Glaze Embossing Resist technique! ✨ Tami Bastiaans pairs Tim Holtz Distress® Micro...
Read MoreDrawer Title
- Choosing a selection results in a full page refresh.