


by Wendy Vecchi
Stenciled Holiday Towel by Wendy Vecchi
- Materials
- Instructions
- Archival Ink™ Designer Series: Wendy Vecchi : Garden Patina, Fern Green, Watering Can, Potting Soil
- Ranger Mini Blending Tool
- Ranger Non-Stick Craft Sheet™
- Ranger Heat it™ Craft Tool
- Wendy Vecchi Studio 490 /Stampers Anonymous Happy Holidays (WVSFA033), Little Bits (WVSFA028), Polka Dotty (WVSFA007)
- Wendy Vecchi Studio 490 /Stampers Anonymous Spatter Stamp (WVBG017)
- Cotton Kitchen Towel
- Painter’s Tape or Post-It Notes
- Cardstock Scrap
- Q-Tip
Instructions


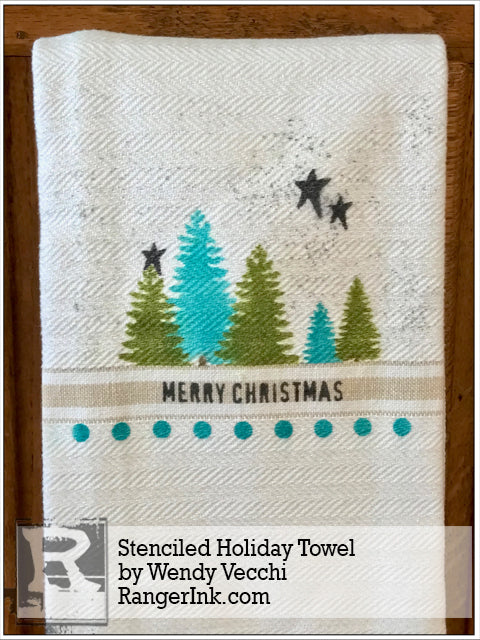
Step 1: Place a cardstock scrap under the area to be stenciled. This prevents ink from being transferred thru the towel.
Choose your Archival Inks. Place the “Merry Christmas” stencil over the striped area and use Painter’s Tape to mask off the surrounding area. This also holds the stencil in place.
Use Watering Can with the Mini Blending Tool to stencil.

Step 2: Position the larger pine tree slightly to the left of center and stencil with Garden Patina. Use a Q-Tip to transfer Potting Soil ink to the tree trunk area.

Step 3: Place tape over the stripe to mask it off. Turn the stencil over to get a slightly different version of the tree.
Position the tree so that the bottom is on the tape, allowing a shorter tree to be stenciled. Stencil the tree with Fern Green.
With the tape still in place, stencil a shorter tree to the left, using Fern Green.

Step 4: Now switch to the small tree stencil. With tape in place, stencil a short small tree, using Garden Patina.

Step 5: Now stencil the full small tree to the right, using Fern Green.

Step 6: Position the Polka Dotty stencil and line up a row of dots, directly under the striped border. Mask off the area above and below the dots and stencil one row of dots, using Garden Patina.

Step 7: Stencil a large and small star using Watering Can on the right side. Stencil a small star to accent the small tree on the far left.

Step 8: Tap the spatter stamp onto the Watering Can pad and lightly add “snowflakes” around the trees.

Step 9: Dry and heat set the inks with the Heat-It Tool or iron.

Additional Example: If you prefer more traditional holiday colors, here’s another example.
This uses Fern Green, Jet Black, and Buttercup archival ink for the stars.
Tips & Hints:

Related Posts

49 and Market Irresistible Curiosities Journal Page by Jessica Mikels
Step into a world of whimsy with this Irresistible Curiosities journal page by Jessica Mikels! Layered with soft ink...
Read More
Make-It™ Chic Birthday Mini Card Set by Lauren Bergold
In this tutorial, Lauren Bergold creates an adorable set of four mini cards using the Make-It™ Chic Birthday Stamp...
Read More