


by Jade Sutton

Summertime Flowers by Jade Sutton
- Materials
- Instructions
- Dina Wakley Media Brushes
- Dina Wakley Media Palette Knife
- Liquid Pearls™: Avocado
- Ranger Glossy Accents™
- Ranger Texture Paste
- Dylusions Ink Sprays: Fresh Lime, Squeezed Orange, Vibrant Turquoise, London Blue, Cherry Pie, Pure Sunshine, Bubblegum Pink, and Crushed Grape
- Dylusions Paint: Cut Grass, Vibrant Turquoise, Fresh Lime, and Postbox Red
- Dylusions Stencils: Shapes Large, Shattered Large
- Dylusions Journal Insert Sheets
- Dylusions Cling Mount Stamps: Basic Backgrounds, Background Love, Around the Edge
- Archival Ink™ #0 Pads: Jet Black
- Ranger Non-Stick Craft Sheet™
- Tim Holtz Tonic Craft Scissors
- Tim Holtz Idea-logy Design Ruler
- Tim Holtz 9 Grid Acrylic Blocks
- Tim Holtz Sizzix Mixed Media Thinlits Die
- Two pieces of copy/printer paper
- Baby Wipes
- Stabilio Black Pencil
- Black Fine Point Sharpie
- Sizzix BigKick Machine
- White Cardstock
- White Uni-ball Signo Pen
- Posca Black Pen
Instructions

Today I want to share with you a fun summertime journal page. I hope you’ll create a page with me!

Step 1: Gather your supplies. Stamp two pieces of copy/printer paper (or any other thin paper) with Dylusions stamps using Jet Black Archival Ink.
Step 2: Tear the two pieces of paper into collage size pieces.
Step 3: Glue the collage pieces onto one Dylusions Journal Insert Sheet with Ranger’s Gel Medium.
Step 4: Cut off the excess collage papers from the edges of the Journal Insert Sheet and apply Dylusions Fresh Lime Paint all over the page with a baby wipe.

Step 5: Add Dylusions Cut Grass and Vibrant Turquoise Paint around the edges of the journal page with a baby wipe. Let the page air dry or dry with a Heat Tool.
Step 6: While the journal page is drying, let’s make the flowers. Add some Ranger Texture Paste and Dylusions Postbox Red paint to the Non-Stick Craft Sheet with a Palette Knife. You will need more texture paste than paint.
Step 7: Mix the Dylusions Postbox Red Paint and Ranger Texture Paste together. Apply the texture paste to a 5 X 8 inch piece of white cardstock through the Dylusions Flower Shape Stencil. Repeat for all three flowers.
Step 8: Remove the stencil and wash the stencil immediately because the texture paste will harden on the stencil. Let the flowers air dry.

Step 9: After the flowers are dry, cut them out with Tim Holtz’ scissors and add the flowers’ centers with a Stabilo pencil.
Step 10: While the flowers are drying, Let’s make the vase. Spray a piece of 5 X 7 inch white cardstock with Dylusions Fresh Lime Spray. Let it dry.
Step 11: Spray your favorite colors of Dylusions Ink Sprays through the 9 X 12 Dylusions “Shattered” Stencil. I used Squeezed Orange, Vibrant Turquoise, London Blue, Cherry Pie, and Crushed Grape. Let the paper air dry or dry with a Heat Tool.
Step 12: Draw black lines where the Shattered Stencil was laying using a Black Fine Point Sharpie and Tim Holtz’s Ruler.

Step 13: Trace the Dylusions Keyhole Mask on the area that you like the best.
Step 14: Cut out the keyhole/vase using Tim Holtz’s scissors.
Step 15: Cut a piece of 6 X 12 inch white cardstock into two 6 X 6 inch pieces. Spray one piece of cardstock with Dylusions Squeezed Orange and Pure Sunshine Dylusions Ink Sprays, and the other with Bubblegum Pink and Cherry Pie sprays.
Step 16: Die cut the large Tim Holtz Corner Die from each piece of sprayed 6 X 6 inch paper using your Die Cutting Machine.

Step 17: Glue the corner pieces and vase to the background with Glossy Accents.
Step 18: Add accents to the flowers with Avocado Liquid Pearls and a Posca black pen. Then add highlights to the center of the flowers with a White Uni-ball Signo pen.
Step 19: To make the leaves, add Fresh Lime, Cut Grass, and London Blue Dylusions Paint to a piece of white cardstock with a baby wipe.
Step 20: Stamp the large leaf rubber stamp on the painted cardstock with Archival Ink. Cut out the leaves.
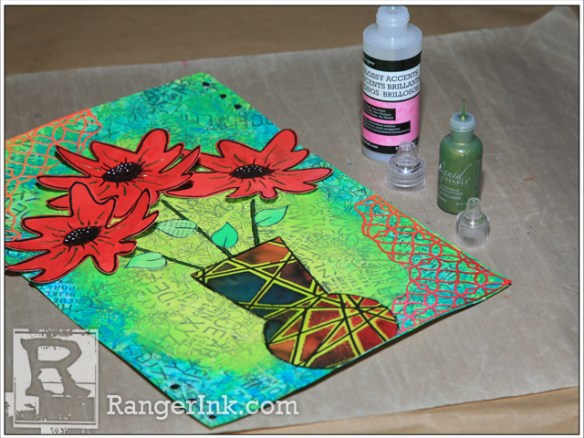
Step 21: Glue the three flowers and leaves to the journal background. Add Avocado Liquid Pearl to the stems. Now the project is complete.

Related Posts

Painting with Liquid Pearls by Miriam Prantner
A little Liquid Pearls magic goes a long way! Miriam Prantner keeps this card simple and stunning by painting...
Read More
"My Cup of Care" Journal Page with Dylusions Pastel Paints by Miranda van den Bosch
Read More
Drawer Title
- Choosing a selection results in a full page refresh.