


Guest artist, Melissa Winters shares how she combines ICE Resin® and QuickCure Clay to create this dramatic heart necklace just in time for Valentine's Day!
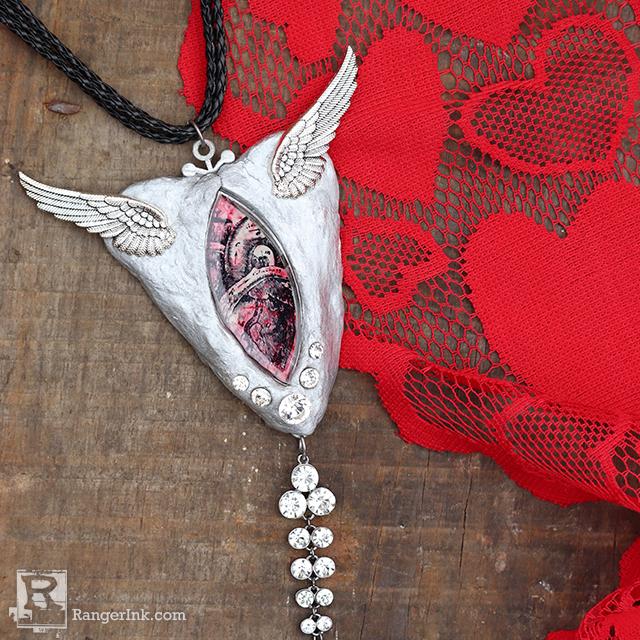
Te Amo Corazón Necklace by Melissa Winters
- Materials
- Instructions
- ICE Resin®
-
ICE Resin® Mixing Cups and Stir Sticks
ICE Resin® Rune Bezel: Large Ellipse Silver
ICE Resin® Rune Bezel Template
ICE Resin® Findings
Tim Holtz® Alcohol Ink: Cranberry, Slate
Tim Holtz® Alcohol Ink YUPO®: White
Tim Holtz® Mixative: Silver
Tim Holtz® Alcohol Blending Solution
QuickCure Clay: Neutral
Ranger Heat It Craft Tool
Ranger Non-Stick Craft Sheet
Tim Holtz® by Stampers Anonymous Cling Mount Stamp Set: Cadaverous
Metal Wings
Crystals
Braided Leather Cord
Instructions
I love Valentine’s Day. Some say it is a manufactured holiday. I say anytime I get to show someone I love them it is a good thing. This year I was hoping to make something bold to wear to my Anniversary dinner. Then I remembered Quick Cure Clay. This pairs perfectly with ICE Resin. My heart began to flutter.

Step 1: Begin using Tim Holtz Alcohol Ink on Alcohol Ink YUPO®. Make a design you find pleasing. I decided to use Cranberry and Slate mixed with a small amount of Alcohol Blending Solution. Allow to dry. Use the Tim Holtz Cadaverous Stamp set and stamp the heart image using Jet Black Archival Ink. Cut out image using the ICE Resin Rune Bezel template to fit the ICE Resin Rune Bezel- Large Ellipse. Set aside.

Step 2: Take the large ellipse bezel from the ICE Resin® Rune collection and begin to build your heart shape around the bezel with QuickCure Clay. I have found that if you knead the clay to soften it up a little it works better. Don’t be afraid to add or take away until you get the shape you want.

Step 3: Next add the indentations in the clay for the crystals. Remove crystals once you have made the marks where you want them to go.

Step 4: Working in a well ventilated area, cure the Clay according to package instructions using a Ranger Heat It Craft Tool. The process for curing should only take a minute or two but could take longer depending on the thickness of your piece. Once you see a wave of smoke, the curing process has began and the Heat Tool can be turned off. You will know it is cured once it feels hard like pottery. Set aside to cool.

Step 5: Once cooled, add color to the clay by brushing on Tim Holtz Mixative in Silver. Allow to dry. While you are waiting, mix a batch of ICE Resin according to package instructions and allow the indicated wait time. Place a dab of mixed Resin inside bezel to secure the YUPO® paper. This will decrease the possibility of bubbles later. Slowly drip Resin in the center of the bezel and fill. Once you have filled the bezel, use a ICE Resin Brush to add a thin coat of resin to the elongated clay heart.

Step 6: When you have finished coating the heart, allow the remaining Resin to sit for 20 minutes. This will thicken the Resin and it can be used like glue to attach metal wings and crystals. Allow to fully cure for three days. After the curing process, add braided leather and crystal dangle. You will certainly be the sweetheart at any Valentine’s gathering.
 Melissa Winters (purpleartlove) lives in Granville, Ohio with her family and herd of animals. By day she works for a large veterinary distribution company. Melissa has been featured in Belle Amoire and Green Craft magazine. If you can’t come visit Canal Market District in person, you can find her on Facebook, Instagram and Etsy https://www.etsy.com/shop/purpleartlove.
Related Posts

Simon Hurley create. Ethereal Trees Christmas Card by Cassie Trask
Christmas is almost here! If you’re squeezing in those last handmade cards, let this magical winter scene inspire you....
Read More
Stickles & Embossing Powder Christmas Card by Miriam Prantner
This adorable snowman card by Miriam Prantner is packed with festive charm! Created with the Tim Holtz Sizzix Winston...
Read More