


Guest Blogger Kourtney Osborn-Vallee shares a tutorial for a rich jewel toned tag that is full of texture and shimmer!
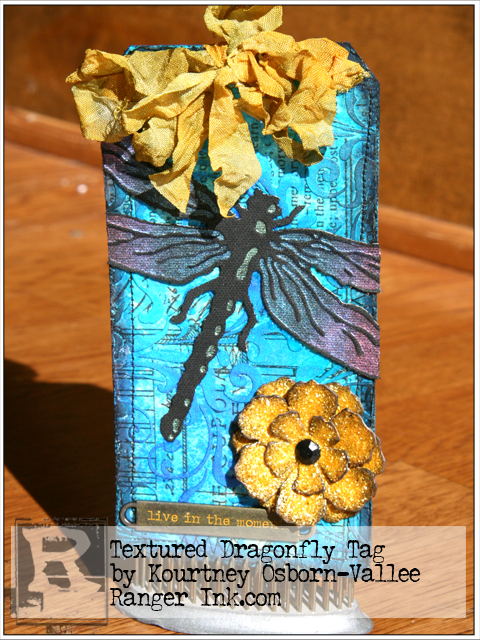
Textured Dragonfly Tag by Kourtney Osborn-Vallee
- Materials
- Instructions
- Ranger Mini Blending Tool
- Ranger Artist Brush Set
- Dina Wakley Media Palette Knife
- Tim Holtz® Waterbrush
- Tim Holtz Distress® Stains
- Tim Holtz Distress® Ink Pads
- Tim Holtz Distress® Glitter
- Ranger Non-Stick Craft Sheet™
- Ranger Heat it™ Craft Tool
- Ranger Texture Paste
- Ranger Sticky-Back Canvas
- Archival Ink™ #0 Pads
- Ranger Glossy Accents™
- Dylusions Ink Sprays
- Tim Holtz by Idea-ology Tissue Wrap- Melange
- Tim Holtz Alterations by Sizzix- Layered Dragonfly, Tattered Floral
- Tim Holtz Stampers Anonymous Layering Stencil- Flourish
- Tim Holtz by Idea-ology Word Bands, Crinkle Ribbon; rhinestone
- Tim Holtz Tonic Studios Paper Distresser, Scissors
- Tim Holtz Sizzix Vagabond;
Instructions
 Guest blogger Kourtney Osborn-Vallee joins us today with a tutorial for stunning jewel-toned tag that is full of texture. Add in Perfect Pearls and Distress Glitter for perfect touches of shimmer.
 Working on a Non-Stick Craft Sheet. Use a paint brush to apply Soft Gel Medium to top side of the tag and back side of the tissue paper and then place wet sides together. Allow to dry.
 Lay the Flourish Layering Stencil over the top of the tag, tissue paper side up. Using a palette knife, start at the top and swipe Texture Paste down over the stencil and fill in entire image. Return unused paste to the bottle.
 Immediately lift the stencil off of the tag and clean the paste out of the stencil. Allow pasted tag to dry.
 Lightly mist tag with water. Then mist puddles of Dylusions in London Blue and Calypso Teal onto the tag. Then mist again lightly with water to get the colors to blend. Dry tag with heat tool. For a shimmery top layer, lightly mist the tag with Perfect Pearls Turquois Mist. Dry with heat tool.
 Use a sewing machine and stitch random designs around the inside edge of the tag. Use Paper Distresser and go around the outer edge of the tag to create a ruffed up edge. Then apply Jet Black Archival ink to the edge of the tag with a mini blending tool, this makes the colors really start to pop.
Peel the backing off of the Sticky Back Canvas and stick it to a Manila Tag to give it some stability. Using the Vagabond Machine and Layer Dragonfly die, die cut the dragonfly at an angle out of the canvas. Then place the die cut dragonfly in the coordinating embossing folder and then run it through the Vagabond again to add the texture to the die cut.
 Using the dabber top, apply Black Soot paint to the entire dragonfly die cut shape and allow to dry.
 Working on the Non-Stick Craft Sheet, dip the Detail water brush into one of the Perfect Pearl colors to pick some up and then mix it on the craft sheet to make a pearly watercolor paint. Apply the pearl mixture to the recessed image. Repeat this with each color. Once all of the colors are applied, go back over the entire thing with just water on the brush to blend all of the colors together and get rid of the harsh lines. Don’t worry if you get out of the lines, you can go back over the raised image with a black marker to hid the oops.
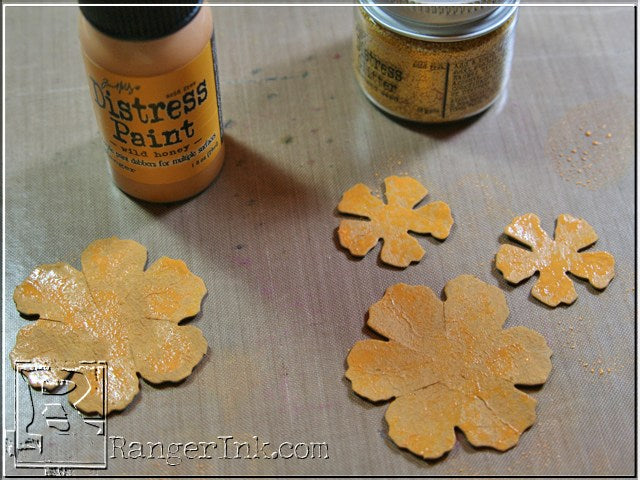 Using the Vagabond machine and Tattered Floral die, die cut one small and two medium flowers out of chipboard. Paint the chipboard pieces with Wild Honey Distress paint and allow to dry. I like to paint the chipboard pieces, this way if the glitter doesn’t stick to the entire image in the next step you won’t see the chipboard color showing through.
Take your scissors and snip in a little in between each of the petals on the medium flowers. Apply a medium layer of Glossy Accents to the top of the chipboard flowers and then sprinkle with Mustard Seed Distress Glitter. Don’t pat the glitter down, let it lay naturally, this will give you the most glitter and shimmer when the light hits it. Allow to dry. Using the Mini Blending Tool, apply Jet Black Archival ink to the edges of the flowers. Use glossy accents and glue the flower pieces together and place a rhinestone in the center of the top flower.
 Working on the Non Stick Craft Sheet, mush the Mustard Seed Distress ink pad to transfer color and then mist with water to form beads. Lightly mist tag with water and then tap into colored beads to color ribbon. To add a little darker shading, apply Wild Honey Distress Stain to mat and tap wet ribbon into the darker color. Crinkle into a ball and dry with heat tool. Once ribbon is dry, we will add a little darker color to make the ribbon match the tag. Mush Black Soot Distress ink pad onto the craft sheet and mist with water to forms beads. Very lightly tap the ribbon into the colored beads. Dry with heat tool.
 Place Metal Word band on Non Stick Craft Sheet. Using dabber apply Wild Honey Distress paint to entire top of metal word band. Make sure to get the paint down into the recessed words. Then use a baby wipe and gently wipe the top of the word band, removing the paint from the top and leaving the paint down in the words. Allow to dry.
 Assemble tag. Glue down the Dragonfly, Metal Word Band and Flower with Glossy Accents. Tie a loose double bow threw the whole in the top of the tag.

Related Posts

"My Cup of Care" Journal Page with Dylusions Pastel Paints by Miranda van den Bosch
Read More

Tim Holtz Distress® Micro Glaze Embossing Resist by Tami Bastiaans
Create gorgeous embossed backgrounds with the Micro Glaze Embossing Resist technique! ✨ Tami Bastiaans pairs Tim Holtz Distress® Micro...
Read MoreDrawer Title
- Choosing a selection results in a full page refresh.