


In this tutorial, Audrey Pettit creates a simply elegant card in a classic color combo of silver and white using Stickles Glitter Gels! This card can be personalized by adding your favorite colors for a birthday, anniversary, wedding, graduation, retirement, and more.
This Calls for a Huge Celebration Card by Audrey Pettit
- Materials
- Instructions
-
Wendy Vecchi MAKE ART Perfect Cardstock: Grey Portrait Card, White Panel
Letter It™ Clear Stamps: You Rock
Letter It™ Clear Stencil: Treading Hearts
Ranger Stickles Glitter Gel: Moon Dust, Asteroid
Wendy Vecchi Archival Ink: Watering Can
Tim Holtz Distress® Mini Ink: Tattered Rose
Ranger Mini Ink Blending Tool with Foam
Ranger Artist Brushes
Ranger Multi-Medium Matte
Ranger Adhesive Foam Tape: White
Ranger Non-Stick Craft Sheet
Tim Holtz® Alterations by Sizzix Die Set: Stitched Rectangles
Enamel Dot Stickers
Satin Ribbon
Corner Rounder Punch
Therm O Web Pixie Spray
Instructions
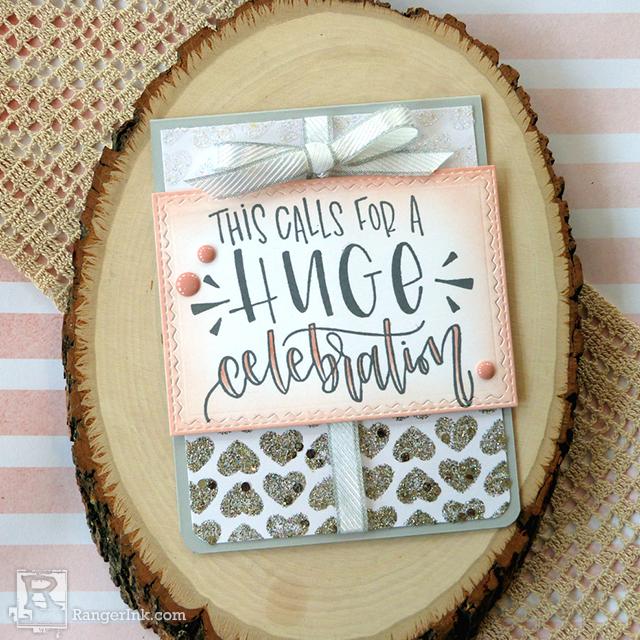
Hi everyone, it’s Audrey, and I’m so excited to be back on the Ranger Ink Projects Page to share a quick and easy card project with you. Everyone likes the metallic sparkle and shine of a really good glitter, right? And what could be better than some no-muss, no-fuss glitter from the Ranger Stickles line? Today I’ll show you how to create a simple, yet very elegant, card design using the fabulous Stickles Glitter Gels.

I love the simple elegance of this card design done up in a classic color combo of silver and white. Then simply pull in your favorite color of Distress ink to personalize this card for a birthday, anniversary, wedding, graduation, retirement, and more.
.
Step 1: To begin, gather a Wendy Vecchi MAKE ART Perfect Grey card base and a Wendy Vecchi MAKE ART White Panel. Spray the back of the Treading Hearts Stencil with Pixie Spray. Set the stencil aside todry until the spray adhesive is tacky to the touch.

Step 2: Center the stencil onto the white cardstock. Starting at the top of the stencil, and working down to about the center of the paper, apply Moon Dust Glitter Gel with a palette knife. Apply Asteroid Glitter Gel to the bottom portion of the stencil. Peel up the stencil, and scrap any excess Gel back into the containers as possible. Wash the stencil and tools immediately with warm soapy water. Set the cardstock aside to dry completely.

Step 3: Round the bottom corners of the card base and the white cardstock using a corner rounder punch. Wrap satin ribbon down the middle of the card, tying the ends into a knot at the top of the card. Adhere the white cardstock to the card base. Tie a bow from the ribbon.

Step 4: Stamp the sentiment onto another piece of white cardstock in Watering Can Archival Ink. Die cut the sentiment with a stitched rectangle die.

Step 5: Apply Tattered Rose Distress Ink to the edges of the rectangle using a Mini Ink Blending Tool with Foam. Dab a bit of the ink onto a Craft Sheet, and pick up the ink with a slightly wet paintbrush. Color the insides of the letters in an ombre shading of dark at the top of the letters, fading off to white at the bottom.

Step 6: Add strips of foam adhesive to the back of the sentiment panel, and then attach the panel to the card base. Add enamel dots.

Try the other colors of Stickles Glitter Gel for a completely different look.
Enjoy!

Related Posts

Dylusions Neon Ink Sprays Journal Page by Miranda van den Bosch
Neon color takes center stage on this eye-catching journal page by Miranda van den Bosch! The newest...
Read More
Tim Holtz Distress Paint Summer Card by Tami Bastiaans
Bring the beach to your craft table! Tami Bastiaans created this bright summer card using Distress Texture Paste, Paints,...
Read More