


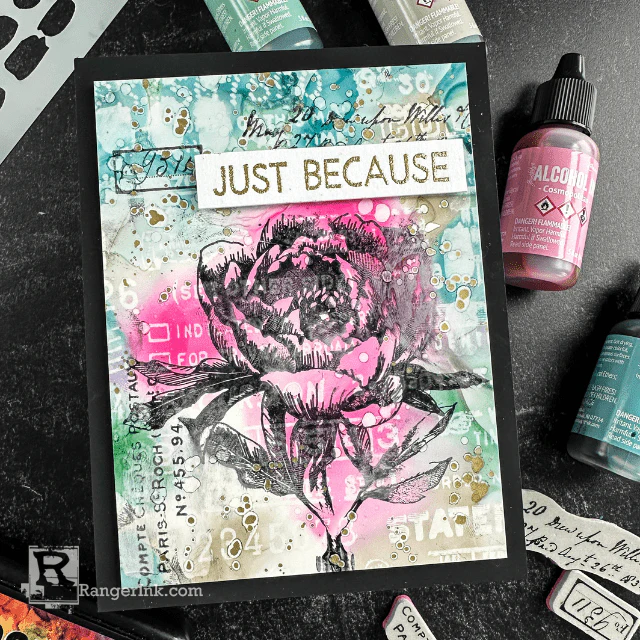
Just because moments deserve something special! Follow along as Cheiron Brandon uses the latest Tim Holtz Alcohol Inks and the Alcohol Ink Lift technique to create this stunning floral card bursting with vibrant layers and colors.
Tim Holtz Alcohol Ink Floral Card by Cheiron Brandon
- Materials
- Instructions
Tim Holtz Alcohol Ink Cosmopolitan
Tim Holtz Alcohol Ink Juniper
Tim Holtz Alcohol Ink Bayou
Tim Holtz Alcohol Ink Smudge
Tim Holtz Alcohol Ink Blending Solution
Tim Holtz Alcohol Lift-Ink Pad
Tim Holtz Alcohol Lift-Ink Re-inker
Emboss It™ Ink Pad Clear
Embossing Powder Gold
Tim Holtz Distress® Archival Ink - Black Soot
Ranger Heat It™ Craft Tool
Tim Holtz Stampers Anonymous Cling Mount Stamp French Garden
Tim Holtz Stampers Anonymous Cling Mount Stamp Tidbits
Tim Holtz Stampers Anonymous Cling Mount Stamp Floristry
Tim Holtz Stampers Anonymous Mini Layering Stencil Set #55 - Brushmark
Instructions
Hello there crafty friends! It’s Cheiron Brandon here to share a card I have created with some of the newest colors of Tim Holtz Alcohol Ink. These new colors are the perfect additions to the palette, and you know I always love new colors to play with. Today I combined Alcohol Ink, Alcohol Lift Ink and stamping in Distress Archival Ink to create lots of light layers on my floral card, I will show you how. Be sure you are working in a well ventilated area for this one!

Step 1: Cut a panel of Yupo Paper. I started with a 5 x 7 piece and will cut down to size at the end. Open your Alcohol Inks and Blending Solution. I used Cosmopolitan, Juniper, Bayou, and Smudge.

Step 2: Add Alcohol Ink Blending Solution to your Yupo Panel.

Step 3: Drop the Alcohol Ink onto your panel and use the Alcohol Ink Blower to move the color around. Add more ink as needed.

Step 4: Let dry or dry with a heat tool.

Step 5: Ink up the entire Tidbits stamp set with Alcohol Lift Ink. The easiest way I found to do this is by laying the stamp set on its back and then placing the inked Yupo right on top of it.

Step 6: Place a piece of scrap paper and a brayer over your panel and brayer over it with firm (but not too firm) and even pressure.

Step 7: Remove the stamp and you will see that the Alcohol Lift Ink has “lifted” the color. Use a clean paper towel to blot, then buff over the piece and completely lift the ink. IMPORTANT: Do this in sections, and be sure to use a clean part of the towel each time. You will get results like this…


Step 8: Stamp the floral image from the French Garden stamp set using Distress Archival Ink in Black Soot Ink and dry with a heat tool. Cut your panel to size.

Step 9: Put some Alcohol Ink Lift reinker onto your glass mat and dab with a foam blending tool, and then dab it off a bit.

Step 10: Place the Brushstroke stencil over your panel and use the tiny foam blending tool that has the Alcohol Lift Ink reinker on it to remove more ink. Press lightly through the stencil and remove the stencil when done.

Step 11: Use the Distress Archival Ink in Black Soot to fill in the background of the panel by stamping the small words and labels from the French Garden set.

Step 12: To finish the card, mix some Gilded Foundry Wax with Alcohol and splatter over your panel, then heat with an embossing tool. Once the panel is dry, stamp and emboss the Just Because greeting from the Floristry set in gold and add your panel to a black card base.

I hope you had fun creating this card with me today! I love how these light colors of Alcohol Ink look with all the layers we created and really pop on the black background. Hope you love these new colors as much as I do!
 Cheiron Brandon has been creating handmade cards for over 15 years. She loves to create cards that incorporate Tim Holtz Distress products and mixed media supplies. She has done design work for many companies in the paper crafting industry including Tim Holtz, Simon Says Stamp, Reverse Confetti, Hero Arts, AALL & Create, Mama Elephant, Neat and Tangled, Dina Wakley, and Ranger Ink. She currently contributes a monthly feature to the Ranger Ink and Simon Says Stamp blogs. Cheiron lives in New Jersey and shares her art (almost) every day on Instagram @cheiron and other tutorials on her YouTube Channel.
Related Posts

Make-It™ You're The Zest Card by Miriam Prantner
Bright, bold, and full of summer vibes! Miriam Prantner created this cheerful citrus-inspired card using the Make-It Fun with Fruit...
Read More
Dylusions Neon Ink Sprays Journal Page by Miranda van den Bosch
Neon color takes center stage on this eye-catching journal page by Miranda van den Bosch! The newest...
Read More