


Follow along as Cheiron Brandon shows you how to make these vibrant pearlescent tags with the newest colors of Tim Holtz Alcohol Pearls and Alloy.
Tim Holtz Alcohol Pearls and Alloy Tags by Cheiron Brandon
- Materials
- Instructions
Tim Holtz® Alcohol Ink Yupo® Heavystock
Tim Holtz® Alcohol Pearls
Tim Holtz® Alcohol Ink Alloy: Rose
Tim Holtz® Alcohol Blending Solution
Tim Holtz® Alcohol Ink Blower
Tim Holtz® Distress Texture Paste: Matte
Tim Holtz Distress® Palette Knives
Tim Holtz® Stampers Anonymous - Mini Layering Stencils - Set #42 - THMST0
Tim Holtz® Stampers Anonymous - Mini Layering Stencils - Set #15 - THMST015
Tim Holtz® Idea-ology Label Stickers Sentiments - TH94121
Other:
Foam Adhesive
Instructions
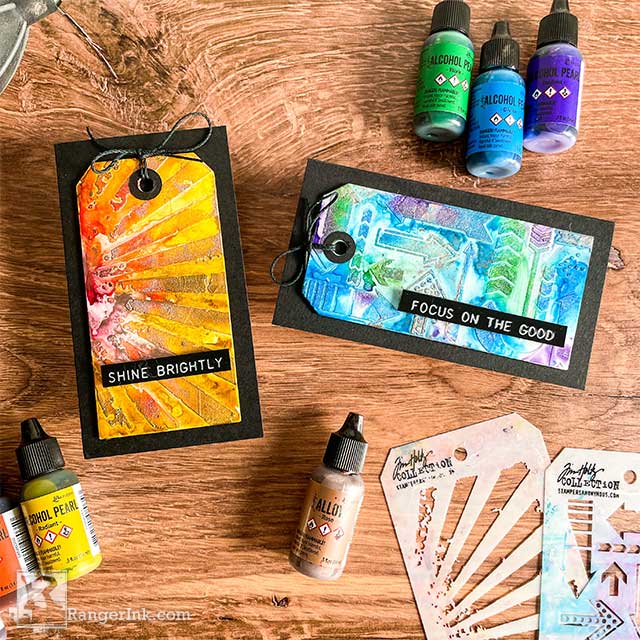
Hi there, creative friends! It’s Cheiron Brandon back with a fun and simple to create project using the newest colors of Tim Holtz Alcohol Pearls and Alloy. I am using all of the colors today in two cards to showcase each set.

Step 1: Gather your supplies. I used Heavyweight Yupo Paper (you could use regular), the two newest sets of Alcohol Pearls (Intense, Scorch, Radiant) and (Elixir, Divine, Opulent), Rose Alloy, a couple of favorite Tim Holtz stencils and Distress Matte Texture Paste.

Step 2: To begin, apply Distress Matte Texture Paste through a stencil onto 2 panels of Yupo and let the paste air dry.

Step 3: Once the paste is dry, cut the panels into tags.

Step 4: To create the first tag, use Alcohol Blending Solution over the tag and then apply Intense, Scorch, and Radiant Alcohol Pearls and move them around the tag with the Alcohol Ink Blower. Then add a little more Alcohol Blending Solution and add tiny drops of the Rose Alloy and move them around with the blower. Let the tag dry.

Step 5: To create the second tag, use Alcohol Blending Solution over the tag and then apply Elixir, Divine, and Opulent Alcohol Pearls and move them around the tag with the Alcohol Ink Blower. Then add a little more Alcohol Blending Solution and add tiny drops of the Rose Alloy and move them around with the blower. Let the tag dry.

Step 6: Take the tags and add holes to the top of each tag and add a black reinforcer. Then add an Idea-ology Sentiment sticker to the front of each tag using foam adhesive.

Step 7: Add twine to each of the reinforcers and add foam adhesive to the back of the tag.

Step 8: Adhere your tag to a black folded notecard.
I hope you enjoyed this fun way to play with Alcohol Pearls and Alloys. I love alcohol inks over texture paste and the pearls and alloys give it so much sparkle and shine. I hope you will try out this fun technique for yourself!
 My name is Cheiron Brandon. I live in Bayonne, New Jersey with my husband and our two adorable rescue pups, Big Boy and Oreo. I work in the financial district by day and love to play with stamps, ink and paint at night in my studio. I teach monthly card making and mixed media classes in NYC. You can find me on my blog at www.cheironbrandon.typepad.com and posting more often @cheiron on Instagram!
Related Posts

Make-It™ You're The Zest Card by Miriam Prantner
Bright, bold, and full of summer vibes! Miriam Prantner created this cheerful citrus-inspired card using the Make-It Fun with Fruit...
Read More
Dylusions Neon Ink Sprays Journal Page by Miranda van den Bosch
Neon color takes center stage on this eye-catching journal page by Miranda van den Bosch! The newest...
Read More