


In this tutorial, Cheiron Brandon shows you how to use Tim Holtz Distress® Foundry Wax with Distress Texture Paste as a resist to create a lustrous accent on this stunning tag.
Tim Holtz Distress® Foundry Wax Story Tag by Cheiron Brandon
- Materials
- Instructions
Tim Holtz Distress® Foundry Wax: Gilded, Statue
Tim Holtz Distress® Mixed Media Heavystock #8 Tags
Tim Holtz Distress® Texture Paste Matte
Tim Holtz Distress® Palette Knives
Tim Holtz Distress® Spray Stain: Spun Sugar, Victorian Velvet, and Seedless Preserves
Ranger Artist Brushes
Tim Holtz Distress® Sprayer
Ranger Heat It™ Craft Tool
Tim Hotz® by Stampers Anonymous Layering Stencil: Lace
Tim Holtz® idea-ology: Paper Dolls Portraits
Tim Holtz® idea-ology Flash Cards
Tim Holtz® idea-ology Ephemera Snippets Number Strips
Tim Holtz® idea-ology Word Keys
Other:
Tim Holtz® by Stampers Anonymous Splat Box
Tim Holtz® by Tonic Studios Glass Mat
Isopropyl Alcohol
Instructions
Hello there creative friends! I am happy to be back today to share a project that I created with the brand new Tim Holtz Foundry Wax. I got to play with this new product, and I can tell you that I am going to be trying it on so many things. The Foundry Wax is a liquid wax and it comes in small bottles (like Alcohol Inks). A few Important steps to note from the packaging:
- Shake the bottle until you hear the mixing ball rattle so the pigments mix
- Apply drops of wax to a craft sheet
- Apply the wax directly to surface using a dry paint brush
- Heat with Heat Tool to transform finish…use in a well-ventilated area
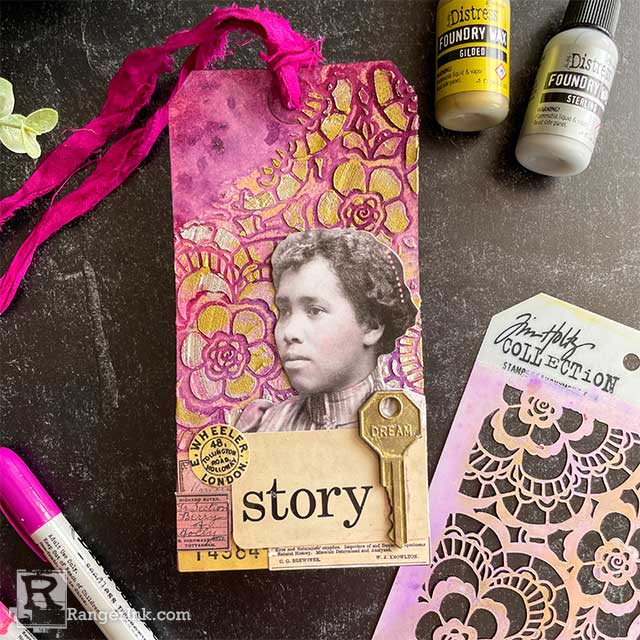
Now that we have taken care of that, I am going to show you how I used the new Foundry Wax over Distress Texture Paste as a resist to make a fun tag with beautiful texture that resembles foil.

Step 1: Gather up your supplies. You will need your Distress Tags, Foundry Wax, a stencil, Distress Texture Paste, a palette knife, Distress Spray Stains and a dry paint brush. You will be able to clean your brush with isopropyl alcohol. I plan to have a dedicated brush or two in my studio just for the waxes.

Step 2: Apply your Distress Texture Paste through a stencil. I used the Stampers Anonymous Lace stencil, as it has big open areas to apply the Foundry Wax.

Step 3: Remove the stencil, let the paste dry, and wash off the Texture Paste and dry it or soak it in water until you have time to clean it.

Step 4: Add a few drops of the Foundry Wax to the glass mat or your craft sheet (don’t forget to shake it first to mix the pigments). I used my finger to blend the Gilded and Sterling Foundry Wax over the raised areas. The wax will start out as fluid when you add it to your craft sheet, and when it hits the air, will become a more creamy consistency.

Step 5: Once you are finished blending your Foundry Wax, dry it with a Heat Tool. It will be permanent once you do this. You will see the color change to really shiny and metallic as you heat it.

Step 6: Put your tag inside of a Splat Box and spray with a mist of water using a Distress Sprayer. Then spray with Distress Spray Stains in Spun Sugar, Victorian Velvet, and Seedless Preserves.

Step 7: Dry the tag with a heat tool. Dab the tag with a paper towel to remove any excess Spray Stain that is sitting on top of the wax.

Step 8: Gather up some Idea-ology pieces to use on your tag. I used a new Paper Dolls Portrait, Flash Cards, Ephemera Snippets Number Strips, and Snippets Ephemera. Arrange them onto your tag using Distress Collage Medium.

Step 9: As a final touch, I colored one of the new Idea-ology Word Keys and colored it with Gilded Foundry Wax. Heat it with a Heat Tool. Be careful and let it cool before you pick it up.

After I heated it with a heat tool and let it dry, I adhered to the tag with Distress Collage Medium. I used a piece of ribbon from my stash to add to the top of the tag.
Hope you enjoyed taking a closer look at Foundry Wax and some of the things you can do with it! I can’t wait to add this tag to a card to send to a friend.
 My name is Cheiron Brandon. I live in Bayonne, New Jersey with my husband and our two adorable rescue pups, Big Boy and Oreo. I work in the financial district by day and love to play with stamps, ink and paint at night in my studio. I teach monthly card making and mixed media classes in NYC. You can find me on my blog at www.cheironbrandon.typepad.com and posting more often @cheiron on Instagram!
Related Posts

"My Cup of Care" Journal Page with Dylusions Pastel Paints by Miranda van den Bosch
Read More

Tim Holtz Distress® Micro Glaze Embossing Resist by Tami Bastiaans
Create gorgeous embossed backgrounds with the Micro Glaze Embossing Resist technique! ✨ Tami Bastiaans pairs Tim Holtz Distress® Micro...
Read MoreDrawer Title
- Choosing a selection results in a full page refresh.