


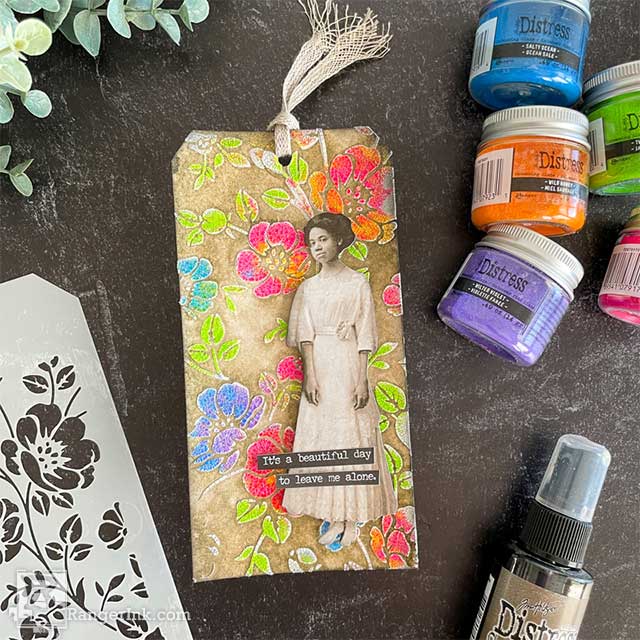
Follow along as Cheiron Brandon shows you how to paint with Tim Holtz Distress® Embossing glaze to create this vibrant tag that is full of texture and shine.
Tim Holtz Distress® Glaze Painted Tag by Cheiron Brandon
- Materials
- Instructions
Tim Holtz Distress® Embossing Glaze
Ranger Opaque Crackle Texture Paste
Tim Holtz Distress® Spray Stain: Frayed Burlap
Tim Holtz Distress® Ink Pad: Black Soot
Tim Holtz Distress® Mixed Media Heavystock #8 Tags
Tim Holtz Distress® Palette Knives
Tim Holtz® idea-ology Snarky Talk Stickers
Other:
Tim Holtz® by Stampers Anonymous Layering Stencil: Floral (THS277)
Tim Holtz® idea-ology Paper Dolls Solos
Tim Holtz® by Stampers Anonymous Splat Box
Instructions
Hello there creative friends! I am happy to be back today to share a project that I created with the brand new colors of Distress Embossing Glazes. I am absolutely loving these bright colors. So happy to have Candied Apple, Picked Raspberry, Wild Honey, Twisted Citron, Salty Ocean and Wilted Violet now in glaze form!
I created a fun tag today using all the colors of the glazes, Distress Mixed Media Heavystock Tags, Crackle Texture Paste and a stencil. There are so many uses for these tags…in your art journal, on a card, or even to tie to a gift (like a bottle of something fun). Today I am going to show you a technique that I love to do with these glazes where you add them over wet texture paste and sprinkle them on, almost like painting with the glazes.

Step 1: Gather up your supplies. You will need your Distress Embossing Glazes, a tag, some Distress Crackle Texture Paste, a palette knife, stencil and a scrap piece of paper to make it easy.

Step 2: Apply the Crackle Texture Paste through a stencil.

Step 3: Remove the stencil and soak in water until you can rinse it off to clean it later.

Step 4: Select one color of the Distress Embossing Glaze, I started with the Mowed Lawn took a tiny pinch of it and sprinkled it over all the leaves, it won’t be perfect, but that just adds to the Distress look.

Step 5: Keep adding colors until you cover all of the paste. Have fun with it, I added multiple colors to some of the flowers, keeping the warm colors and cool colors together.

Step 6: Lightly tap your fingers underneath the tag to move the powder around. Pour off the excess.

Step 7: Once you are done ‘painting’ with the glaze, let the paste dry, you will see the texture paste start to crackle.

Step 8: Once the paste is dry, heat the tag with an embossing gun to melt the paste.

Step 9: In a splat box, spray the tag with water from a Distress Sprayer, then spray your tag with Frayed Burlap Distress Stain.
I
Step 10: Ink the edges of the tag with Black Soot Distress Ink using a Mini Ink Blending Tool.

Step 11: Add an Idea-ology Paper Doll.

Step 12: Then add a sentiment from the Snarky Talk Sticker Book and tie a piece of ribbon through the top to finish it.
Hope you enjoyed this tutorial! I can’t wait to add this tag to a card to send to a friend.
 My name is Cheiron Brandon. I live in Bayonne, New Jersey with my husband and our two adorable rescue pups, Big Boy and Oreo. I work in the financial district by day and love to play with stamps, ink and paint at night in my studio. I teach monthly card making and mixed media classes in NYC. You can find me on my blog at www.cheironbrandon.typepad.com and posting more often @cheiron on Instagram!
Related Posts

"My Cup of Care" Journal Page with Dylusions Pastel Paints by Miranda van den Bosch
Read More

Tim Holtz Distress® Micro Glaze Embossing Resist by Tami Bastiaans
Create gorgeous embossed backgrounds with the Micro Glaze Embossing Resist technique! ✨ Tami Bastiaans pairs Tim Holtz Distress® Micro...
Read MoreDrawer Title
- Choosing a selection results in a full page refresh.