


Wendy Vecchi Clover All Over Card by Lauren Bergold
- Materials
- Instructions
Wendy Vecchi MAKE ART A Million Thanks Stamp, Die and Stencil Set
Wendy Vecchi MAKE ART Chippies: Wreaths
Wendy Vecchi MAKE ART Stay-tion
Wendy Vecchi MAKE ART Stay-tion Craft Sheet
Wendy Vecchi MAKE ART Perfect Stamp Positioner Set
Wendy Vecchi MAKE ART Chippies: Wreaths
Wendy Vecchi MAKE ART Stay-tion
Wendy Vecchi MAKE ART Stay-tion Craft Sheet
Wendy Vecchi MAKE ART Perfect Stamp Positioner Set
Letter It™ Clear Foam Roll Tape
Wendy Vecchi Perfect Cardstock White Panels
Tim Holtz® Alcohol Ink Yupo® Translucent
Tim Holtz® Alcohol Ink Yupo® Heavystock
Tim Holtz® Alcohol Ink Cardstock
Wendy Vecchi Perfect Cardstock White Panels
Tim Holtz® Alcohol Ink Yupo® Translucent
Tim Holtz® Alcohol Ink Yupo® Heavystock
Tim Holtz® Alcohol Ink Cardstock
Ranger Mini Ink Blending Tool
Domed Replacement Foams
Ranger Detail Blending Tool
Ranger Mister
Emboss It™ Ink Pad Clear
Ranger Heat It™ Craft Tool
Ranger Detail Blending Tool
Ranger Mister
Emboss It™ Ink Pad Clear
Ranger Heat It™ Craft Tool
Instructions
You don't have to be Irish to celebrate St. Patrick's Day, and it doesn't have to be St. Patrick's Day to celebrate the amazing good luck of having kind and thoughtful friends, all year round.

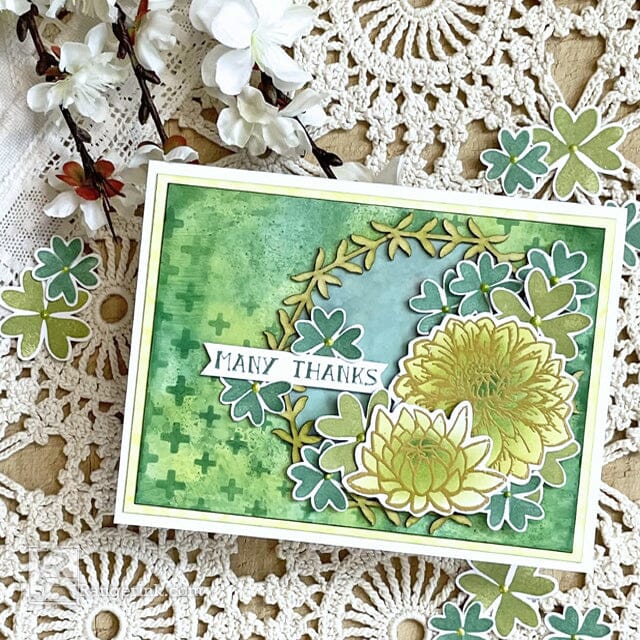
Step 1: Gather your supplies: This card features the heart, flourish and sentiment stamps from Wendy Vecchi's Merci and More Stamp, Die and Stencil Set; the flowers from Wendy's Bravo set; Chippies Wreaths; a selection of Green Archival Inks; Tree Branch Embossing Powder; Prickly Pear Liquid Pearls and a few varieties of Ranger Specialty Paper.

Step 2: Stamp the two largest flowers from Wendy Vecchi's Bravo Stamp, Die and Stencil set in clear Emboss It ink, on a white Wendy Vecchi Perfect Cardstock Panel and use the Ranger Heat It Tool to emboss with Tree Branch Embossing Powder.

Step 3: Use the coordinating flower stencils and a Ranger Mini Ink Blending Tool with Domed Foams to apply Prickly Pear Archival Ink all over both flowers. Add Leaf Green Archival to the central portion of the flowers; then use a Detail Blending Tool to apply a small amount of English Ivy Archival at the very centers. Use the coordinating dies to cut out the flowers.

Step 4: Using a Ranger Mini Ink Blending Tool and a Domed Foam, apply a generous coat of Prickly Pear Archival Ink to the more delicate circle in the Chippies Wreaths set.

Step 5: Smoosh an English Ivy Archival Ink Pad onto the Wendy Vecchi Craft Sheet and use a Ranger Mister to spritz lightly with 91% Isopropyl Alcohol. Place a 5.5 x 4" piece of Tim Holtz Alcohol Ink Glossy Cardstock facedown in the ink, and move it around so that the ink collects on the paper. Repeat several times until the coverage and intensity of color is to your liking. When the panel is dry, fill in any voids with Leaf Green Archival and an Ink Blending Tool. Repeat the same technique on a 5 x 4.25" piece of Translucent Yupo Paper using English Ivy; and also on a 5.75 x 4.25" piece of Yupo Heavystock with Prickly Pear.

Step 6: Trace or die cut a 3 3/8" inch circle from the tinted translucent Yupo paper. This will serve as a backer for the wreath Chippie.

Step 7: Place the stencil sheet from Wendy Vecchi's A Million Thanks Stamp, Die and Stencil set onto the inky green glossy card stock panel, and add the cross pattern with English Ivy Archival. Shift the stencil to the diagonal corner and repeat. Lightly ink the edges in English Ivy, if desired.

Step 8: Create some lucky four-leafed clovers by stamping the smallest heart from Merci and More four times in English Ivy so that the pointed ends of the hearts all meet at the center. Cut the clovers out with scissors, leaving a thin white border. Add a tiny dot of Prickly Pear Liquid Pearls to the center of each clover, and set aside on a flat surface to allow the Liquid Pearls to dry completely. Create larger lucky clovers with Fern Green Archival and the larger heart stamp from the same set.

Step 9: Assembly! Use Perfect Card Adhesive to attach the dark green stenciled panel to the Prickly Pear panel, and then affix both to a white A6 card. Attach the translucent circle to the righthand side of the card using a small amount of adhesive at the edges only. Affix the Chippie Wreath on top of the circle. Add the diecut flowers and the sentiment with small pieces of Letter It Clear Foam Tape. Scatter the lucky clovers around the circle and adhere them with Perfect Card Adhesive.

Step 10: Stamp a few more lucky clovers on the flap of an A6 envelope, address the envelope to someone you appreciate, sign the card and mail it right away!
 My name is Lauren Bergold, and I live in central New Jersey with my husband of 30+ years and A LOT of art supplies! My favorite medium is paper, and I especially love making cards. I teach papercrafting classes, as well as collecting and compiling vintage and found papers. You can find me on my blog, All the Good Blog Names Were Taken, and on Instagram as @llaurenb where I love to connect with other artists and makers!
